![[Updated] Native Chrome OS Screen Replay App](https://thmb.techidaily.com/ab68550bed8939ff878aaece9b28e90d8b0465006aaa80a48dab2ef20ecc47cd.jpg)
[Updated] Native Chrome OS Screen Replay App

Native Chrome OS Screen Replay App
Being an internet surfer, you would have come across a lot of screen recorder applications to record your screen. They are mostly designed for Microsoft Windows or Linux. So, it’s pretty much easy to go and search google for these well-featured applications for these two common operating systems and you will find one. However, with the launch of the new futuristic OS from chrome known as “Chrome OS”, a lot of computer users prefer this OS instead of the others. The reason might be many behind it but it is what it is. So in this hour, many of these users are video content creators, for that they need to record videos and their screens.
So we have done our research to assist those who are in search of a cool and easy screen recorder. Well, the answer is the newly launched Chrome OS screen recorder that comes in as a utility software with Chrome OS. You don’t need any plugin, software, or any settings but just a shortcut key you can access this cool screen recorder. Enough of the intro now it’s time to dive into the amazing Chrome OS and other ways you can record your screen.
Part 1: Record with Chrome Native Screen Recorder
The Chrome OS Native screenshot as well as a screen recorder application is very easy and simple to use. It comes with a simple GUI in the Chromebook OS. The recorder lets you record your screen and audio input. To get your hand on the application and learn how to use it, you gotta follow the steps below. Before moving to the “How’s” you need to know that the Chrome OS native screenshot generally comes with the OS but if you are an old user and using the old version then you will need to bring it on your OS. Let’s see how can we do that.
Step 1: Setting Up
If you are not seeing the recorder out of the box then you will need to access the Chrome OS features. It can be done by enabling the Chromes OS flags. All you have to do is to search chrome://flags with its browser. After that search for “screen capture”. And you will see enable option in front of the screen capture bar, enable it and you will be asked for a permission reset prompt and it’s done.
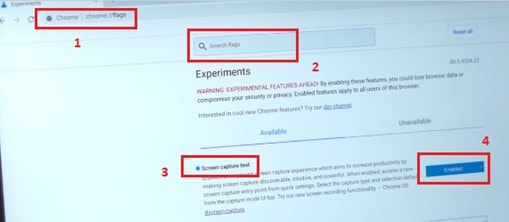
Step 2: Recorder Screen
Once you are done with settings up the flag or you are using the latest Chrome OS now it’s time to move to record your screen. Go to the lower right button of your OS screen and click on the shelf as shown in the figure below. A new window will appear, now you will need to click on the screen capture.
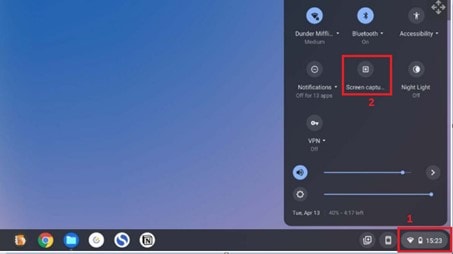
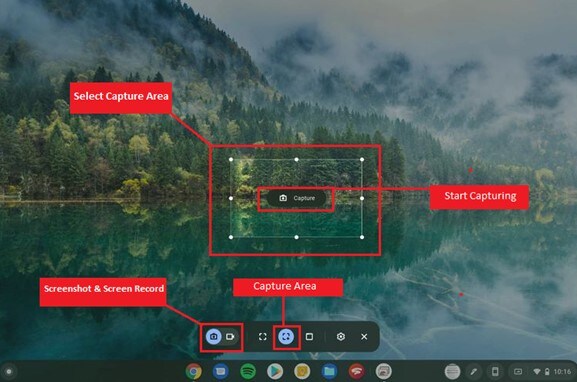
Soon as you click on the screen capture, you will be prompted to a new screen with a variety of options for the tool as shown. Here you can choose a specific target area on the screen for screenshots as well as screen videos from the “Capture Area” in the figure. You can switch using the two options as shown in the figure below. To finally start recording, click “Start Capturing” as shown in the figure.
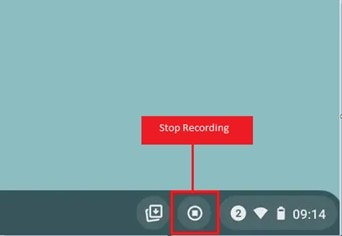
Finally, once you are done recording and now it’s time to stop recording. You just need to click on the stop icon in the lower-right bottom of the desktop screen as shown in the figure below.
Part 2: Other Alternative Ways to Record Chrome Screen
A lot of other applications and plugins are also used to capture screenshots and record your Chrome OS. Some of the basic and fantastic applications that might help you to record your screen are discussed in the coming sections.
1. Screencastify
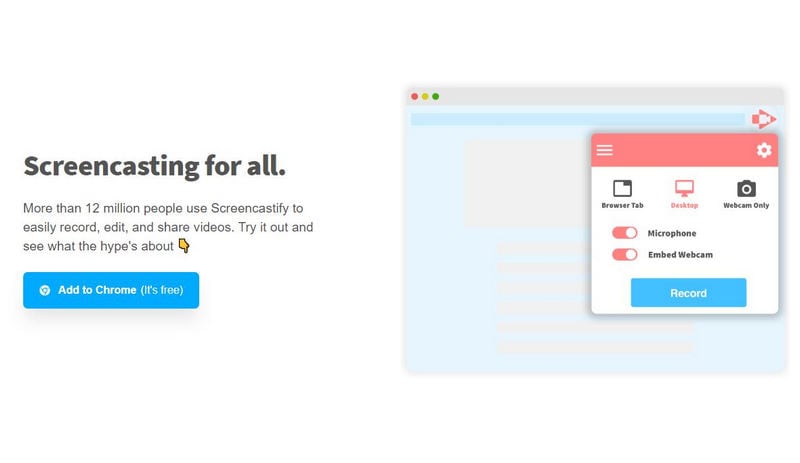
Screencastify is one of the easy to set up and user-friendly extensions that can be used on the Chrome OS browser to record your screen. All you have to do is go to screecastify.com and click on add extension as shown in the figure.
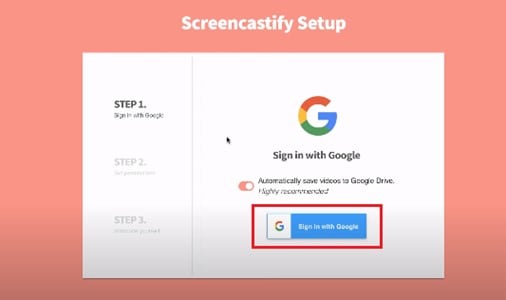
Once it is installed, you can go to extensions and launch it. It will pop up a signing page just sign in using your Google account directly as shown. There are three steps, each step needs to be done completely to proceed further. The First step is signing in. To get done with this step in hurry just click sign in using google account.
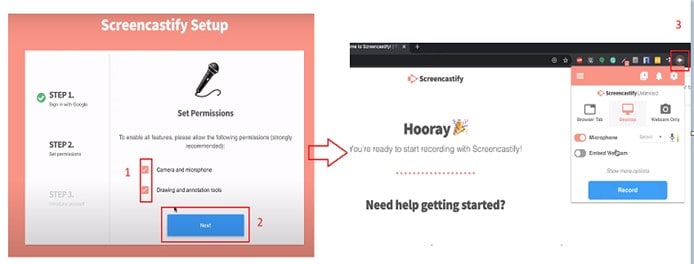
Once you are finished signing in and installing, it’s time to set microphone settings in a new browser window. After that click next and it will be finished. Access it from the top right corner as shown in the picture and it will be open.
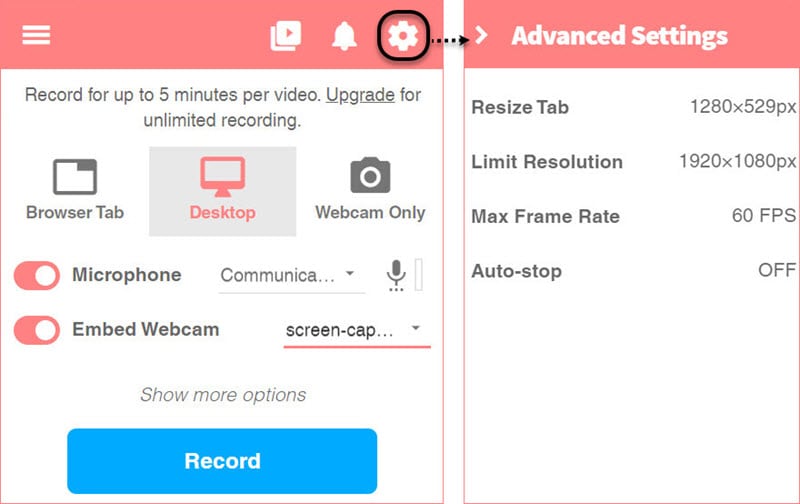
You can record your desktop screen with the desktop icon. The browser tab can be recorded by clicking that icon and clicking record. Moreover, the webcam record can be captured using the webcam icon and clicking start recording as shown below in the figure.
Finally, after clicking record a new window will appear to ask you to select the entire screen. Just click the “entire screen” and click share and your recording will be started after a count down. The recording can be stopped using the “stop sharing” that appear in the end of the screen.
2. Awesome Screenshot Screen Recorder
Another Google addon for screen recording is Awesome screenshot and screen recorder. This extension is also very easy to use and deploy onto your Chrome OS browser. All you need to search it in the extension bar by typing in “Awesome Screen Recorder.” Once it appears click on the “Add to Chrome” and click add an extension in the new popped up message.

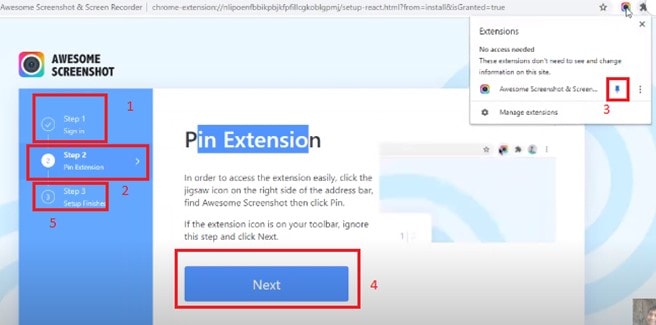
After adding the extension a new window will appear to set up your extension. There are three steps, first, you will need to sign up using your Google account. After that, the next step is to pin the addon to the top bar. For that click on the extension icon and pin it to the bar as shown in 3 in the figure. Click next and finish the setup.
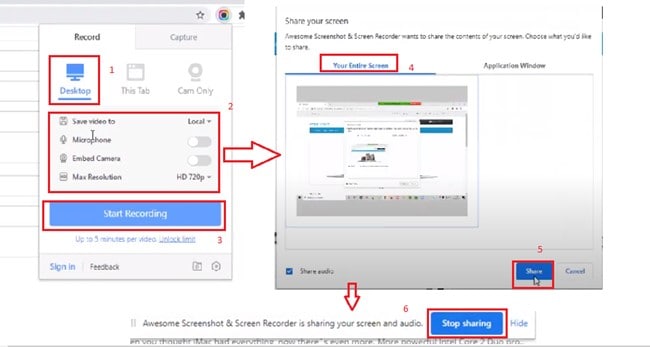
Let’s come to the recording of the screen. Open up the extension from the pinned icon and you will see its GUI. Select “record” and click on the “Desktop” icon as shown. Do the simple settings by selecting the storing facility, enabling the microphone, setting resolution, and enabling the camera. In the end, click start recording. Next, you will select the screen or a specific application window. Once it’s chosen click share as shown in the figure. To stop the sharing click on the “Stop Sharing” button to stop.
Similarly, a screenshot can be taken by going to the “Capture” section in the main bar. Click “Visible Port” and click start capturing. After that, a vibrant screenshot editor will pop up to edit your screenshot at the run time.
3. Nimbus
Another amazing Google extension for screen recording that is used widely is Nimbus. The installation is somehow similar to the said above extensions. Search for the extension named “Nimbus”. Add it to the chrome browser like shown. After that, a signup page will appear to sign up using a Google account. Add the extension to pinned application in the bar as shown in the figure.
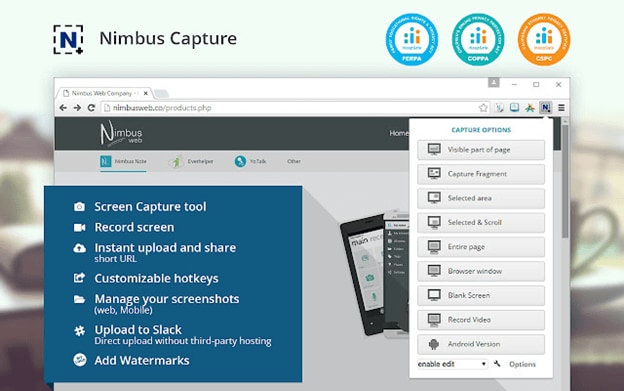
Once you are done with the installation settings, now you can click on the Nimbus icon from the top. The Nimbus GUI will show up with a variety of options. Let’s stick with screen recording for now. Click on screen recording as shown. A new settings window will appear. You can enable mic, select webcam recording, watermark addition, etc from here. Once you are done with settings click to start recording. Select “entire screen” in the newly popped windows. Finally, click share, and bingo your recording will start. To stop the recording click stop sharing as shown in the figure below.
Filmora Screen Recorder
Record computer screen and webcam
Capture system and microphone audio
Customize the target recording area
Edit videos with thousands of effects and tools
To wind up, it’s true there are a lot of screen recording add-ons and applications out there on the internet. But in this article, we focused on the on-screen recording of Chrome OS using the extension store of google chrome. There is no doubt, that the native application that comes with Chrome OS is the most simple and easy-to-use application with all of the features possible in a screen recorder should have with it. Furthermore, most of the users who are not interested in the native screen recorder of Chrome OS can use the alternative recorder add-ons discussed in the above section. The alternative recorders are also equipped with full features that not only record screen but also webcam, custom screen area, editors, and screenshot editing capabilities. I hope after reading this article, you will be able to choose one of the screen recorders from them and use it to serve your purpose.
To wind up, it’s true there are a lot of screen recording add-ons and applications out there on the internet. But in this article, we focused on the on-screen recording of Chrome OS using the extension store of google chrome. There is no doubt, that the native application that comes with Chrome OS is the most simple and easy-to-use application with all of the features possible in a screen recorder should have with it. Furthermore, most of the users who are not interested in the native screen recorder of Chrome OS can use the alternative recorder add-ons discussed in the above section. The alternative recorders are also equipped with full features that not only record screen but also webcam, custom screen area, editors, and screenshot editing capabilities. I hope after reading this article, you will be able to choose one of the screen recorders from them and use it to serve your purpose.
To wind up, it’s true there are a lot of screen recording add-ons and applications out there on the internet. But in this article, we focused on the on-screen recording of Chrome OS using the extension store of google chrome. There is no doubt, that the native application that comes with Chrome OS is the most simple and easy-to-use application with all of the features possible in a screen recorder should have with it. Furthermore, most of the users who are not interested in the native screen recorder of Chrome OS can use the alternative recorder add-ons discussed in the above section. The alternative recorders are also equipped with full features that not only record screen but also webcam, custom screen area, editors, and screenshot editing capabilities. I hope after reading this article, you will be able to choose one of the screen recorders from them and use it to serve your purpose.
To wind up, it’s true there are a lot of screen recording add-ons and applications out there on the internet. But in this article, we focused on the on-screen recording of Chrome OS using the extension store of google chrome. There is no doubt, that the native application that comes with Chrome OS is the most simple and easy-to-use application with all of the features possible in a screen recorder should have with it. Furthermore, most of the users who are not interested in the native screen recorder of Chrome OS can use the alternative recorder add-ons discussed in the above section. The alternative recorders are also equipped with full features that not only record screen but also webcam, custom screen area, editors, and screenshot editing capabilities. I hope after reading this article, you will be able to choose one of the screen recorders from them and use it to serve your purpose.
Also read:
- [New] In 2024, Discover the Most Compelling 5 iPhone-Friendly Podcast Services
- [New] The Best 5 Devices to Record Your Virtual Meetings
- [New] Top-Tier Talk Transcribers in Schools
- [Updated] Guide to the Elite Audio/Video Makers Web
- [Updated] In 2024, Action-Packed Escapades - The Next Big Things Post-GTA V
- 2024 Approved ScreenSnapper's Journey Navigating the Latest Recorders
- 2024 Approved Seamless Music Addition for Social Media IPhone/Android
- FreenoWeb Cam App Assessment & Comparison Guide
- In 2024, How To Broadcast Videos on Twitter without the 'Retweet' Step
- In 2024, How to Transfer Data After Switching From Vivo S17 to Latest Samsung | Dr.fone
- Install New Drivers for U-Are-U ReadFinger V4.5
- Pioneering Apps for Diverse Game File Logging Needs
- Quick Guide to Repairing Elgato HD60 Compatibility Issues Effortlessly
- Seeking Speed Identifying the Top 5 Racer Games
- Unveiling the Latest in Gadgets - Discover Tom's Hardware Experts
- Would You Consider Paying for Advanced Apple Insights? Analyzing Monthly Fees Around $20 as a Viable Option
- Title: [Updated] Native Chrome OS Screen Replay App
- Author: Vivienne Westwood
- Created at : 2024-12-04 16:00:28
- Updated at : 2024-12-11 16:00:30
- Link: https://video-capture.techidaily.com/updated-native-chrome-os-screen-replay-app/
- License: This work is licensed under CC BY-NC-SA 4.0.