![[New] Securing Premium Image on Zoom via Strategic Filters](https://thmb.techidaily.com/2738dcb65655ca3023848f9ec7026a9cce211e70815a31f4f65d2f9ea9ded629.jpg)
[New] Securing Premium Image on Zoom via Strategic Filters
Securing Premium Image on Zoom via Strategic Filters
How to Use Zoom Video Filters to Make a High-Quality Video Call

Richard Bennett
Mar 27, 2024• Proven solutions
The Zoom video meeting and chat app has become a wildly famous hostage to billions of folks studying, working, and socializing from home. Despite several security concerns that arose alongside Zoom’s social platform, it now features end-to-end encryption and other ways to protect your privacy. In addition, it has also resolved chats from “Zoombombing” and other privacy flaws. All in all, Zoom is adding new features daily as per the people’s concerns, and the introduction of Zoom video filters is among them.
The Zoom meeting filters help make your video meetings experience a little less weird – and hopefully avoid Zoom anxiety and Zoom fatigue.
- Part 1: How to Use Native and Third-Party Zoom Filters?
- Part 2: How to Use Zoom Video Filters: A Step-by-Step Guide [Desktop, Android, iOS]
- Part 3: How to use Snapchat Filters on Zoom? [A Detailed Look]
- Part 4: Tips for Making a High-Quality Zoom Meeting
Part 1: How to Use Native and Third-Party Zoom Filters?
NoFilter? No thanks!
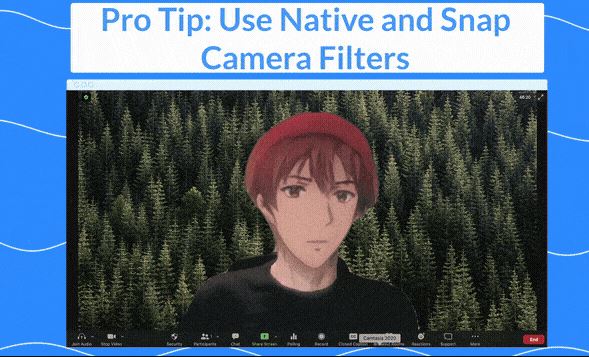
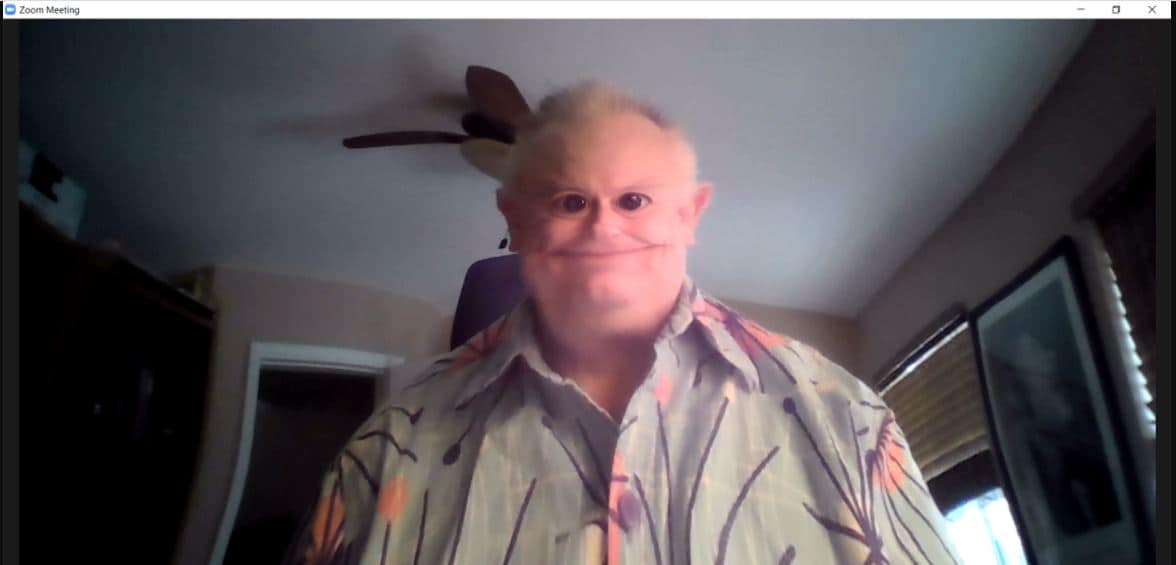
You can hang out with several Zoom video filters, including growing unicorn horns, wearing a pirate eye patch, or aerospace goggles to level up your team calls, happy hours, or game nights.
Below are two sections explaining how to use native Zoom meeting filtersand third-party Snapchat filters for Zoom.
How to Use Native Zoom Filters
Among many Zoom meeting filters, you can easily select and switch them as per your preference.
Go to the up arrow beside the Stop Video icon in the Zoom meeting session and tap the Choose Video Filter button.
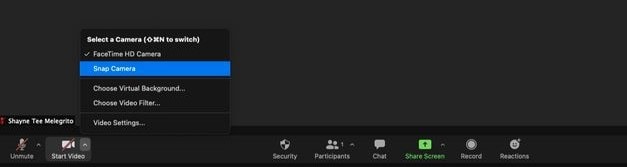
How to Use Third-Party Filters
Third-party integrations like Snap Camera also give you features to have fun with video filters for Zoom.
Source: blog.zoom.us
- Download and launch the latest version of Zoom on your computer system.
- Tap your profile picture present over the top right corner of the Zoom desktop client and choose the Settings
- Click Video on the left panel.
- Under Camera, go to the drop-down menu and select the third-party app as your camera, Snapchat filters for Zoom.
Part 2: How to Use Zoom Video Filters: A Step-by-Step Guide [Desktop, Android, iOS]
Once you’re in a Zoom room, you can use video filters for Zoom. However, you must note that a Zoom meeting can’t start without an account, and you can only use Zoom’s filters once you join a meeting.
Steps to Apply Zoom Meeting Filters on Your Desktop
Requirements for Windows Users:
Windows users need a 64-bit OS and a Zoom desktop client version 5.2.0 (42634.0805) or higher installed.
Requirements for Mac Users:
You will need a Zoom desktop client if you use macOS, version 5.2.0 (42634.0805) or higher, and run on macOS 10.13 or higher.
Steps to access Zoom video filters on Windows or Mac:
- Join or start a meeting.
- Hit the arrow on the upper right section of the video button.
- Tap Choose Video Filter…
- Choose a background filter.
Alternately:
- Go to your Zoom account home and click the Settings
- Select Background & Filters> Video Filters.
- Choose a background filter.
Steps to Apply Zoom Meeting Filters on an iOS or Android Device
Requirements for iOS and Android Devices:
For iOS, your device must be running on iOS 11 or higher. Other compatible devices are iPhone 8 and iPad 2017 or higher. Meanwhile, the platform requires Android 8.0 or higher.
Below are the exact steps if Zoom video filters are not showing on your Android or iOS device.
- Join or start a meeting via the Zoom
- Select the More option on the bottom right of the screen.
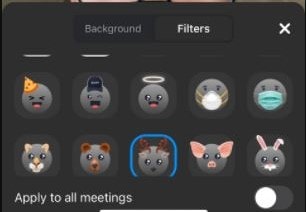
- Tap Background and Filters, then tap Filters.
- Choose a background filter.
Part 3: How to use Snapchat Filters on Zoom? [A Detailed Look]
By using Snap Camera and Zoom simultaneously, you can experiment with various Snapchat filters for Zoom. Here’s how to do so with a few clicks:
Step 1: Set Up Snap Camera
Source: pcmag.com
If you haven’t done it yet, first install the Zoom Client for Meetings software. Next, install the Snap Camera app.
Now, open the Snap Camera app to see yourself in the camera viewer.
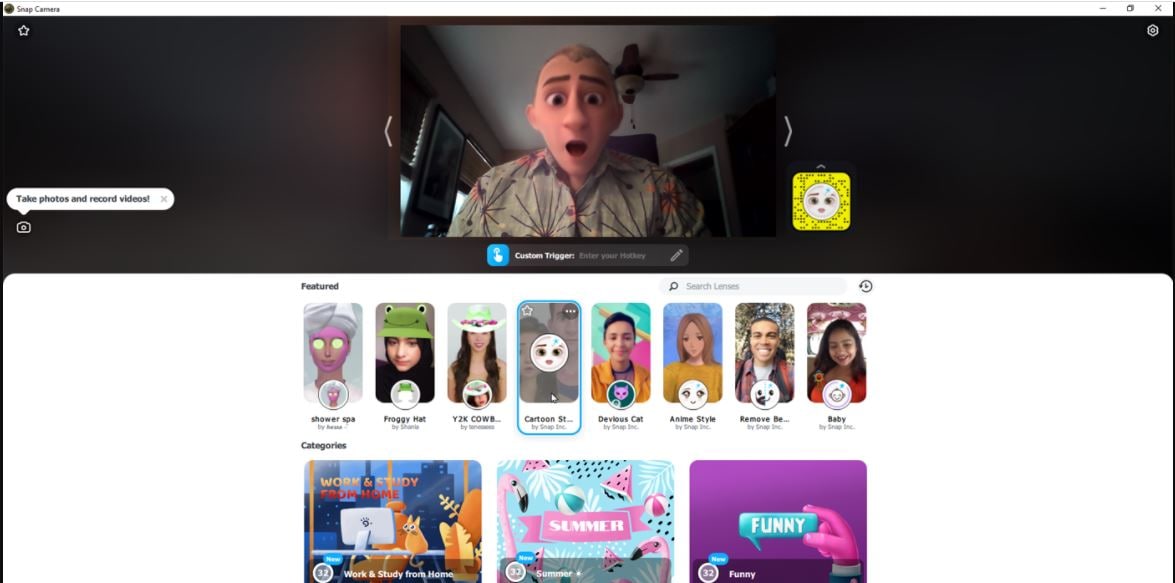
Step 2: Find the filters
Look for the filters among the different categories or search them by typing a term in the search field.

After you’ve selected a filter, open Zoom and start or join a meeting.
Now, change the camera source that Zoom will use over the video screen. Select the arrow icon beside the Start Video button and choose Snap Camera to switch to.
Step 3: Change Filters
Source: pcmag.com
Choose Start Video to turn your Video on, and see yourself switched with selected Snapchat filters for Zoom.
You can then switch among different filters anytime during the session. Place the Snap Camera app accordingly, so it’s next to the Zoom app for easy management. Switch an extra filter in Snap Camera, and change your appearance.
To return to your regular appearance and background, click the filter you just selected. Then, turn off the Snap Camera app to close the Snap Camera altogether.
Go back to the Zoom video window, click the arrow next to the Video button again, and switch the source back to your primary Camera.
Step 4: Snap Camera Settings
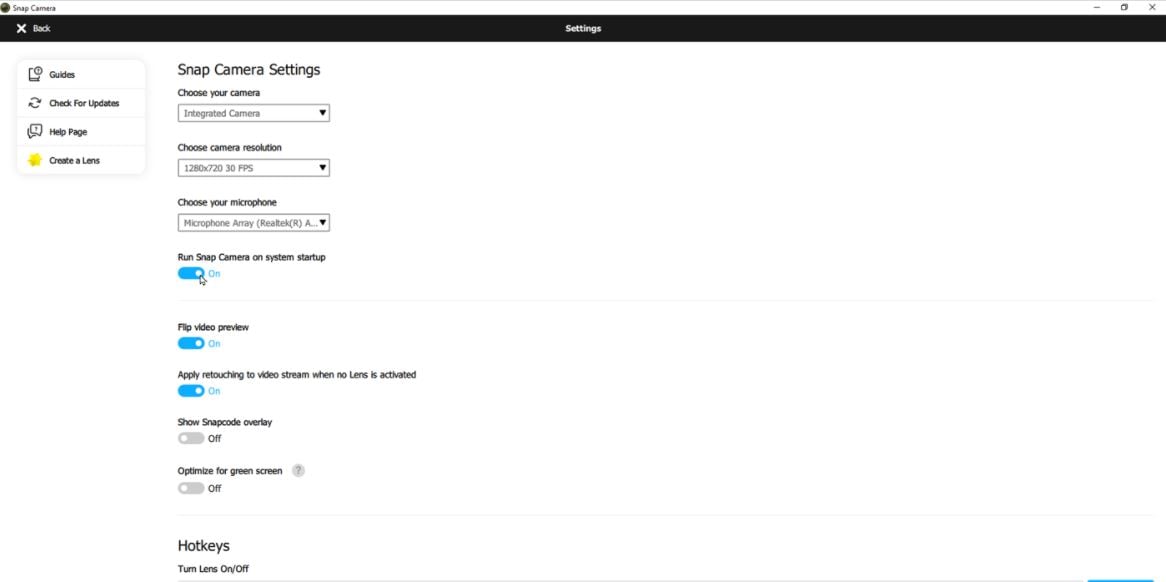
Open the Snap Camera app and choose the Settings icon in the upper right.
Toggle the button that says Run Snap Camera on System Startup. Now the app will automatically launch when you sign in to Windows.
Part 4: Tips for Making a High-Quality Zoom Meeting
Learning how to set up Zoom meeting filters is straightforward, alright, but you can also optimize Zoom meetings for the best experience.
Given below are a few tips to improve the quality of the Zoom meetings:
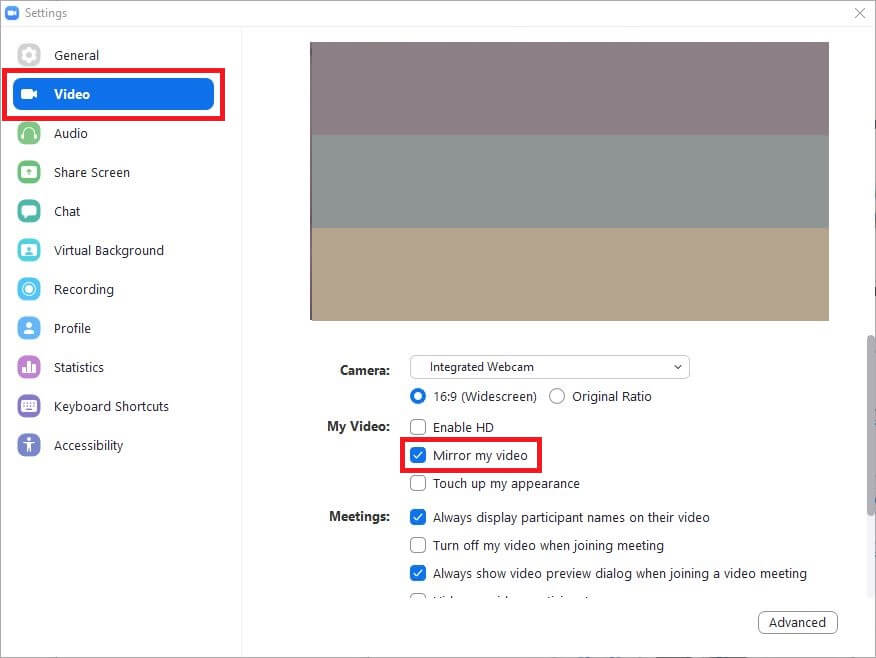
1. Mirror Effect
The mirror effect enables by default and lets you flip the video display during the conference. To enable or disable this feature, click the Settings icon from the top-right corner of the Zoom window (when not in a conference), select Video from the left pane, and check or uncheck the Mirror my video box from the right, respectively.
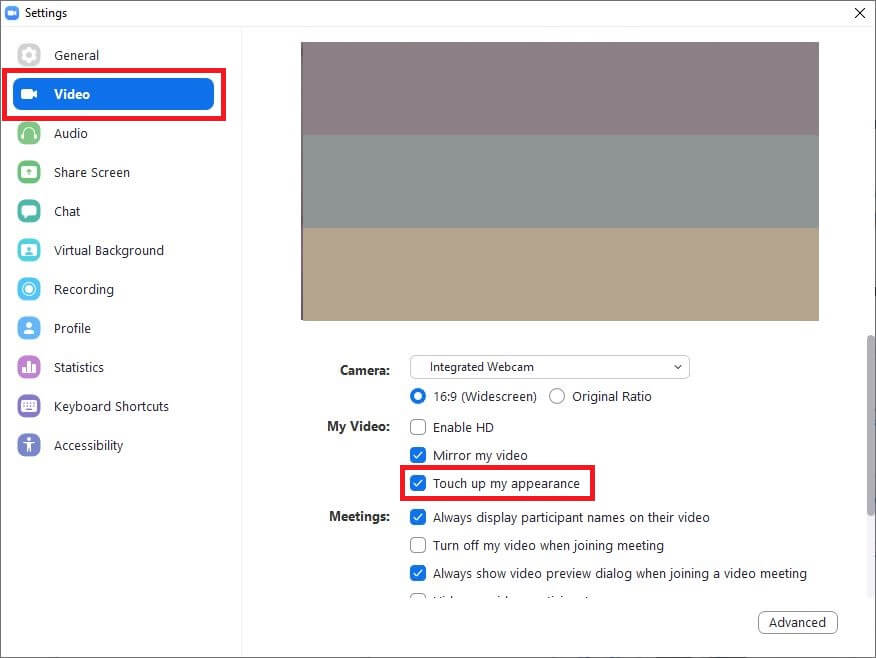
2. Appearance Touchup
This feature makes your camera visuals less crispy. It’s a great effect to distract other meeting participants with the imperfections your sleepy face or clothes have when you’re right out of bed.
3. Virtual Backgrounds
Virtual backgrounds let you hide those wrinkled or untidy bedsheets or wet towels that are generally hovering around your messy home. When enabled, you can choose a pleasant environment or other scenic beauty visible to other participants during the session.
4.Prevent Screen Sharing
You can keep all the ignorant participants from sharing their screens accidentally while you’re discussing a serious matter. For this purpose, hit the up-facing arrow beside the Share Screen option from the bottom of the camera window, click Advanced Sharing Options, and choose the Only Host radio button from the Who can share section that appears on the following box.
5. Mute Participants
You can mute all the participants in one go and remove unnecessary voices appearing like a fish market. To do this, select the Manage Participants option from the bottom of the camera screen and then hit the Mute All button from the Participants pane’s bottom left corner.
You can also select the Mute button next to each participant’s name in the Participants pane to mute them individually.
Conclusion
The process of applying Zoom video filters is simple, and learning how to set up a third-party camera for Snapchat filters for Zoom is even simpler. For the latter, however, you are required to install an add-in that is freely available from the vendor’s official website. To conclude, being one of the most straightforward solutions (i.e., free in most scenarios) for video conferences and virtual business meetings, almost all the corporate professionals around the globe prefer Zoom.
Richard Bennett
Richard Bennett is a writer and a lover of all things video.
Follow @Richard Bennett
Richard Bennett
Mar 27, 2024• Proven solutions
The Zoom video meeting and chat app has become a wildly famous hostage to billions of folks studying, working, and socializing from home. Despite several security concerns that arose alongside Zoom’s social platform, it now features end-to-end encryption and other ways to protect your privacy. In addition, it has also resolved chats from “Zoombombing” and other privacy flaws. All in all, Zoom is adding new features daily as per the people’s concerns, and the introduction of Zoom video filters is among them.
The Zoom meeting filters help make your video meetings experience a little less weird – and hopefully avoid Zoom anxiety and Zoom fatigue.
- Part 1: How to Use Native and Third-Party Zoom Filters?
- Part 2: How to Use Zoom Video Filters: A Step-by-Step Guide [Desktop, Android, iOS]
- Part 3: How to use Snapchat Filters on Zoom? [A Detailed Look]
- Part 4: Tips for Making a High-Quality Zoom Meeting
Part 1: How to Use Native and Third-Party Zoom Filters?
NoFilter? No thanks!
You can hang out with several Zoom video filters, including growing unicorn horns, wearing a pirate eye patch, or aerospace goggles to level up your team calls, happy hours, or game nights.
Below are two sections explaining how to use native Zoom meeting filtersand third-party Snapchat filters for Zoom.
How to Use Native Zoom Filters
Among many Zoom meeting filters, you can easily select and switch them as per your preference.
Go to the up arrow beside the Stop Video icon in the Zoom meeting session and tap the Choose Video Filter button.
How to Use Third-Party Filters
Third-party integrations like Snap Camera also give you features to have fun with video filters for Zoom.
Source: blog.zoom.us
- Download and launch the latest version of Zoom on your computer system.
- Tap your profile picture present over the top right corner of the Zoom desktop client and choose the Settings
- Click Video on the left panel.
- Under Camera, go to the drop-down menu and select the third-party app as your camera, Snapchat filters for Zoom.
Part 2: How to Use Zoom Video Filters: A Step-by-Step Guide [Desktop, Android, iOS]
Once you’re in a Zoom room, you can use video filters for Zoom. However, you must note that a Zoom meeting can’t start without an account, and you can only use Zoom’s filters once you join a meeting.
Steps to Apply Zoom Meeting Filters on Your Desktop
Requirements for Windows Users:
Windows users need a 64-bit OS and a Zoom desktop client version 5.2.0 (42634.0805) or higher installed.
Requirements for Mac Users:
You will need a Zoom desktop client if you use macOS, version 5.2.0 (42634.0805) or higher, and run on macOS 10.13 or higher.
Steps to access Zoom video filters on Windows or Mac:
- Join or start a meeting.
- Hit the arrow on the upper right section of the video button.
- Tap Choose Video Filter…
- Choose a background filter.
Alternately:
- Go to your Zoom account home and click the Settings
- Select Background & Filters> Video Filters.
- Choose a background filter.
Steps to Apply Zoom Meeting Filters on an iOS or Android Device
Requirements for iOS and Android Devices:
For iOS, your device must be running on iOS 11 or higher. Other compatible devices are iPhone 8 and iPad 2017 or higher. Meanwhile, the platform requires Android 8.0 or higher.
Below are the exact steps if Zoom video filters are not showing on your Android or iOS device.
- Join or start a meeting via the Zoom
- Select the More option on the bottom right of the screen.
- Tap Background and Filters, then tap Filters.
- Choose a background filter.
Part 3: How to use Snapchat Filters on Zoom? [A Detailed Look]
By using Snap Camera and Zoom simultaneously, you can experiment with various Snapchat filters for Zoom. Here’s how to do so with a few clicks:
Step 1: Set Up Snap Camera
Source: pcmag.com
If you haven’t done it yet, first install the Zoom Client for Meetings software. Next, install the Snap Camera app.
Now, open the Snap Camera app to see yourself in the camera viewer.
Step 2: Find the filters
Look for the filters among the different categories or search them by typing a term in the search field.
After you’ve selected a filter, open Zoom and start or join a meeting.
Now, change the camera source that Zoom will use over the video screen. Select the arrow icon beside the Start Video button and choose Snap Camera to switch to.
Step 3: Change Filters
Source: pcmag.com
Choose Start Video to turn your Video on, and see yourself switched with selected Snapchat filters for Zoom.
You can then switch among different filters anytime during the session. Place the Snap Camera app accordingly, so it’s next to the Zoom app for easy management. Switch an extra filter in Snap Camera, and change your appearance.
To return to your regular appearance and background, click the filter you just selected. Then, turn off the Snap Camera app to close the Snap Camera altogether.
Go back to the Zoom video window, click the arrow next to the Video button again, and switch the source back to your primary Camera.
Step 4: Snap Camera Settings
Open the Snap Camera app and choose the Settings icon in the upper right.
Toggle the button that says Run Snap Camera on System Startup. Now the app will automatically launch when you sign in to Windows.
Part 4: Tips for Making a High-Quality Zoom Meeting
Learning how to set up Zoom meeting filters is straightforward, alright, but you can also optimize Zoom meetings for the best experience.
Given below are a few tips to improve the quality of the Zoom meetings:
1. Mirror Effect
The mirror effect enables by default and lets you flip the video display during the conference. To enable or disable this feature, click the Settings icon from the top-right corner of the Zoom window (when not in a conference), select Video from the left pane, and check or uncheck the Mirror my video box from the right, respectively.
2. Appearance Touchup
This feature makes your camera visuals less crispy. It’s a great effect to distract other meeting participants with the imperfections your sleepy face or clothes have when you’re right out of bed.
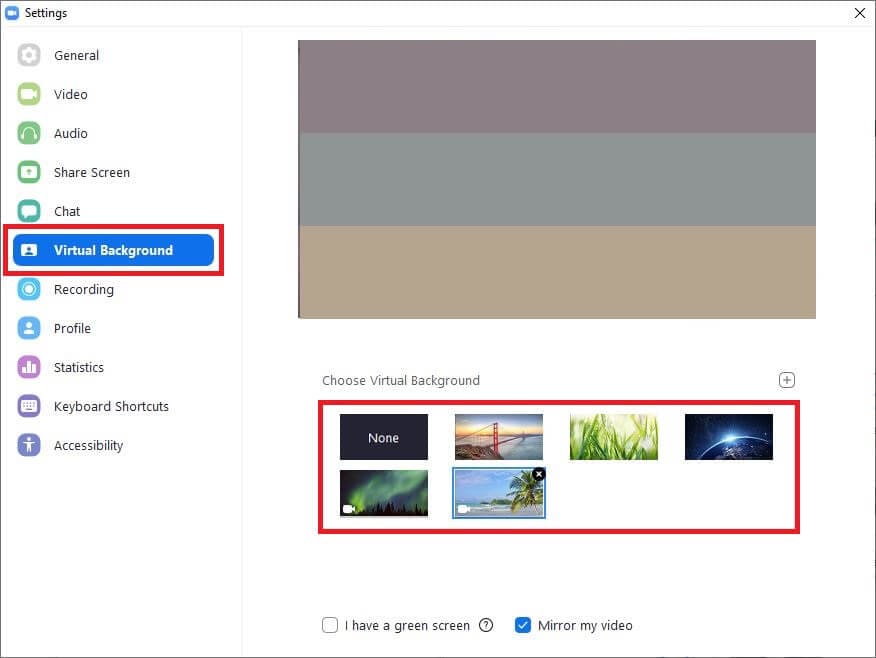
3. Virtual Backgrounds
Virtual backgrounds let you hide those wrinkled or untidy bedsheets or wet towels that are generally hovering around your messy home. When enabled, you can choose a pleasant environment or other scenic beauty visible to other participants during the session.
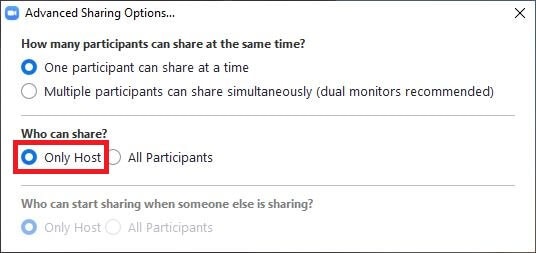
4.Prevent Screen Sharing
You can keep all the ignorant participants from sharing their screens accidentally while you’re discussing a serious matter. For this purpose, hit the up-facing arrow beside the Share Screen option from the bottom of the camera window, click Advanced Sharing Options, and choose the Only Host radio button from the Who can share section that appears on the following box.
5. Mute Participants
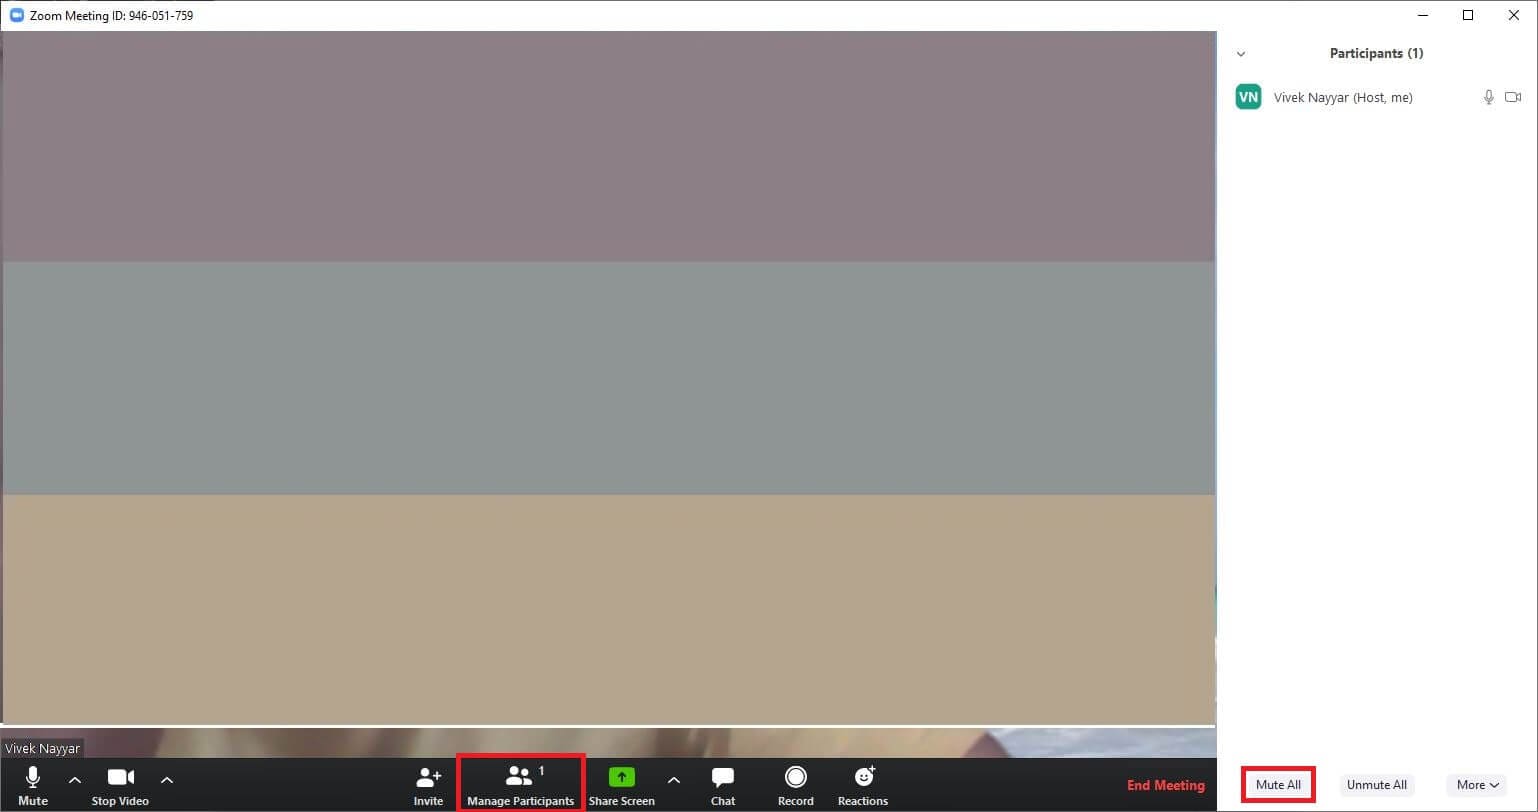
You can mute all the participants in one go and remove unnecessary voices appearing like a fish market. To do this, select the Manage Participants option from the bottom of the camera screen and then hit the Mute All button from the Participants pane’s bottom left corner.
You can also select the Mute button next to each participant’s name in the Participants pane to mute them individually.
Conclusion
The process of applying Zoom video filters is simple, and learning how to set up a third-party camera for Snapchat filters for Zoom is even simpler. For the latter, however, you are required to install an add-in that is freely available from the vendor’s official website. To conclude, being one of the most straightforward solutions (i.e., free in most scenarios) for video conferences and virtual business meetings, almost all the corporate professionals around the globe prefer Zoom.
Richard Bennett
Richard Bennett is a writer and a lover of all things video.
Follow @Richard Bennett
Also read:
- [New] Best Free, Invisible Android Video Recorders for 2024
- [New] FCP Without Spending – Practical Guide
- [New] In 2024, Advanced Mac Toolkit Screen/Audio Recording Feature
- [New] In 2024, The Ultimate Step-by-Step on Instagram Filter Usage 2023
- [New] Mac Users Guide The Full Spectrum of ScreenFlow Pro for 2024
- [New] Unveiling Simplicity in iPad Screen Saving Tactics
- [Updated] 2024 Approved Quick Guide Downloading & Prepping VRecord
- [Updated] Explore Best Android Emulators for PlayStation 2 Gaming for 2024
- [Updated] How to Bur Background in Google Meet
- [Updated] In 2024, Covert Recording Erasing Identifiable Information
- [Updated] StreamMasters OBS Edition
- 2024 Approved Convert Any Instagram Video in Minutes Best Free Tools (Windows/Mac)
- How to restore wiped videos on Infinix Note 30 VIP
- How to Unlock Your iPhone 12 Passcode 4 Easy Methods (With or Without iTunes)
- In 2024, Add Cinematic Shake to Images Using PS
- In 2024, How to Unlock Honor 70 Lite 5G Phone with Broken Screen
- Masterful Aid Creation Simplified: The Best 7 Cybernetic Tools
- The Complete Guide to Scheduling & Recording Online Meetings with Slack & Filmora
- Top 6 Apps/Services to Trace Any Honor 90 Location By Mobile Number | Dr.fone
- Title: [New] Securing Premium Image on Zoom via Strategic Filters
- Author: Vivienne Westwood
- Created at : 2025-02-06 06:14:21
- Updated at : 2025-02-12 07:00:24
- Link: https://video-capture.techidaily.com/new-securing-premium-image-on-zoom-via-strategic-filters/
- License: This work is licensed under CC BY-NC-SA 4.0.