![[New] In 2024, Capturing Every Aspect of Minecraft Play](https://thmb.techidaily.com/7ad836b78743150f7926162559e15271095acf4f64d610e7943b29ad8777b2c6.jpg)
[New] In 2024, Capturing Every Aspect of Minecraft Play
Capturing Every Aspect of Minecraft Play
Minecraft, a game that rises above and is appreciated by all ages, is a sandbox cross-Step game assembled last 2011. Its prominence got the title of the top-of-the-line computer game ever due to the Minecraft screen recorder capabilities, with more than 200 million deals. That being said, numerous gamers stream Minecraft interactivity and with the Minecraft recorders, bring in cash depending on their watchers and supporters. All things considered, editing afterwards recording Minecraft then utilizes a screen recorder to catch their Minecraft interactivity and save it as a video document.
Minecraft has zeroed in on worldwide cooperation and sharing since its initial web-based servers in the Alpha days. These days, particularly for inventive and story-mode ongoing interaction, recording and streaming Minecraft is more famous than any other time, regardless of whether for streamlining speed runs or flaunting imaginative magnum opuses. With this, it is simpler to share and transfer to gaming video web-based Steps like Twitch, YouTube, and that’s only the tip of the iceberg. To discover the best Minecraft screen recorder, you’re on the right page. In any case, assuming you’re not a top decoration or YouTuber, you probably won’t have a clue about the most ideal way to record Minecraft for your motivations, and relying upon how to record Minecraft on Windows 10, you shouldn’t have to utilize the most hearty, troublesome devices.
Way 1. Best Way to Record Minecraft Games
Way 2. Record Minecraft with OBS
Way 3. Record Minecraft with Bandicam
Way 4. Record Minecraft with QuickTime Player
Way 5. Record Minecraft with FBX Game Recorder
Way 6. Record Minecraft with Windows Game Bar
Way 1. Best Way to Record Minecraft Games
Wondershare Filmora is a no-slack computer screen recorder that can record Minecraft video and sound in HD quality with no watermark. It upholds a video quality at up to 60fps and 10-bit codec so that the important Minecraft interactivity minutes can be recorded distinctively. As far as the recording highlights, this Minecraft screen recorder engages clients to catch the objective window, full screen or explicit region right away. Recording recordings with sound, yet your webcam exercises can likewise be caught. Thus, it will likewise perform superbly in making video instructional exercises.
With this best Minecraft screen recorder, you can conveniently record Minecraft ongoing interaction with redid screen recording region is excellent. Other than game catch, Wondershare Filmora likewise performs well in recording web-based recordings and sounds, catching webcam recordings, and making video instructional exercises. With the utilization of easy route keys, you can oversee the Minecraft game recording all the more without any problem. While recording, you are even permitted to make previews and add marks, etc. Concerning the result formats, it gives numerous recordings formats, for instance, MP4, WMV, MOV, F4V, TS, AVI, and GIF, and 4 sound configurations and 5 picture formats. Get the Wondershare Filmora now and investigate the Minecraft world with it!
For Win 7 or later (64-bit)
For macOS 10.12 or later
Step 1: Download and Install Filmora
To start with this Minecraft recorder, you need to download and install the application inside your system. For that, you can use this Minecraft recorder on the go. Just visit the Wondershare official platform on the web and from there, you can find both versions of Filmora software, i-e., Windows and Mac versions with the latest version.
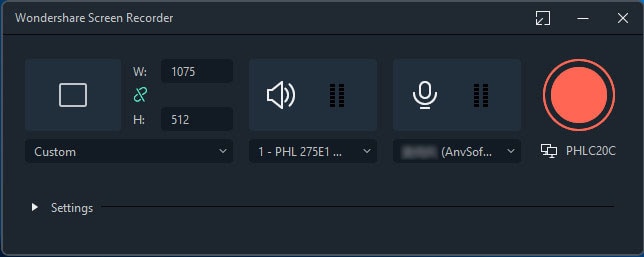
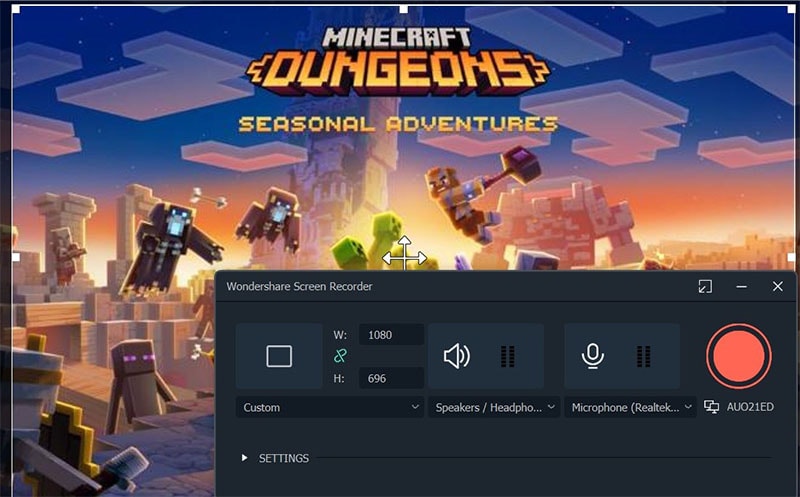
After that, you can proceed by going to the File > Record Media and then select your desired format of screen recording from the list as shown here. It’ll take you to the user-friendly UI of Filmora where you can pick up the recording feature on-spot as shown in the figure below:
Step 2: Customize the Gameplay
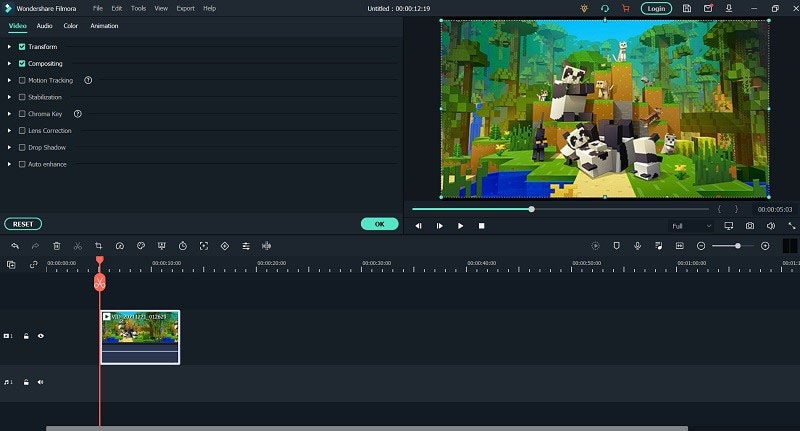
After the customizations to the Minecraft recording including webcam, microphone, gameplay sound and much more, simply hit the Record button and it shall start recording your customized screen right away. Now as you’re done with the recording, you can hit the Stop button as same as the process how you’ve started the recording. Inside the editor, you can edit the content with full features as Filmora gives you numerous editing tools to utilize.
Step 3: Export or Share Recording
Now, after the successful editing with Filmora, when you’ve everything summed up, you can then save your edited Minecraft recordings right from there. you have a lot of choices to select while sending out your screen catching and webcam chronicles after you’re finished with the altering part. For that, hit the Export button at the top-right corner of the product interface as follow:

The best part with this Minecraft recorder is that Wondershare Filmora also allows you to upload your recorded and edited content directly to YouTube or some other renowned platform, you can without much of a stretch select your desired platform to share from there.
Way 2. Record Minecraft with OBS
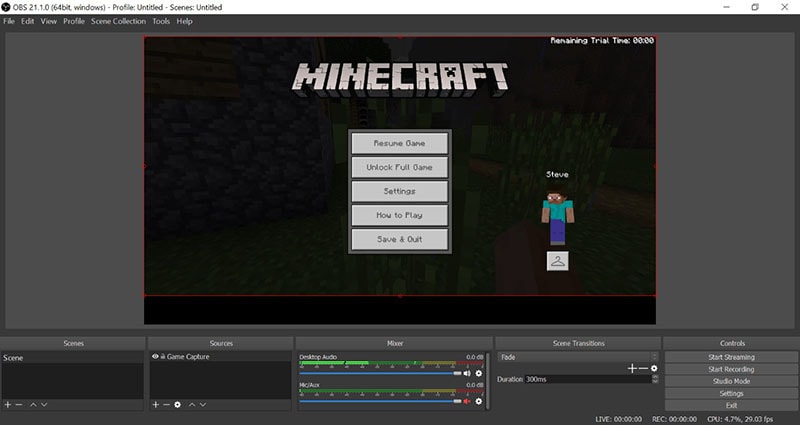
Minecraft is still extremely well known today as we can see the Minecraft recordings and content still profoundly apparent on YouTube, Vimeo, Twitch, and other game networks. OBS Studio is an open-source screen recorder that everybody can use free of charge. It is a confided in name due to its consistent recording abilities. It has many screen channels that can be utilized to add impacts to the video you are recording. Also, you can utilize the “Studio Mode” of the apparatus to communicate your Minecraft game on the web. The sound blender of the apparatus is additionally something that individuals love about OBS Studio.
Step 1. Launch OBS Studio
Get the OBS screen recorder apparatus introduced on your framework and afterwards dispatch it. Characterize hotkeys for a simple beginning and stop usefulness.

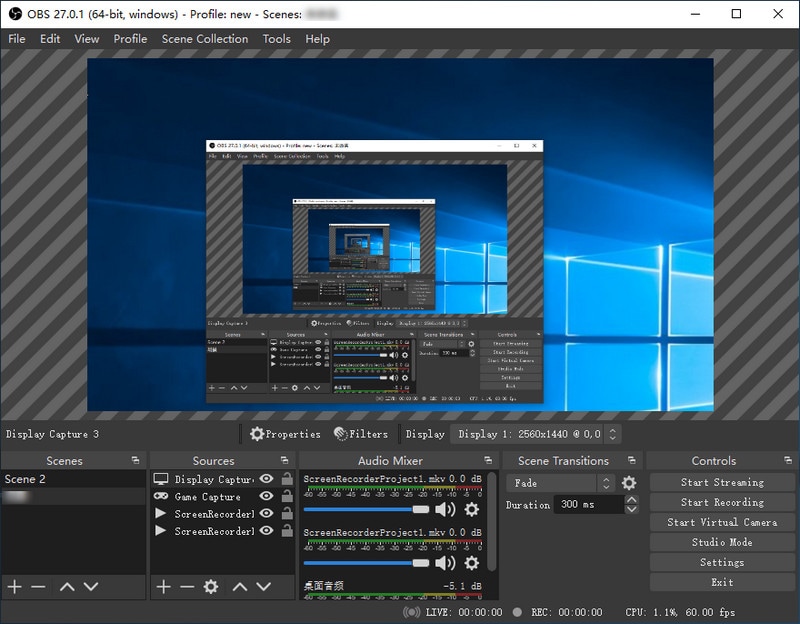
Step 2. Create Scenes for Gameplay
To add text and pictures to your accounts, right-click on the source region and select the game catch choice. Presently open Minecraft and afterwards pick it from the application list. Begin playing in full-screen mode.
Step 3. Start/Stop Recording
Click the “Record” button to begin recording and snap it again to stop the recording system.
Way 3. Record Minecraft with Bandicam
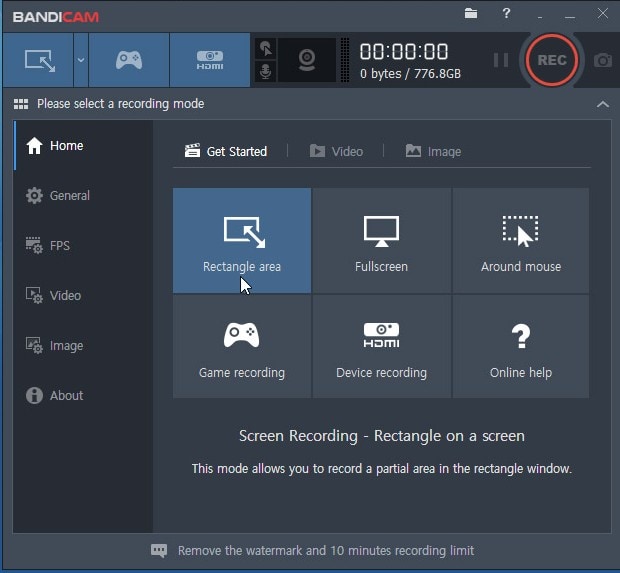
Another program that can fill in as a Minecraft screen recorder is Bandicam. It is broadly utilized as a screen recorder and an interactivity recorder. It permits clients to record video arrangements when playing the game. Generally, sounds from games can be recorded flawlessly without misfortune. Plus, AVI and MP4 formats are upheld when you distribute the record. There is likewise a possibility for catching a picture on the screen, which permits you to continue invigorating minutes during playing the game with top calibre.
The most effective method to Record on Minecraft with Bandicam. Bandicam is fit for changing the fps of recording. Be that as it may, when beginning recording the game, there will be slacks showing up in the video which will impact the impact of the video.
Step 1. Customize Bandicam Recording
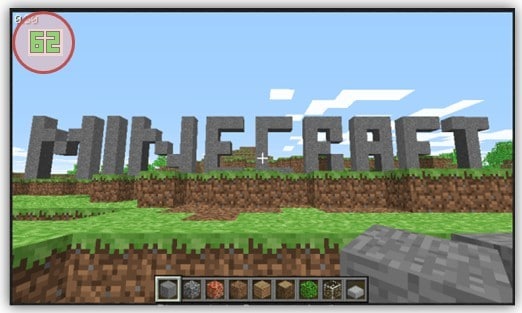
Pick the “Game Recording” mode to tune to an excellent video. Run Minecraft on your gadget. Adapt for outline rating utilizing the “FPS” tab shown on your gadget screen.
Step 2. Start Recording
Hit the “F12” button on the console or press the “Record” button to start the recording system. During recording, the numbers shown in green shading will become red.
Step 3. Stop and Save Gameplay Recording
To quit recording, hit the “F12” button on the console again or click again on the “Record” button.
Way 4. Record Minecraft with QuickTime Player
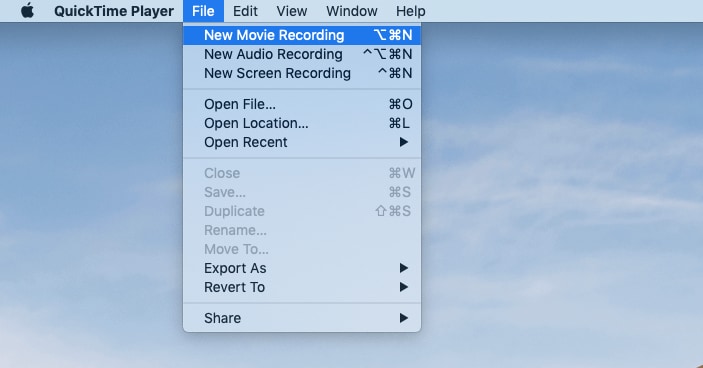
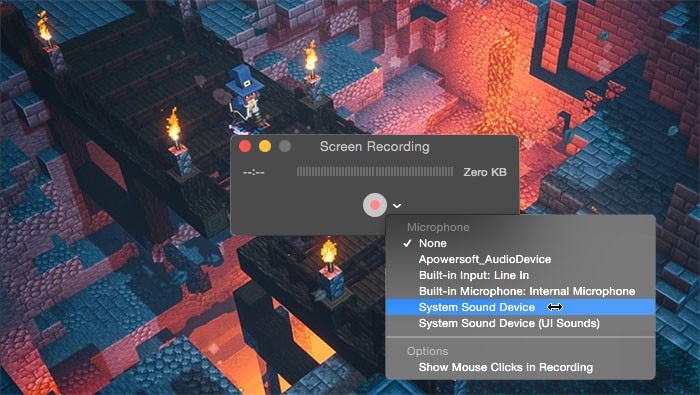
QuickTime Player is a media player that is equipped for taking care of different organizations of computerized video, picture, sound, and so on In the interim, it can likewise be utilized to screen record with sound on HP PC. Utilizing QuickTime Player to record your screen is straightforward. With it, you can make a recording of your whole screen or select only a part of it, and afterwards save the recorded document on your PC or offer it on YouTube.
Step 1: Launch QuickTime and Minecraft
Dispatch QuickTime Player on your Mac (The most straightforward method for observing it is to look with Spotlight). Click on File from the App menu on the left half of the screen. Select New Screen Recording starting from the drop menu.
Step 2: Customize and Start Recording
Click on the caret close to the red button to choose your sound choices. To record your whole screen, click anyplace on your screen, then, at that point, click the brief. To record a part of the screen, drag your cursor from one corner of the segment to the next, and afterwards, click record when incited.
Step 3: Stop Recording
Click the Stop button in the Menu bar on the left half of your screen when you’re finished recording.
Way 5. Record Minecraft with FBX Game Recorder
FBX game recorder is a basic, moderate, yet effective Minecraft video recorder. It is ideal for recording games since it can likewise remember a webcam window for the recording. FBX game recorder includes an “Image in-Picture” innovation. It synchronizes your webcam window into the Minecraft game recording with practically no slack. Also, it can consequently pack the record estimate and improve them so you can save extra room. This is conceivable on account of the capacity that can alter the video nature of the recording.
Step 1: Launch FBX and Minecraft
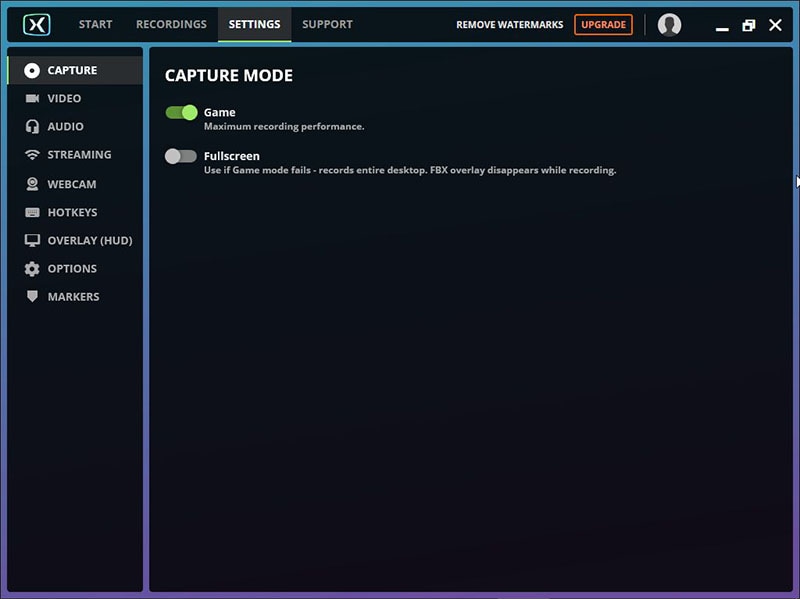
Dispatch FBX and go to the Capture segment of the Settings tab. Select Game catch mode. Start Minecraft. Later a couple of seconds, you will see FBX’s overlay show up on the screen.

Step 2: Start Recording
At the point when you are prepared to start recording, press the Start/Stop Recording hotkey. Of course, this will be Ctrl + F12. The recording pointer will show up in the overlay. You are presently recording!

Step 3: Stop Recording
At the point when you need to quit recording, press the Start/Stop Recording hotkey again to save your video. The overlay will trade to a ‘Saved’ message for a couple of seconds. When it trades back to the typical overlay, you are prepared to record once more.
Way 6. Record Minecraft with Windows Game Bar
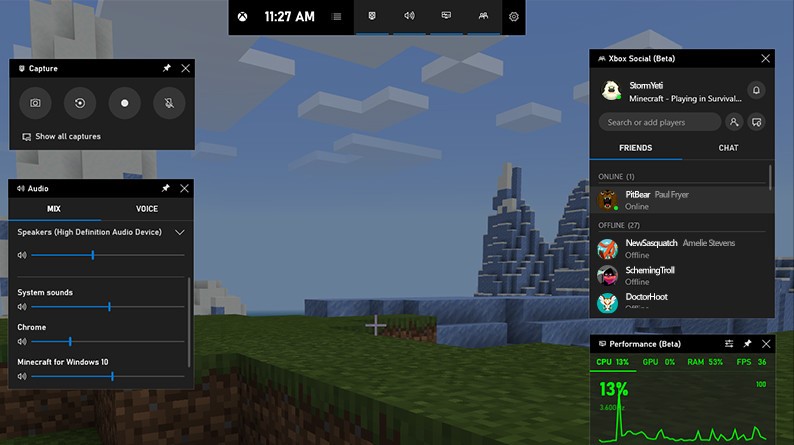
The last instrument that you can use to record Minecraft is a Windows underlying apparatus called Game Bar. This is the authority Minecraft screen catch apparatus of Xbox control centre and Windows gadgets. The beneficial thing about having this apparatus is that it accompanies your framework, and you can get to it immediately. Besides that, it upholds recording the screen and amplifier together. You can likewise change the volume of the sound from the “Sound” tab. In any case, the Game Bar is somewhat poor. It has a base framework necessary for the processor and formats equipment on the PC. These necessities should be met first. In any case, the screen recording component will be incapacitated.
Step 1. Press “Windows Key + G” to open the Game Bar while playing a game. It will spring up over the game you’re playing.
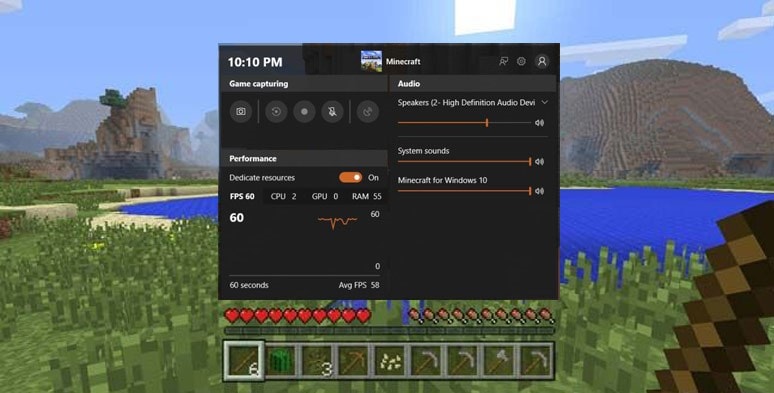
Step 2. Click the red “Record” button. You can see a clock at the upper right corner of your window while it’s recording.
Step 3. Raise the Game Bar and snap the red “Stop” button to quit recording the game. You can likewise begin and stop the recording with “Windows Key + Alt + R” hotkeys. Windows saves all recordings you record to your record as MP4 documents. Each labelled with the game’s name and the time you caught them.

Conclusion
Gameplay recording, for instance, Minecraft should be possible effectively utilizing the appropriate apparatuses fundamental for screen recording. Additionally, the speed of the screen recording during gameplay can be affected by the actual PC. Assuming you need your gaming video to be perceived and approbated by the general population, screen record Minecraft game video would be a decent beginning Step for you. Or then again you simply need to keep the video to retain the time you spent on this work of art. By then, at that point, the Filmora Screen Recorder is your best sidekick that assists you with screening catch and recording the Minecraft game video.
Way 2. Record Minecraft with OBS
Way 3. Record Minecraft with Bandicam
Way 4. Record Minecraft with QuickTime Player
Way 5. Record Minecraft with FBX Game Recorder
Way 6. Record Minecraft with Windows Game Bar
Way 1. Best Way to Record Minecraft Games
Wondershare Filmora is a no-slack computer screen recorder that can record Minecraft video and sound in HD quality with no watermark. It upholds a video quality at up to 60fps and 10-bit codec so that the important Minecraft interactivity minutes can be recorded distinctively. As far as the recording highlights, this Minecraft screen recorder engages clients to catch the objective window, full screen or explicit region right away. Recording recordings with sound, yet your webcam exercises can likewise be caught. Thus, it will likewise perform superbly in making video instructional exercises.
With this best Minecraft screen recorder, you can conveniently record Minecraft ongoing interaction with redid screen recording region is excellent. Other than game catch, Wondershare Filmora likewise performs well in recording web-based recordings and sounds, catching webcam recordings, and making video instructional exercises. With the utilization of easy route keys, you can oversee the Minecraft game recording all the more without any problem. While recording, you are even permitted to make previews and add marks, etc. Concerning the result formats, it gives numerous recordings formats, for instance, MP4, WMV, MOV, F4V, TS, AVI, and GIF, and 4 sound configurations and 5 picture formats. Get the Wondershare Filmora now and investigate the Minecraft world with it!
For Win 7 or later (64-bit)
For macOS 10.12 or later
Step 1: Download and Install Filmora
To start with this Minecraft recorder, you need to download and install the application inside your system. For that, you can use this Minecraft recorder on the go. Just visit the Wondershare official platform on the web and from there, you can find both versions of Filmora software, i-e., Windows and Mac versions with the latest version.
After that, you can proceed by going to the File > Record Media and then select your desired format of screen recording from the list as shown here. It’ll take you to the user-friendly UI of Filmora where you can pick up the recording feature on-spot as shown in the figure below:
Step 2: Customize the Gameplay
After the customizations to the Minecraft recording including webcam, microphone, gameplay sound and much more, simply hit the Record button and it shall start recording your customized screen right away. Now as you’re done with the recording, you can hit the Stop button as same as the process how you’ve started the recording. Inside the editor, you can edit the content with full features as Filmora gives you numerous editing tools to utilize.
Step 3: Export or Share Recording
Now, after the successful editing with Filmora, when you’ve everything summed up, you can then save your edited Minecraft recordings right from there. you have a lot of choices to select while sending out your screen catching and webcam chronicles after you’re finished with the altering part. For that, hit the Export button at the top-right corner of the product interface as follow:
The best part with this Minecraft recorder is that Wondershare Filmora also allows you to upload your recorded and edited content directly to YouTube or some other renowned platform, you can without much of a stretch select your desired platform to share from there.
Way 2. Record Minecraft with OBS
Minecraft is still extremely well known today as we can see the Minecraft recordings and content still profoundly apparent on YouTube, Vimeo, Twitch, and other game networks. OBS Studio is an open-source screen recorder that everybody can use free of charge. It is a confided in name due to its consistent recording abilities. It has many screen channels that can be utilized to add impacts to the video you are recording. Also, you can utilize the “Studio Mode” of the apparatus to communicate your Minecraft game on the web. The sound blender of the apparatus is additionally something that individuals love about OBS Studio.
Step 1. Launch OBS Studio
Get the OBS screen recorder apparatus introduced on your framework and afterwards dispatch it. Characterize hotkeys for a simple beginning and stop usefulness.
Step 2. Create Scenes for Gameplay
To add text and pictures to your accounts, right-click on the source region and select the game catch choice. Presently open Minecraft and afterwards pick it from the application list. Begin playing in full-screen mode.
Step 3. Start/Stop Recording
Click the “Record” button to begin recording and snap it again to stop the recording system.
Way 3. Record Minecraft with Bandicam
Another program that can fill in as a Minecraft screen recorder is Bandicam. It is broadly utilized as a screen recorder and an interactivity recorder. It permits clients to record video arrangements when playing the game. Generally, sounds from games can be recorded flawlessly without misfortune. Plus, AVI and MP4 formats are upheld when you distribute the record. There is likewise a possibility for catching a picture on the screen, which permits you to continue invigorating minutes during playing the game with top calibre.
The most effective method to Record on Minecraft with Bandicam. Bandicam is fit for changing the fps of recording. Be that as it may, when beginning recording the game, there will be slacks showing up in the video which will impact the impact of the video.
Step 1. Customize Bandicam Recording
Pick the “Game Recording” mode to tune to an excellent video. Run Minecraft on your gadget. Adapt for outline rating utilizing the “FPS” tab shown on your gadget screen.
Step 2. Start Recording
Hit the “F12” button on the console or press the “Record” button to start the recording system. During recording, the numbers shown in green shading will become red.
Step 3. Stop and Save Gameplay Recording
To quit recording, hit the “F12” button on the console again or click again on the “Record” button.

Way 4. Record Minecraft with QuickTime Player
QuickTime Player is a media player that is equipped for taking care of different organizations of computerized video, picture, sound, and so on In the interim, it can likewise be utilized to screen record with sound on HP PC. Utilizing QuickTime Player to record your screen is straightforward. With it, you can make a recording of your whole screen or select only a part of it, and afterwards save the recorded document on your PC or offer it on YouTube.
Step 1: Launch QuickTime and Minecraft
Dispatch QuickTime Player on your Mac (The most straightforward method for observing it is to look with Spotlight). Click on File from the App menu on the left half of the screen. Select New Screen Recording starting from the drop menu.
Step 2: Customize and Start Recording
Click on the caret close to the red button to choose your sound choices. To record your whole screen, click anyplace on your screen, then, at that point, click the brief. To record a part of the screen, drag your cursor from one corner of the segment to the next, and afterwards, click record when incited.
Step 3: Stop Recording
Click the Stop button in the Menu bar on the left half of your screen when you’re finished recording.
Way 5. Record Minecraft with FBX Game Recorder
FBX game recorder is a basic, moderate, yet effective Minecraft video recorder. It is ideal for recording games since it can likewise remember a webcam window for the recording. FBX game recorder includes an “Image in-Picture” innovation. It synchronizes your webcam window into the Minecraft game recording with practically no slack. Also, it can consequently pack the record estimate and improve them so you can save extra room. This is conceivable on account of the capacity that can alter the video nature of the recording.
Step 1: Launch FBX and Minecraft
Dispatch FBX and go to the Capture segment of the Settings tab. Select Game catch mode. Start Minecraft. Later a couple of seconds, you will see FBX’s overlay show up on the screen.
Step 2: Start Recording
At the point when you are prepared to start recording, press the Start/Stop Recording hotkey. Of course, this will be Ctrl + F12. The recording pointer will show up in the overlay. You are presently recording!
Step 3: Stop Recording
At the point when you need to quit recording, press the Start/Stop Recording hotkey again to save your video. The overlay will trade to a ‘Saved’ message for a couple of seconds. When it trades back to the typical overlay, you are prepared to record once more.
Way 6. Record Minecraft with Windows Game Bar
The last instrument that you can use to record Minecraft is a Windows underlying apparatus called Game Bar. This is the authority Minecraft screen catch apparatus of Xbox control centre and Windows gadgets. The beneficial thing about having this apparatus is that it accompanies your framework, and you can get to it immediately. Besides that, it upholds recording the screen and amplifier together. You can likewise change the volume of the sound from the “Sound” tab. In any case, the Game Bar is somewhat poor. It has a base framework necessary for the processor and formats equipment on the PC. These necessities should be met first. In any case, the screen recording component will be incapacitated.
Step 1. Press “Windows Key + G” to open the Game Bar while playing a game. It will spring up over the game you’re playing.
Step 2. Click the red “Record” button. You can see a clock at the upper right corner of your window while it’s recording.
Step 3. Raise the Game Bar and snap the red “Stop” button to quit recording the game. You can likewise begin and stop the recording with “Windows Key + Alt + R” hotkeys. Windows saves all recordings you record to your record as MP4 documents. Each labelled with the game’s name and the time you caught them.
 Video Converter Factory Pro
Conclusion
Gameplay recording, for instance, Minecraft should be possible effectively utilizing the appropriate apparatuses fundamental for screen recording. Additionally, the speed of the screen recording during gameplay can be affected by the actual PC. Assuming you need your gaming video to be perceived and approbated by the general population, screen record Minecraft game video would be a decent beginning Step for you. Or then again you simply need to keep the video to retain the time you spent on this work of art. By then, at that point, the Filmora Screen Recorder is your best sidekick that assists you with screening catch and recording the Minecraft game video.
Way 2. Record Minecraft with OBS
Way 3. Record Minecraft with Bandicam
Way 4. Record Minecraft with QuickTime Player
Way 5. Record Minecraft with FBX Game Recorder
Way 6. Record Minecraft with Windows Game Bar
Way 1. Best Way to Record Minecraft Games
Wondershare Filmora is a no-slack computer screen recorder that can record Minecraft video and sound in HD quality with no watermark. It upholds a video quality at up to 60fps and 10-bit codec so that the important Minecraft interactivity minutes can be recorded distinctively. As far as the recording highlights, this Minecraft screen recorder engages clients to catch the objective window, full screen or explicit region right away. Recording recordings with sound, yet your webcam exercises can likewise be caught. Thus, it will likewise perform superbly in making video instructional exercises.
With this best Minecraft screen recorder, you can conveniently record Minecraft ongoing interaction with redid screen recording region is excellent. Other than game catch, Wondershare Filmora likewise performs well in recording web-based recordings and sounds, catching webcam recordings, and making video instructional exercises. With the utilization of easy route keys, you can oversee the Minecraft game recording all the more without any problem. While recording, you are even permitted to make previews and add marks, etc. Concerning the result formats, it gives numerous recordings formats, for instance, MP4, WMV, MOV, F4V, TS, AVI, and GIF, and 4 sound configurations and 5 picture formats. Get the Wondershare Filmora now and investigate the Minecraft world with it!
For Win 7 or later (64-bit)
For macOS 10.12 or later
Step 1: Download and Install Filmora
To start with this Minecraft recorder, you need to download and install the application inside your system. For that, you can use this Minecraft recorder on the go. Just visit the Wondershare official platform on the web and from there, you can find both versions of Filmora software, i-e., Windows and Mac versions with the latest version.
After that, you can proceed by going to the File > Record Media and then select your desired format of screen recording from the list as shown here. It’ll take you to the user-friendly UI of Filmora where you can pick up the recording feature on-spot as shown in the figure below:
Step 2: Customize the Gameplay
After the customizations to the Minecraft recording including webcam, microphone, gameplay sound and much more, simply hit the Record button and it shall start recording your customized screen right away. Now as you’re done with the recording, you can hit the Stop button as same as the process how you’ve started the recording. Inside the editor, you can edit the content with full features as Filmora gives you numerous editing tools to utilize.
Step 3: Export or Share Recording
Now, after the successful editing with Filmora, when you’ve everything summed up, you can then save your edited Minecraft recordings right from there. you have a lot of choices to select while sending out your screen catching and webcam chronicles after you’re finished with the altering part. For that, hit the Export button at the top-right corner of the product interface as follow:
The best part with this Minecraft recorder is that Wondershare Filmora also allows you to upload your recorded and edited content directly to YouTube or some other renowned platform, you can without much of a stretch select your desired platform to share from there.
Way 2. Record Minecraft with OBS
Minecraft is still extremely well known today as we can see the Minecraft recordings and content still profoundly apparent on YouTube, Vimeo, Twitch, and other game networks. OBS Studio is an open-source screen recorder that everybody can use free of charge. It is a confided in name due to its consistent recording abilities. It has many screen channels that can be utilized to add impacts to the video you are recording. Also, you can utilize the “Studio Mode” of the apparatus to communicate your Minecraft game on the web. The sound blender of the apparatus is additionally something that individuals love about OBS Studio.
Step 1. Launch OBS Studio
Get the OBS screen recorder apparatus introduced on your framework and afterwards dispatch it. Characterize hotkeys for a simple beginning and stop usefulness.
Step 2. Create Scenes for Gameplay
To add text and pictures to your accounts, right-click on the source region and select the game catch choice. Presently open Minecraft and afterwards pick it from the application list. Begin playing in full-screen mode.
Step 3. Start/Stop Recording
Click the “Record” button to begin recording and snap it again to stop the recording system.
![]() FX PRO (Gold Robot + Silver Robot(Basic Package))
FX PRO (Gold Robot + Silver Robot(Basic Package))
Way 3. Record Minecraft with Bandicam
Another program that can fill in as a Minecraft screen recorder is Bandicam. It is broadly utilized as a screen recorder and an interactivity recorder. It permits clients to record video arrangements when playing the game. Generally, sounds from games can be recorded flawlessly without misfortune. Plus, AVI and MP4 formats are upheld when you distribute the record. There is likewise a possibility for catching a picture on the screen, which permits you to continue invigorating minutes during playing the game with top calibre.
The most effective method to Record on Minecraft with Bandicam. Bandicam is fit for changing the fps of recording. Be that as it may, when beginning recording the game, there will be slacks showing up in the video which will impact the impact of the video.
Step 1. Customize Bandicam Recording
Pick the “Game Recording” mode to tune to an excellent video. Run Minecraft on your gadget. Adapt for outline rating utilizing the “FPS” tab shown on your gadget screen.
Step 2. Start Recording
Hit the “F12” button on the console or press the “Record” button to start the recording system. During recording, the numbers shown in green shading will become red.
Step 3. Stop and Save Gameplay Recording
To quit recording, hit the “F12” button on the console again or click again on the “Record” button.
Way 4. Record Minecraft with QuickTime Player
QuickTime Player is a media player that is equipped for taking care of different organizations of computerized video, picture, sound, and so on In the interim, it can likewise be utilized to screen record with sound on HP PC. Utilizing QuickTime Player to record your screen is straightforward. With it, you can make a recording of your whole screen or select only a part of it, and afterwards save the recorded document on your PC or offer it on YouTube.
Step 1: Launch QuickTime and Minecraft
Dispatch QuickTime Player on your Mac (The most straightforward method for observing it is to look with Spotlight). Click on File from the App menu on the left half of the screen. Select New Screen Recording starting from the drop menu.
Step 2: Customize and Start Recording
Click on the caret close to the red button to choose your sound choices. To record your whole screen, click anyplace on your screen, then, at that point, click the brief. To record a part of the screen, drag your cursor from one corner of the segment to the next, and afterwards, click record when incited.
Step 3: Stop Recording
Click the Stop button in the Menu bar on the left half of your screen when you’re finished recording.
Way 5. Record Minecraft with FBX Game Recorder
FBX game recorder is a basic, moderate, yet effective Minecraft video recorder. It is ideal for recording games since it can likewise remember a webcam window for the recording. FBX game recorder includes an “Image in-Picture” innovation. It synchronizes your webcam window into the Minecraft game recording with practically no slack. Also, it can consequently pack the record estimate and improve them so you can save extra room. This is conceivable on account of the capacity that can alter the video nature of the recording.
Step 1: Launch FBX and Minecraft
Dispatch FBX and go to the Capture segment of the Settings tab. Select Game catch mode. Start Minecraft. Later a couple of seconds, you will see FBX’s overlay show up on the screen.
Step 2: Start Recording
At the point when you are prepared to start recording, press the Start/Stop Recording hotkey. Of course, this will be Ctrl + F12. The recording pointer will show up in the overlay. You are presently recording!
Step 3: Stop Recording
At the point when you need to quit recording, press the Start/Stop Recording hotkey again to save your video. The overlay will trade to a ‘Saved’ message for a couple of seconds. When it trades back to the typical overlay, you are prepared to record once more.
Way 6. Record Minecraft with Windows Game Bar
The last instrument that you can use to record Minecraft is a Windows underlying apparatus called Game Bar. This is the authority Minecraft screen catch apparatus of Xbox control centre and Windows gadgets. The beneficial thing about having this apparatus is that it accompanies your framework, and you can get to it immediately. Besides that, it upholds recording the screen and amplifier together. You can likewise change the volume of the sound from the “Sound” tab. In any case, the Game Bar is somewhat poor. It has a base framework necessary for the processor and formats equipment on the PC. These necessities should be met first. In any case, the screen recording component will be incapacitated.
Step 1. Press “Windows Key + G” to open the Game Bar while playing a game. It will spring up over the game you’re playing.
Step 2. Click the red “Record” button. You can see a clock at the upper right corner of your window while it’s recording.
Step 3. Raise the Game Bar and snap the red “Stop” button to quit recording the game. You can likewise begin and stop the recording with “Windows Key + Alt + R” hotkeys. Windows saves all recordings you record to your record as MP4 documents. Each labelled with the game’s name and the time you caught them.
Conclusion
Gameplay recording, for instance, Minecraft should be possible effectively utilizing the appropriate apparatuses fundamental for screen recording. Additionally, the speed of the screen recording during gameplay can be affected by the actual PC. Assuming you need your gaming video to be perceived and approbated by the general population, screen record Minecraft game video would be a decent beginning Step for you. Or then again you simply need to keep the video to retain the time you spent on this work of art. By then, at that point, the Filmora Screen Recorder is your best sidekick that assists you with screening catch and recording the Minecraft game video.
Way 2. Record Minecraft with OBS
Way 3. Record Minecraft with Bandicam
Way 4. Record Minecraft with QuickTime Player
Way 5. Record Minecraft with FBX Game Recorder
Way 6. Record Minecraft with Windows Game Bar
Way 1. Best Way to Record Minecraft Games
Wondershare Filmora is a no-slack computer screen recorder that can record Minecraft video and sound in HD quality with no watermark. It upholds a video quality at up to 60fps and 10-bit codec so that the important Minecraft interactivity minutes can be recorded distinctively. As far as the recording highlights, this Minecraft screen recorder engages clients to catch the objective window, full screen or explicit region right away. Recording recordings with sound, yet your webcam exercises can likewise be caught. Thus, it will likewise perform superbly in making video instructional exercises.
With this best Minecraft screen recorder, you can conveniently record Minecraft ongoing interaction with redid screen recording region is excellent. Other than game catch, Wondershare Filmora likewise performs well in recording web-based recordings and sounds, catching webcam recordings, and making video instructional exercises. With the utilization of easy route keys, you can oversee the Minecraft game recording all the more without any problem. While recording, you are even permitted to make previews and add marks, etc. Concerning the result formats, it gives numerous recordings formats, for instance, MP4, WMV, MOV, F4V, TS, AVI, and GIF, and 4 sound configurations and 5 picture formats. Get the Wondershare Filmora now and investigate the Minecraft world with it!
For Win 7 or later (64-bit)
For macOS 10.12 or later
Step 1: Download and Install Filmora
To start with this Minecraft recorder, you need to download and install the application inside your system. For that, you can use this Minecraft recorder on the go. Just visit the Wondershare official platform on the web and from there, you can find both versions of Filmora software, i-e., Windows and Mac versions with the latest version.
After that, you can proceed by going to the File > Record Media and then select your desired format of screen recording from the list as shown here. It’ll take you to the user-friendly UI of Filmora where you can pick up the recording feature on-spot as shown in the figure below:
Step 2: Customize the Gameplay
After the customizations to the Minecraft recording including webcam, microphone, gameplay sound and much more, simply hit the Record button and it shall start recording your customized screen right away. Now as you’re done with the recording, you can hit the Stop button as same as the process how you’ve started the recording. Inside the editor, you can edit the content with full features as Filmora gives you numerous editing tools to utilize.
Step 3: Export or Share Recording
Now, after the successful editing with Filmora, when you’ve everything summed up, you can then save your edited Minecraft recordings right from there. you have a lot of choices to select while sending out your screen catching and webcam chronicles after you’re finished with the altering part. For that, hit the Export button at the top-right corner of the product interface as follow:
The best part with this Minecraft recorder is that Wondershare Filmora also allows you to upload your recorded and edited content directly to YouTube or some other renowned platform, you can without much of a stretch select your desired platform to share from there.
Way 2. Record Minecraft with OBS
Minecraft is still extremely well known today as we can see the Minecraft recordings and content still profoundly apparent on YouTube, Vimeo, Twitch, and other game networks. OBS Studio is an open-source screen recorder that everybody can use free of charge. It is a confided in name due to its consistent recording abilities. It has many screen channels that can be utilized to add impacts to the video you are recording. Also, you can utilize the “Studio Mode” of the apparatus to communicate your Minecraft game on the web. The sound blender of the apparatus is additionally something that individuals love about OBS Studio.
Step 1. Launch OBS Studio
Get the OBS screen recorder apparatus introduced on your framework and afterwards dispatch it. Characterize hotkeys for a simple beginning and stop usefulness.
Step 2. Create Scenes for Gameplay
To add text and pictures to your accounts, right-click on the source region and select the game catch choice. Presently open Minecraft and afterwards pick it from the application list. Begin playing in full-screen mode.
Step 3. Start/Stop Recording
Click the “Record” button to begin recording and snap it again to stop the recording system.


Way 3. Record Minecraft with Bandicam
Another program that can fill in as a Minecraft screen recorder is Bandicam. It is broadly utilized as a screen recorder and an interactivity recorder. It permits clients to record video arrangements when playing the game. Generally, sounds from games can be recorded flawlessly without misfortune. Plus, AVI and MP4 formats are upheld when you distribute the record. There is likewise a possibility for catching a picture on the screen, which permits you to continue invigorating minutes during playing the game with top calibre.
The most effective method to Record on Minecraft with Bandicam. Bandicam is fit for changing the fps of recording. Be that as it may, when beginning recording the game, there will be slacks showing up in the video which will impact the impact of the video.
Step 1. Customize Bandicam Recording
Pick the “Game Recording” mode to tune to an excellent video. Run Minecraft on your gadget. Adapt for outline rating utilizing the “FPS” tab shown on your gadget screen.
Step 2. Start Recording
Hit the “F12” button on the console or press the “Record” button to start the recording system. During recording, the numbers shown in green shading will become red.
Step 3. Stop and Save Gameplay Recording
To quit recording, hit the “F12” button on the console again or click again on the “Record” button.
Way 4. Record Minecraft with QuickTime Player
QuickTime Player is a media player that is equipped for taking care of different organizations of computerized video, picture, sound, and so on In the interim, it can likewise be utilized to screen record with sound on HP PC. Utilizing QuickTime Player to record your screen is straightforward. With it, you can make a recording of your whole screen or select only a part of it, and afterwards save the recorded document on your PC or offer it on YouTube.
Step 1: Launch QuickTime and Minecraft
Dispatch QuickTime Player on your Mac (The most straightforward method for observing it is to look with Spotlight). Click on File from the App menu on the left half of the screen. Select New Screen Recording starting from the drop menu.
Step 2: Customize and Start Recording
Click on the caret close to the red button to choose your sound choices. To record your whole screen, click anyplace on your screen, then, at that point, click the brief. To record a part of the screen, drag your cursor from one corner of the segment to the next, and afterwards, click record when incited.
Step 3: Stop Recording
Click the Stop button in the Menu bar on the left half of your screen when you’re finished recording.
Way 5. Record Minecraft with FBX Game Recorder
FBX game recorder is a basic, moderate, yet effective Minecraft video recorder. It is ideal for recording games since it can likewise remember a webcam window for the recording. FBX game recorder includes an “Image in-Picture” innovation. It synchronizes your webcam window into the Minecraft game recording with practically no slack. Also, it can consequently pack the record estimate and improve them so you can save extra room. This is conceivable on account of the capacity that can alter the video nature of the recording.
Step 1: Launch FBX and Minecraft
Dispatch FBX and go to the Capture segment of the Settings tab. Select Game catch mode. Start Minecraft. Later a couple of seconds, you will see FBX’s overlay show up on the screen.
Step 2: Start Recording
At the point when you are prepared to start recording, press the Start/Stop Recording hotkey. Of course, this will be Ctrl + F12. The recording pointer will show up in the overlay. You are presently recording!
Step 3: Stop Recording
At the point when you need to quit recording, press the Start/Stop Recording hotkey again to save your video. The overlay will trade to a ‘Saved’ message for a couple of seconds. When it trades back to the typical overlay, you are prepared to record once more.
Way 6. Record Minecraft with Windows Game Bar
The last instrument that you can use to record Minecraft is a Windows underlying apparatus called Game Bar. This is the authority Minecraft screen catch apparatus of Xbox control centre and Windows gadgets. The beneficial thing about having this apparatus is that it accompanies your framework, and you can get to it immediately. Besides that, it upholds recording the screen and amplifier together. You can likewise change the volume of the sound from the “Sound” tab. In any case, the Game Bar is somewhat poor. It has a base framework necessary for the processor and formats equipment on the PC. These necessities should be met first. In any case, the screen recording component will be incapacitated.
Step 1. Press “Windows Key + G” to open the Game Bar while playing a game. It will spring up over the game you’re playing.
Step 2. Click the red “Record” button. You can see a clock at the upper right corner of your window while it’s recording.
Step 3. Raise the Game Bar and snap the red “Stop” button to quit recording the game. You can likewise begin and stop the recording with “Windows Key + Alt + R” hotkeys. Windows saves all recordings you record to your record as MP4 documents. Each labelled with the game’s name and the time you caught them.

Conclusion
Gameplay recording, for instance, Minecraft should be possible effectively utilizing the appropriate apparatuses fundamental for screen recording. Additionally, the speed of the screen recording during gameplay can be affected by the actual PC. Assuming you need your gaming video to be perceived and approbated by the general population, screen record Minecraft game video would be a decent beginning Step for you. Or then again you simply need to keep the video to retain the time you spent on this work of art. By then, at that point, the Filmora Screen Recorder is your best sidekick that assists you with screening catch and recording the Minecraft game video.
- Title: [New] In 2024, Capturing Every Aspect of Minecraft Play
- Author: Vivienne Westwood
- Created at : 2024-07-20 01:29:12
- Updated at : 2024-07-21 01:29:12
- Link: https://video-capture.techidaily.com/new-in-2024-capturing-every-aspect-of-minecraft-play/
- License: This work is licensed under CC BY-NC-SA 4.0.