![[New] A Compreehensive Look at iTunes Video Capture](https://thmb.techidaily.com/1b3acf6f92837e9104aa399e6aa268354b94b6b827af6bb095b68b19082ca48f.png)
[New] A Compreehensive Look at iTunes Video Capture
A Compreehensive Look at iTunes Video Capture
Itune is a computer program from apple which allows you to watch and play different music videos and audio. It organizes the musical audio and video files by copying them to Apple products such as iPad, iPod, and iPhone. Well, most of us modern generation want to know of other ways to record iTunes videos through different ways. In this context, there are a lot of applications that claim to record iTunes videos but it’s not recommended to opt for one before knowing from a source based on research.
Coming to the crux, you don’t have to worry about going to the internet and finding one to know how you can record videos from iTunes but through this article, we will let you know every step that you should utilize to record videos from iTunes. So before wasting further of your precious time let’s straight dive into different ways of recording or screen recording iTunes videos.
Since there are a lot of ways to screen record iTunes videos but here in this article, we suggested some of the most common and effective ways to record iTunes videos. The suggestion of this application is based on thorough research so you don’t have to worry about any problems later on.
.png) Kanto Player Professional
Kanto Player ProfessionalWay 1. Record iTunes Videos with Filmora
Wondershare Filmora is one of the most popular video editing software out there on the internet. It comes with genuine and most powerful tools. One of its tools and capability is to record screens using its powerful screen recorder. It doesn’t only record the screen display but the audio and as well as the webcam if you are a streamer or gamer.
The wondershare screen recorder lets you choose a customizable area to capture from the display. Moreover, you can choose other options like full screen but the customizable section is more preferred since we are more concerned about copying a particular area from the iTunes videos playing area. In this way, we will record a considerable amount of our own choice of video through filmora to store it locally on our computer. So let’s move toward the step by the stepwise procedure of doing it so.
For Win 7 or later (64-bit)
For macOS 10.12 or later
Step 1. So first and foremost job is to have Filmora latest version on your computer. You can either download it from its official website or take it from your friends. Let’s say you have the Filmora installed on your PC now it’s time to launch it. So go to the windows search bar and type in Filmora. You will see Filmora, just click on it and you will see it pop a new screen as shown in the figure below.
 ZoneAlarm Pro Antivirus + Firewall NextGen

Step 2. Once you see this screen shown in the figure above click on the PC screen marked in red. After that, you will see Filmora launched into a new window to start your screen recording for iTunes.

Step 3. Once you see this screen you can now select full screen to record on your pc or select custom. So to start recoring from itunes just go to the iTune program and play a video as showin in the figure.
Step 4. Now to capture the video check for the resolution, audio, and microphone settings. Moreover, check for saving to location, fps, and quality of the video as shown in the figure below.

Step 5. Once you are done with that just click custom and select a range of areas to capture, you can move around the selection area of your own choice. After that click on the start recording button to start recording. Once you are done with the recording you can pause or stop it from its small another video running in the background as shown below. Click stop and it will be saved in the Filmora video section.
Step 6. Now you can import the video by applying effects to it or leaving it in its original form. Since we are recording video from iTunes we will stick to the video saving part only so now you can access your stored video from the location that has been set in the settings of the capturing menu.

Way 2. How to Record iTunes with QuickTime
QuickTime is free software from Apple to handle multimedia in the form of different formats including digital video, picture, sound panoramic, images, and much more. However, this application comes again with the amazing capability of recording your computer screen.
The application is available on windows and is specifically designed for mac systems. The supported version in windows 7 and Vista, might not work well on other versions. So let’s begin with how you can use this application for recording videos on iTunes using Mac.
Step 1. So first of all install the application by downloading it from its official website. After that launch application and you will see its windows open as shown.
Step 2. You will variety of options in the menu of the application such as movie recording or only audio recording. To record any video on iTunes, just go to the iTunes website or open its program. Once you have done that all you need to do is turn on the recording.
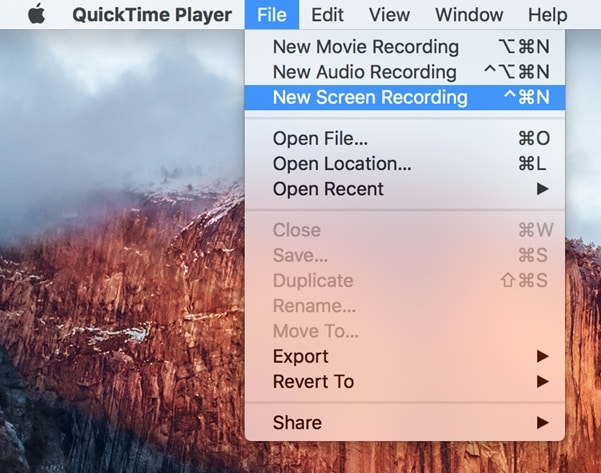
Step 3. Click screen recording and you will see its recording on the above menu and a new window will appear as shown below.
Step 4. To start recording click on the red button and you will see a new pop-up asking you to record the full screen or part of the screen. Choose the audio settings enabled to capture the audio along with the video too. You can also enable the mouse clicks to be visible in the recording, but for now we will not stick to it since we will copy any video without having any unwanted effects.
Step 5. Since we are interested in only a part of the screen on copying or recording screen from iTunes so drag around the video screen and it will start recording that particular part as shown in the figure. The other options like recording on the full screen are also available. That can also be done just by clicking on the screen and it will record in full screen.
Step 6. Once you are done with recording click on the stop icon on the top bar of your screen and you will see it is recorded into a video shown on your screen. Now it’s time to save it properly on a specific location.
Step 7. For that, you just need to go to “File” and click save to a specified location on your computer. The location can be chosen with the new window you will see to select a folder for your recording to be saved. So this is how you can record any video on iTunes just by selecting a part of the area on the screen.

Way 3. Use Bandicam to Record iTunes
Bandicam is another best and free video screen and computer screen recorder along with recording the audio, microphone, and any other source connected with a computer. You can also record your webcam footage along with the screen of your computer with bandicam.
Using bandicam for recording videos from iTunes is another perfect way to store its videos on the computer. All you have to do is to avail yourself of a new version of bandicam. You can do that by downloading it from its official site. So before wasting further of your let’s learn how can we utilize bandicam for our video capturing from iTunes.
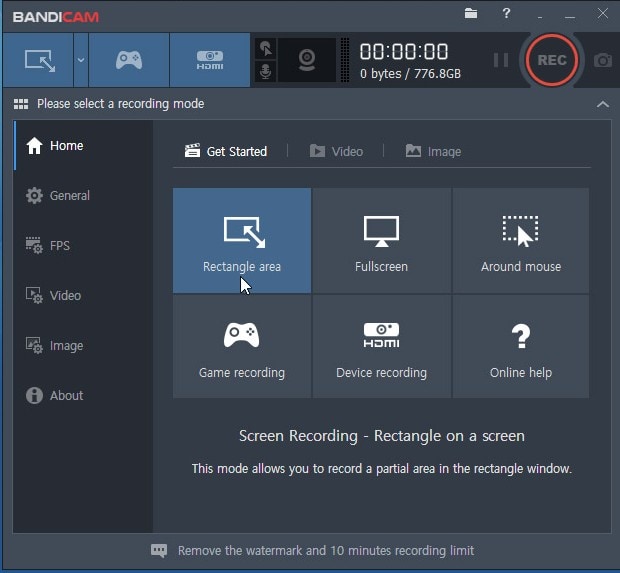
Step 1. First of all, you have to is launching the bandicam. You can either do it by searching the windows bar for bandicam. Just type in the bandicam and you will see it on your computer and click to launch it. Once it’s launched you will see this window shown below.
Step 2. You will see a lot of different screen options. Such as you can choose rectangle area selection to select in rectangle shape or full screen. Since we are going to capture any video from iTunes, we will prefer the rectangle selection area. So go to your iTunes page and open a video you want to record as shown. Before going for the selection of areas to capture make sure that you have enabled all the options such as the audio source of the systems.
Step 3. Once you have selected the area of your interest it’s time to start your recording. You can do that by clicking on start recording in the top bar of the recording area as shown below. The recording will get started. The recording will be only limited to the area that you have selected in the application. In other words, you can copy the particular video from iTunes.
Step 4. To stop recording click on the red stop icon and it will stop recording. You can do this for any video on iTunes. All you have to do is visit the video, select a recording area through the bandicam features, and in the end start recording. To stop recording just click the red icon as shown above and it will stop recording.
Step 5. For accessing the folder containing your output video, just click on the folder in the above picture. When you click on it it will open up the videos you just recorded from iTunes. This method is only limited to iTunes but there are a lot of other platforms out there from which you can record your liking of video.
Conclusion
These were the most common ways to record videos on the iTunes platform. Although, there are a lot of different other methods too the most efficient and effective ways that we placed at your disposal were these. You can blindly go to the internet and start searching for any other methods but it requires some time to do this searching. Therefore, for your easiness, all you have to do is go through this article and you will be able to capture any videos on iTunes. I hope this article would have greatly helped you and will help others who are quick to know about the readymade applications to record videos from iTunes.
For macOS 10.12 or later
Step 1. So first and foremost job is to have Filmora latest version on your computer. You can either download it from its official website or take it from your friends. Let’s say you have the Filmora installed on your PC now it’s time to launch it. So go to the windows search bar and type in Filmora. You will see Filmora, just click on it and you will see it pop a new screen as shown in the figure below.
 Power Tools add-on for Google Sheets, 12-month subscription
Step 2. Once you see this screen shown in the figure above click on the PC screen marked in red. After that, you will see Filmora launched into a new window to start your screen recording for iTunes.
Step 3. Once you see this screen you can now select full screen to record on your pc or select custom. So to start recoring from itunes just go to the iTune program and play a video as showin in the figure.
Step 4. Now to capture the video check for the resolution, audio, and microphone settings. Moreover, check for saving to location, fps, and quality of the video as shown in the figure below.
 vMix Basic HD - Software based live production. vMix Basic HD includes 4 inputs, 3 cameras, streaming, recording, playlist.
Step 5. Once you are done with that just click custom and select a range of areas to capture, you can move around the selection area of your own choice. After that click on the start recording button to start recording. Once you are done with the recording you can pause or stop it from its small another video running in the background as shown below. Click stop and it will be saved in the Filmora video section.
Step 6. Now you can import the video by applying effects to it or leaving it in its original form. Since we are recording video from iTunes we will stick to the video saving part only so now you can access your stored video from the location that has been set in the settings of the capturing menu.
Way 2. How to Record iTunes with QuickTime
QuickTime is free software from Apple to handle multimedia in the form of different formats including digital video, picture, sound panoramic, images, and much more. However, this application comes again with the amazing capability of recording your computer screen.
The application is available on windows and is specifically designed for mac systems. The supported version in windows 7 and Vista, might not work well on other versions. So let’s begin with how you can use this application for recording videos on iTunes using Mac.
Step 1. So first of all install the application by downloading it from its official website. After that launch application and you will see its windows open as shown.
Step 2. You will variety of options in the menu of the application such as movie recording or only audio recording. To record any video on iTunes, just go to the iTunes website or open its program. Once you have done that all you need to do is turn on the recording.
Step 3. Click screen recording and you will see its recording on the above menu and a new window will appear as shown below.
Step 4. To start recording click on the red button and you will see a new pop-up asking you to record the full screen or part of the screen. Choose the audio settings enabled to capture the audio along with the video too. You can also enable the mouse clicks to be visible in the recording, but for now we will not stick to it since we will copy any video without having any unwanted effects.
Step 5. Since we are interested in only a part of the screen on copying or recording screen from iTunes so drag around the video screen and it will start recording that particular part as shown in the figure. The other options like recording on the full screen are also available. That can also be done just by clicking on the screen and it will record in full screen.
Step 6. Once you are done with recording click on the stop icon on the top bar of your screen and you will see it is recorded into a video shown on your screen. Now it’s time to save it properly on a specific location.
Step 7. For that, you just need to go to “File” and click save to a specified location on your computer. The location can be chosen with the new window you will see to select a folder for your recording to be saved. So this is how you can record any video on iTunes just by selecting a part of the area on the screen.
Way 3. Use Bandicam to Record iTunes
Bandicam is another best and free video screen and computer screen recorder along with recording the audio, microphone, and any other source connected with a computer. You can also record your webcam footage along with the screen of your computer with bandicam.
Using bandicam for recording videos from iTunes is another perfect way to store its videos on the computer. All you have to do is to avail yourself of a new version of bandicam. You can do that by downloading it from its official site. So before wasting further of your let’s learn how can we utilize bandicam for our video capturing from iTunes.
Step 1. First of all, you have to is launching the bandicam. You can either do it by searching the windows bar for bandicam. Just type in the bandicam and you will see it on your computer and click to launch it. Once it’s launched you will see this window shown below.
Step 2. You will see a lot of different screen options. Such as you can choose rectangle area selection to select in rectangle shape or full screen. Since we are going to capture any video from iTunes, we will prefer the rectangle selection area. So go to your iTunes page and open a video you want to record as shown. Before going for the selection of areas to capture make sure that you have enabled all the options such as the audio source of the systems.
Step 3. Once you have selected the area of your interest it’s time to start your recording. You can do that by clicking on start recording in the top bar of the recording area as shown below. The recording will get started. The recording will be only limited to the area that you have selected in the application. In other words, you can copy the particular video from iTunes.
Step 4. To stop recording click on the red stop icon and it will stop recording. You can do this for any video on iTunes. All you have to do is visit the video, select a recording area through the bandicam features, and in the end start recording. To stop recording just click the red icon as shown above and it will stop recording.
Step 5. For accessing the folder containing your output video, just click on the folder in the above picture. When you click on it it will open up the videos you just recorded from iTunes. This method is only limited to iTunes but there are a lot of other platforms out there from which you can record your liking of video.
Conclusion
These were the most common ways to record videos on the iTunes platform. Although, there are a lot of different other methods too the most efficient and effective ways that we placed at your disposal were these. You can blindly go to the internet and start searching for any other methods but it requires some time to do this searching. Therefore, for your easiness, all you have to do is go through this article and you will be able to capture any videos on iTunes. I hope this article would have greatly helped you and will help others who are quick to know about the readymade applications to record videos from iTunes.
For macOS 10.12 or later
Step 1. So first and foremost job is to have Filmora latest version on your computer. You can either download it from its official website or take it from your friends. Let’s say you have the Filmora installed on your PC now it’s time to launch it. So go to the windows search bar and type in Filmora. You will see Filmora, just click on it and you will see it pop a new screen as shown in the figure below.
 Video Converter Factory Pro
Step 2. Once you see this screen shown in the figure above click on the PC screen marked in red. After that, you will see Filmora launched into a new window to start your screen recording for iTunes.

Step 3. Once you see this screen you can now select full screen to record on your pc or select custom. So to start recoring from itunes just go to the iTune program and play a video as showin in the figure.
Step 4. Now to capture the video check for the resolution, audio, and microphone settings. Moreover, check for saving to location, fps, and quality of the video as shown in the figure below.
Step 5. Once you are done with that just click custom and select a range of areas to capture, you can move around the selection area of your own choice. After that click on the start recording button to start recording. Once you are done with the recording you can pause or stop it from its small another video running in the background as shown below. Click stop and it will be saved in the Filmora video section.
Step 6. Now you can import the video by applying effects to it or leaving it in its original form. Since we are recording video from iTunes we will stick to the video saving part only so now you can access your stored video from the location that has been set in the settings of the capturing menu.
Way 2. How to Record iTunes with QuickTime
QuickTime is free software from Apple to handle multimedia in the form of different formats including digital video, picture, sound panoramic, images, and much more. However, this application comes again with the amazing capability of recording your computer screen.
The application is available on windows and is specifically designed for mac systems. The supported version in windows 7 and Vista, might not work well on other versions. So let’s begin with how you can use this application for recording videos on iTunes using Mac.
Step 1. So first of all install the application by downloading it from its official website. After that launch application and you will see its windows open as shown.
Step 2. You will variety of options in the menu of the application such as movie recording or only audio recording. To record any video on iTunes, just go to the iTunes website or open its program. Once you have done that all you need to do is turn on the recording.
Step 3. Click screen recording and you will see its recording on the above menu and a new window will appear as shown below.
Step 4. To start recording click on the red button and you will see a new pop-up asking you to record the full screen or part of the screen. Choose the audio settings enabled to capture the audio along with the video too. You can also enable the mouse clicks to be visible in the recording, but for now we will not stick to it since we will copy any video without having any unwanted effects.
Step 5. Since we are interested in only a part of the screen on copying or recording screen from iTunes so drag around the video screen and it will start recording that particular part as shown in the figure. The other options like recording on the full screen are also available. That can also be done just by clicking on the screen and it will record in full screen.
Step 6. Once you are done with recording click on the stop icon on the top bar of your screen and you will see it is recorded into a video shown on your screen. Now it’s time to save it properly on a specific location.
Step 7. For that, you just need to go to “File” and click save to a specified location on your computer. The location can be chosen with the new window you will see to select a folder for your recording to be saved. So this is how you can record any video on iTunes just by selecting a part of the area on the screen.
Way 3. Use Bandicam to Record iTunes
Bandicam is another best and free video screen and computer screen recorder along with recording the audio, microphone, and any other source connected with a computer. You can also record your webcam footage along with the screen of your computer with bandicam.
Using bandicam for recording videos from iTunes is another perfect way to store its videos on the computer. All you have to do is to avail yourself of a new version of bandicam. You can do that by downloading it from its official site. So before wasting further of your let’s learn how can we utilize bandicam for our video capturing from iTunes.
Step 1. First of all, you have to is launching the bandicam. You can either do it by searching the windows bar for bandicam. Just type in the bandicam and you will see it on your computer and click to launch it. Once it’s launched you will see this window shown below.
Step 2. You will see a lot of different screen options. Such as you can choose rectangle area selection to select in rectangle shape or full screen. Since we are going to capture any video from iTunes, we will prefer the rectangle selection area. So go to your iTunes page and open a video you want to record as shown. Before going for the selection of areas to capture make sure that you have enabled all the options such as the audio source of the systems.
Step 3. Once you have selected the area of your interest it’s time to start your recording. You can do that by clicking on start recording in the top bar of the recording area as shown below. The recording will get started. The recording will be only limited to the area that you have selected in the application. In other words, you can copy the particular video from iTunes.
Step 4. To stop recording click on the red stop icon and it will stop recording. You can do this for any video on iTunes. All you have to do is visit the video, select a recording area through the bandicam features, and in the end start recording. To stop recording just click the red icon as shown above and it will stop recording.
Step 5. For accessing the folder containing your output video, just click on the folder in the above picture. When you click on it it will open up the videos you just recorded from iTunes. This method is only limited to iTunes but there are a lot of other platforms out there from which you can record your liking of video.

Conclusion
These were the most common ways to record videos on the iTunes platform. Although, there are a lot of different other methods too the most efficient and effective ways that we placed at your disposal were these. You can blindly go to the internet and start searching for any other methods but it requires some time to do this searching. Therefore, for your easiness, all you have to do is go through this article and you will be able to capture any videos on iTunes. I hope this article would have greatly helped you and will help others who are quick to know about the readymade applications to record videos from iTunes.
For macOS 10.12 or later
Step 1. So first and foremost job is to have Filmora latest version on your computer. You can either download it from its official website or take it from your friends. Let’s say you have the Filmora installed on your PC now it’s time to launch it. So go to the windows search bar and type in Filmora. You will see Filmora, just click on it and you will see it pop a new screen as shown in the figure below.
Step 2. Once you see this screen shown in the figure above click on the PC screen marked in red. After that, you will see Filmora launched into a new window to start your screen recording for iTunes.
Step 3. Once you see this screen you can now select full screen to record on your pc or select custom. So to start recoring from itunes just go to the iTune program and play a video as showin in the figure.
Step 4. Now to capture the video check for the resolution, audio, and microphone settings. Moreover, check for saving to location, fps, and quality of the video as shown in the figure below.

Step 5. Once you are done with that just click custom and select a range of areas to capture, you can move around the selection area of your own choice. After that click on the start recording button to start recording. Once you are done with the recording you can pause or stop it from its small another video running in the background as shown below. Click stop and it will be saved in the Filmora video section.
Step 6. Now you can import the video by applying effects to it or leaving it in its original form. Since we are recording video from iTunes we will stick to the video saving part only so now you can access your stored video from the location that has been set in the settings of the capturing menu.
Way 2. How to Record iTunes with QuickTime
QuickTime is free software from Apple to handle multimedia in the form of different formats including digital video, picture, sound panoramic, images, and much more. However, this application comes again with the amazing capability of recording your computer screen.
The application is available on windows and is specifically designed for mac systems. The supported version in windows 7 and Vista, might not work well on other versions. So let’s begin with how you can use this application for recording videos on iTunes using Mac.
Step 1. So first of all install the application by downloading it from its official website. After that launch application and you will see its windows open as shown.
Step 2. You will variety of options in the menu of the application such as movie recording or only audio recording. To record any video on iTunes, just go to the iTunes website or open its program. Once you have done that all you need to do is turn on the recording.
Step 3. Click screen recording and you will see its recording on the above menu and a new window will appear as shown below.
Step 4. To start recording click on the red button and you will see a new pop-up asking you to record the full screen or part of the screen. Choose the audio settings enabled to capture the audio along with the video too. You can also enable the mouse clicks to be visible in the recording, but for now we will not stick to it since we will copy any video without having any unwanted effects.
Step 5. Since we are interested in only a part of the screen on copying or recording screen from iTunes so drag around the video screen and it will start recording that particular part as shown in the figure. The other options like recording on the full screen are also available. That can also be done just by clicking on the screen and it will record in full screen.
Step 6. Once you are done with recording click on the stop icon on the top bar of your screen and you will see it is recorded into a video shown on your screen. Now it’s time to save it properly on a specific location.
Step 7. For that, you just need to go to “File” and click save to a specified location on your computer. The location can be chosen with the new window you will see to select a folder for your recording to be saved. So this is how you can record any video on iTunes just by selecting a part of the area on the screen.
Way 3. Use Bandicam to Record iTunes
Bandicam is another best and free video screen and computer screen recorder along with recording the audio, microphone, and any other source connected with a computer. You can also record your webcam footage along with the screen of your computer with bandicam.
Using bandicam for recording videos from iTunes is another perfect way to store its videos on the computer. All you have to do is to avail yourself of a new version of bandicam. You can do that by downloading it from its official site. So before wasting further of your let’s learn how can we utilize bandicam for our video capturing from iTunes.
Step 1. First of all, you have to is launching the bandicam. You can either do it by searching the windows bar for bandicam. Just type in the bandicam and you will see it on your computer and click to launch it. Once it’s launched you will see this window shown below.
Step 2. You will see a lot of different screen options. Such as you can choose rectangle area selection to select in rectangle shape or full screen. Since we are going to capture any video from iTunes, we will prefer the rectangle selection area. So go to your iTunes page and open a video you want to record as shown. Before going for the selection of areas to capture make sure that you have enabled all the options such as the audio source of the systems.
Step 3. Once you have selected the area of your interest it’s time to start your recording. You can do that by clicking on start recording in the top bar of the recording area as shown below. The recording will get started. The recording will be only limited to the area that you have selected in the application. In other words, you can copy the particular video from iTunes.
Step 4. To stop recording click on the red stop icon and it will stop recording. You can do this for any video on iTunes. All you have to do is visit the video, select a recording area through the bandicam features, and in the end start recording. To stop recording just click the red icon as shown above and it will stop recording.
Step 5. For accessing the folder containing your output video, just click on the folder in the above picture. When you click on it it will open up the videos you just recorded from iTunes. This method is only limited to iTunes but there are a lot of other platforms out there from which you can record your liking of video.
Conclusion
These were the most common ways to record videos on the iTunes platform. Although, there are a lot of different other methods too the most efficient and effective ways that we placed at your disposal were these. You can blindly go to the internet and start searching for any other methods but it requires some time to do this searching. Therefore, for your easiness, all you have to do is go through this article and you will be able to capture any videos on iTunes. I hope this article would have greatly helped you and will help others who are quick to know about the readymade applications to record videos from iTunes.
- Title: [New] A Compreehensive Look at iTunes Video Capture
- Author: Vivienne Westwood
- Created at : 2024-07-20 02:23:29
- Updated at : 2024-07-21 02:23:29
- Link: https://video-capture.techidaily.com/new-a-compreehensive-look-at-itunes-video-capture/
- License: This work is licensed under CC BY-NC-SA 4.0.