
Kazam Screen Recorder Features| Guide| Review for 2024
Kazam Screen Recorder Features| Guide| Review
Assuming that you have as of late moved to Linux and are looking for screen recorders, you are at the ideal locations. Introduced in 2010, the Kazam screen recorder project appeared to arrive at an impasse between mid-2012 and mid-2013. Blog notes on the task’s landing page propose that work on Kazam nearly went to a crushing stop since life and different activities disrupted everything for some time. Kazam is a screencasting and screen capture application that shows a lot of potentials, however, it isn’t yet completely reasonable for anything over close to home use. Screen-recording apparatuses are a stage or two past single-outline screen-catch applications. Kazam is currently accessible from the Ubuntu Universe vault.
Another choice is to get Kazam from Launchpad. This gives a lot more extensive scope of downloads for more seasoned forms and more up to date forms down the line that probably won’t be delivered through the vaults. Kazam fills the two roles and can record input from the PC’s amplifier just as from the speakers. You can record sound from any strong information gadget upheld by PulseAudio. Even though, it improves work with taking screen captures than recording extensive screen meetings. All things considered, it is exceptionally convenient to have an application that gives both movement and still-catch modes. The current update of the Kazam screen recorder is likewise accessible from the Synaptic Package Manager that takes care of various other Linux distros.
1. Features of Kazam Screen Recorder
Catching screen captures and recording activities are shown on a PC screen ordinarily are taken care of by isolated applications. For infrequent use, that might be fine for most Linux clients. Kazam ubuntu is a basic screen recording program that will catch the substance of your screen and record a video document that can be played by any video player that upholds VP8/WebM video design. Kazam will show a clock and after the clock hits 0, the recording begins. It records the substance of your work area and makes a video document that can be played in the vast majority of video players which upholds VP8 and WebM video design. While making a video of our work area we have a choice to catch sound from input gadgets like Speakers and Microphones.
- Stunning and straightforward GUI and can undoubtedly be coordinated with the most recent Unity, Gnome rendition.
- With Kazam ubuntu, two modes are accessible - Record Screen for example screencast and screen capture mode.
Choices to record: Full-screen desktop, any single window, any custom region on the work area - Sound likewise can be recorded when doing a screen cast from either work area speakers out or the amplifier.
- Stand by time can be set in seconds before recording begins also the ability to capture cursor
- Kazam ubuntu also gives you the choice to pick your redo outline rate for quality recording
- Encoding designs accessible for recorded document: VP8(WebM), RAW (AVI), HUFFYUV (AVI), Lossless JPEG (AVI)
- Automatic record putting something aside for both video and screen capture
2. Shortcuts for Kazam Ubuntu Screen Recording
Use console alternate ways. It’s the most effective way to appreciate Kazam. Utilizing console alternate ways is a lot simpler than you can suspect. Here is the rundown of hotkeys upheld by Kazam. You can do it with the menu choice too however that part gets recorded also. Enter console easy routes. Assuming that you are a capable screen caster you comprehend the significance of console alternate ways. There are countless occasions when we record our screen where we want to stop the screen for some time and resume once more.
- Start recording: WINDOWS KEY + CTRL + R
- Finish recording: WINDOWS KEY + CTRL + F
- Pause recording, press again to resume: WINDOWS KEY + CTRL + P
- For pausing and resuming the recording: WINDOWS + CTRL + P
- Quits recording: WINDOWS KEY + CTRL + Q
- Shows Kazam Ubuntu UI: WINDOWS + CONTROL + S
In addition to these, you can also use console alternative ways. It’s the most ideal way to kickstart Kazam screen recording. Utilizing console alternate routes is a lot simpler than you can suspect. Whatever you put forth a valiant effort, to take a look at the choices “Mouse cursor” and “Key presses and mouse clicks”. Along these lines, your mouse snaps, and key presses will be recorded/communicated. If not, your watchers will not have the option to see the cursor development.

3. How to Record Screen with Kazam
When utilizing Linux, Kazam is one of the most amazing screen recorders you can get. It’s a truly well-known device among the local area that accompanies strong capacities and hearty dependability. Assuming you’ve observed any Linux instructional exercise on YouTube or another stage, it’s exceptionally conceivable that the video was recorded with the assistance of Kazam. Kazam has procured colossal notoriety locally that the authority Ubuntu store has the current most recent stable adaptation (v1.4.5). Notwithstanding, for partaking in the most recent variant (v1.5.3), we need to utilize the Kazam PPA. V1.5.3 is close to as steady as the “steady” discharge.
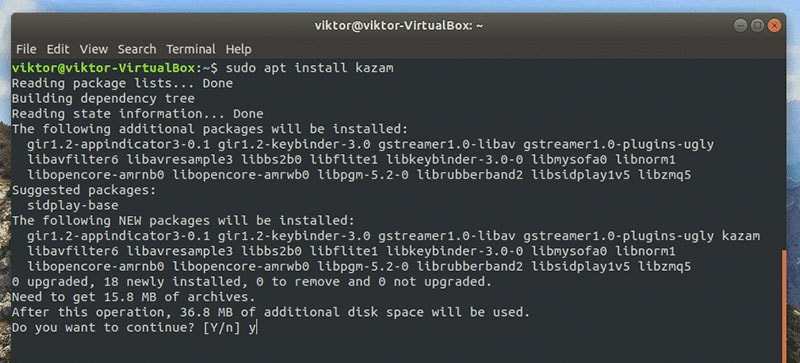
Step 1: Introduce Kazam in Ubuntu
The most recent adaptation of Kazam is 1.5.3 and I prescribe you to utilize this, in any case, if you don’t need highlights, for example, Webcam recording, live stream and so forth you can utilize form 1.4.5.
To introduce Kazam 1.4.5, run this order in the Ubuntu terminal.
sudo apt-get install Kazam
If you want to install version 1.5.3, you can use this PPA.
sudo add-apt-repository ppa:sylvain-pineau/Kazam
sudo apt-get update
sudo apt install Kazam
Step 2: Launch Kazam
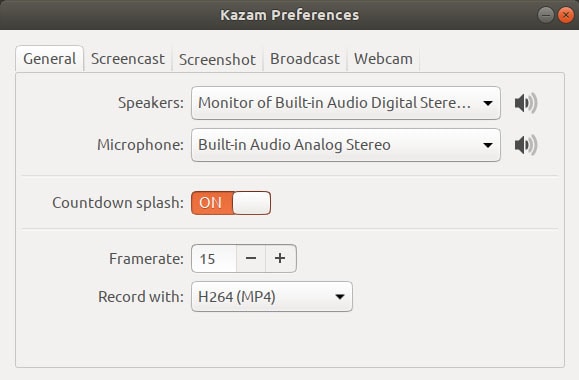
Whenever you have introduced Kazam, open it from the Application menu. You should see a screen like this one. Select the region which you need to record, you can utilize the full screen to record one screen and All screens to record every one of the screens. The Kazam utility permits you to make some customizations that you can make before recording your video.
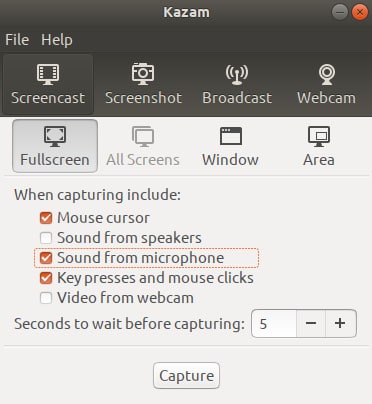
The below window also allows you to make numerous settings that you can redo as per your screen catching requirements. This window likewise allows you to set a period, in a flash, that this utility will take before recording your screen. This allows you to change to the specific screen, window, or region that you need to record.
Step 3. Start the Recording
Click on catch once you are prepared and it will show you a commencement like this. Ensure that you generally “stand by” enough before the catching starts. The default timing is 5 seconds. This permits you to get ready for the recording. At the point when the catching starts, it’ll sprinkle the excess seconds on the screen. Kazam will begin recording when the counter arrives at 0. Do anything you desire for recording. You’ll see the Kazam button at the top strip.
Step 4. Save the Recording
After commencement moves past, your recording will start. You should see a red camera symbol flickering at the highest point of the menu bar. Assuming you decide to complete the recording, it will give you the choice to “Save for Later”. If you have a video supervisor introduced in Linux, you can likewise begin altering the recording starting here.
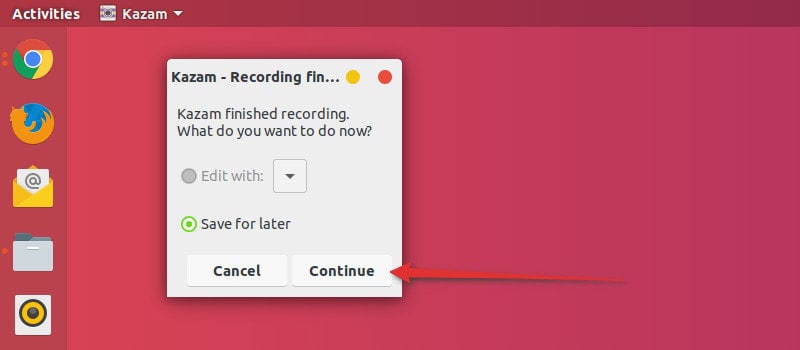
Whenever you are finished with the recording, press Windows key + CTRL + F to complete the process of recording or you can explore through the menu and Snap-On Finish recording.
4. Our Take on Kazam Ubuntu Recorder
Not at all like most screen recording programs for Linux, Kazam is amazing in its altering/trading choices (in a perfect, decent graphical UI), works with a norm, simple to-alter design, however, it isn’t without its disadvantages. Kazam allows you to record in different document designs (WEBM, AVI, MP4 and others). For staying away from the capacity issue while recording, the most ideal choice is the MP4. I additionally unequivocally suggest staying away from the RAW (AVI) design (except if you’re completely mindful of what you’re doing) as even the recording several minutes can create GBs of recorded information. There is additionally another choice present for taking screen captures in Kazam. At the point when you start screen recording,
The main serious issue with Kazam is the absence of help for recording through a webcam. Even though, in case you simply need to utilize Kazam for catching screens and taking screen captures, it is the best decision for fledglings. Kazam is an extraordinary screen recorder that is extremely simple to learn. Kazam is genuinely a monster as far as elements and effortlessness. It offers the most exquisite method of recording for any Linux distro. Notwithstanding not being refreshed for some time, Kazam manages the land. Kazam additionally upholds various video yield designs. Recording sound from a solid source is one more extraordinary fundamental extra in Kazam. It gives an all-around planned and simple to utilize interface for catching screen projects and screen captures. It can record work area video and numerous sound transfers at the same time with command over sound levels and the screen district being caught.
Filmora Screen Recorder and Editor
Record computer screen and webcam
Capture system and microphone audio
Customize target recording area
Edit videos with thousands of effects and tools
Final Words
Work area screen recording is required for various purposes. Some of them incorporate gaming meetings in real-time, video instructional exercises and so forth We’ve currently seen Kazam Free Screen-Recording App for Linux. You can utilize the Kazam hotkeys that help you in beginning, stopping, continuing, and completing the process of recording. With the most recent renditions of Kazam, you can even record your mouse snaps and console key presses. There is screen capture support too. These backings various video organizes and permits recording from mouthpiece or speaker.
2. Shortcuts for Kazam Ubuntu Screen Recording
Use console alternate ways. It’s the most effective way to appreciate Kazam. Utilizing console alternate ways is a lot simpler than you can suspect. Here is the rundown of hotkeys upheld by Kazam. You can do it with the menu choice too however that part gets recorded also. Enter console easy routes. Assuming that you are a capable screen caster you comprehend the significance of console alternate ways. There are countless occasions when we record our screen where we want to stop the screen for some time and resume once more.
- Start recording: WINDOWS KEY + CTRL + R
- Finish recording: WINDOWS KEY + CTRL + F
- Pause recording, press again to resume: WINDOWS KEY + CTRL + P
- For pausing and resuming the recording: WINDOWS + CTRL + P
- Quits recording: WINDOWS KEY + CTRL + Q
- Shows Kazam Ubuntu UI: WINDOWS + CONTROL + S
In addition to these, you can also use console alternative ways. It’s the most ideal way to kickstart Kazam screen recording. Utilizing console alternate routes is a lot simpler than you can suspect. Whatever you put forth a valiant effort, to take a look at the choices “Mouse cursor” and “Key presses and mouse clicks”. Along these lines, your mouse snaps, and key presses will be recorded/communicated. If not, your watchers will not have the option to see the cursor development.
3. How to Record Screen with Kazam
When utilizing Linux, Kazam is one of the most amazing screen recorders you can get. It’s a truly well-known device among the local area that accompanies strong capacities and hearty dependability. Assuming you’ve observed any Linux instructional exercise on YouTube or another stage, it’s exceptionally conceivable that the video was recorded with the assistance of Kazam. Kazam has procured colossal notoriety locally that the authority Ubuntu store has the current most recent stable adaptation (v1.4.5). Notwithstanding, for partaking in the most recent variant (v1.5.3), we need to utilize the Kazam PPA. V1.5.3 is close to as steady as the “steady” discharge.
Step 1: Introduce Kazam in Ubuntu
The most recent adaptation of Kazam is 1.5.3 and I prescribe you to utilize this, in any case, if you don’t need highlights, for example, Webcam recording, live stream and so forth you can utilize form 1.4.5.
To introduce Kazam 1.4.5, run this order in the Ubuntu terminal.
sudo apt-get install Kazam
If you want to install version 1.5.3, you can use this PPA.
sudo add-apt-repository ppa:sylvain-pineau/Kazam
sudo apt-get update
sudo apt install Kazam
 Glary Utilities PRO - Premium all-in-one utility to clean, speed up, maintain and protect your PC
Step 2: Launch Kazam
Whenever you have introduced Kazam, open it from the Application menu. You should see a screen like this one. Select the region which you need to record, you can utilize the full screen to record one screen and All screens to record every one of the screens. The Kazam utility permits you to make some customizations that you can make before recording your video.
 Lyric Video Creator Professional Version
The below window also allows you to make numerous settings that you can redo as per your screen catching requirements. This window likewise allows you to set a period, in a flash, that this utility will take before recording your screen. This allows you to change to the specific screen, window, or region that you need to record.
Step 3. Start the Recording
Click on catch once you are prepared and it will show you a commencement like this. Ensure that you generally “stand by” enough before the catching starts. The default timing is 5 seconds. This permits you to get ready for the recording. At the point when the catching starts, it’ll sprinkle the excess seconds on the screen. Kazam will begin recording when the counter arrives at 0. Do anything you desire for recording. You’ll see the Kazam button at the top strip.
 Easy and Safe Partition Software & Hard Disk Manager
Step 4. Save the Recording
After commencement moves past, your recording will start. You should see a red camera symbol flickering at the highest point of the menu bar. Assuming you decide to complete the recording, it will give you the choice to “Save for Later”. If you have a video supervisor introduced in Linux, you can likewise begin altering the recording starting here.
Whenever you are finished with the recording, press Windows key + CTRL + F to complete the process of recording or you can explore through the menu and Snap-On Finish recording.

WPS Office Premium ( File Recovery, Photo Scanning, Convert PDF)–Yearly
4. Our Take on Kazam Ubuntu Recorder
Not at all like most screen recording programs for Linux, Kazam is amazing in its altering/trading choices (in a perfect, decent graphical UI), works with a norm, simple to-alter design, however, it isn’t without its disadvantages. Kazam allows you to record in different document designs (WEBM, AVI, MP4 and others). For staying away from the capacity issue while recording, the most ideal choice is the MP4. I additionally unequivocally suggest staying away from the RAW (AVI) design (except if you’re completely mindful of what you’re doing) as even the recording several minutes can create GBs of recorded information. There is additionally another choice present for taking screen captures in Kazam. At the point when you start screen recording,
The main serious issue with Kazam is the absence of help for recording through a webcam. Even though, in case you simply need to utilize Kazam for catching screens and taking screen captures, it is the best decision for fledglings. Kazam is an extraordinary screen recorder that is extremely simple to learn. Kazam is genuinely a monster as far as elements and effortlessness. It offers the most exquisite method of recording for any Linux distro. Notwithstanding not being refreshed for some time, Kazam manages the land. Kazam additionally upholds various video yield designs. Recording sound from a solid source is one more extraordinary fundamental extra in Kazam. It gives an all-around planned and simple to utilize interface for catching screen projects and screen captures. It can record work area video and numerous sound transfers at the same time with command over sound levels and the screen district being caught.
Filmora Screen Recorder and Editor
Record computer screen and webcam
Capture system and microphone audio
Customize target recording area
Edit videos with thousands of effects and tools
Final Words
Work area screen recording is required for various purposes. Some of them incorporate gaming meetings in real-time, video instructional exercises and so forth We’ve currently seen Kazam Free Screen-Recording App for Linux. You can utilize the Kazam hotkeys that help you in beginning, stopping, continuing, and completing the process of recording. With the most recent renditions of Kazam, you can even record your mouse snaps and console key presses. There is screen capture support too. These backings various video organizes and permits recording from mouthpiece or speaker.
2. Shortcuts for Kazam Ubuntu Screen Recording
Use console alternate ways. It’s the most effective way to appreciate Kazam. Utilizing console alternate ways is a lot simpler than you can suspect. Here is the rundown of hotkeys upheld by Kazam. You can do it with the menu choice too however that part gets recorded also. Enter console easy routes. Assuming that you are a capable screen caster you comprehend the significance of console alternate ways. There are countless occasions when we record our screen where we want to stop the screen for some time and resume once more.
- Start recording: WINDOWS KEY + CTRL + R
- Finish recording: WINDOWS KEY + CTRL + F
- Pause recording, press again to resume: WINDOWS KEY + CTRL + P
- For pausing and resuming the recording: WINDOWS + CTRL + P
- Quits recording: WINDOWS KEY + CTRL + Q
- Shows Kazam Ubuntu UI: WINDOWS + CONTROL + S
In addition to these, you can also use console alternative ways. It’s the most ideal way to kickstart Kazam screen recording. Utilizing console alternate routes is a lot simpler than you can suspect. Whatever you put forth a valiant effort, to take a look at the choices “Mouse cursor” and “Key presses and mouse clicks”. Along these lines, your mouse snaps, and key presses will be recorded/communicated. If not, your watchers will not have the option to see the cursor development.
3. How to Record Screen with Kazam
When utilizing Linux, Kazam is one of the most amazing screen recorders you can get. It’s a truly well-known device among the local area that accompanies strong capacities and hearty dependability. Assuming you’ve observed any Linux instructional exercise on YouTube or another stage, it’s exceptionally conceivable that the video was recorded with the assistance of Kazam. Kazam has procured colossal notoriety locally that the authority Ubuntu store has the current most recent stable adaptation (v1.4.5). Notwithstanding, for partaking in the most recent variant (v1.5.3), we need to utilize the Kazam PPA. V1.5.3 is close to as steady as the “steady” discharge.
Step 1: Introduce Kazam in Ubuntu
The most recent adaptation of Kazam is 1.5.3 and I prescribe you to utilize this, in any case, if you don’t need highlights, for example, Webcam recording, live stream and so forth you can utilize form 1.4.5.
To introduce Kazam 1.4.5, run this order in the Ubuntu terminal.
sudo apt-get install Kazam
If you want to install version 1.5.3, you can use this PPA.
sudo add-apt-repository ppa:sylvain-pineau/Kazam
sudo apt-get update
sudo apt install Kazam
Step 2: Launch Kazam
Whenever you have introduced Kazam, open it from the Application menu. You should see a screen like this one. Select the region which you need to record, you can utilize the full screen to record one screen and All screens to record every one of the screens. The Kazam utility permits you to make some customizations that you can make before recording your video.
The below window also allows you to make numerous settings that you can redo as per your screen catching requirements. This window likewise allows you to set a period, in a flash, that this utility will take before recording your screen. This allows you to change to the specific screen, window, or region that you need to record.
Step 3. Start the Recording
Click on catch once you are prepared and it will show you a commencement like this. Ensure that you generally “stand by” enough before the catching starts. The default timing is 5 seconds. This permits you to get ready for the recording. At the point when the catching starts, it’ll sprinkle the excess seconds on the screen. Kazam will begin recording when the counter arrives at 0. Do anything you desire for recording. You’ll see the Kazam button at the top strip.
Step 4. Save the Recording
After commencement moves past, your recording will start. You should see a red camera symbol flickering at the highest point of the menu bar. Assuming you decide to complete the recording, it will give you the choice to “Save for Later”. If you have a video supervisor introduced in Linux, you can likewise begin altering the recording starting here.
Whenever you are finished with the recording, press Windows key + CTRL + F to complete the process of recording or you can explore through the menu and Snap-On Finish recording.

company, user or members of the same household. Action! - screen and game recorder</a>
4. Our Take on Kazam Ubuntu Recorder
Not at all like most screen recording programs for Linux, Kazam is amazing in its altering/trading choices (in a perfect, decent graphical UI), works with a norm, simple to-alter design, however, it isn’t without its disadvantages. Kazam allows you to record in different document designs (WEBM, AVI, MP4 and others). For staying away from the capacity issue while recording, the most ideal choice is the MP4. I additionally unequivocally suggest staying away from the RAW (AVI) design (except if you’re completely mindful of what you’re doing) as even the recording several minutes can create GBs of recorded information. There is additionally another choice present for taking screen captures in Kazam. At the point when you start screen recording,
The main serious issue with Kazam is the absence of help for recording through a webcam. Even though, in case you simply need to utilize Kazam for catching screens and taking screen captures, it is the best decision for fledglings. Kazam is an extraordinary screen recorder that is extremely simple to learn. Kazam is genuinely a monster as far as elements and effortlessness. It offers the most exquisite method of recording for any Linux distro. Notwithstanding not being refreshed for some time, Kazam manages the land. Kazam additionally upholds various video yield designs. Recording sound from a solid source is one more extraordinary fundamental extra in Kazam. It gives an all-around planned and simple to utilize interface for catching screen projects and screen captures. It can record work area video and numerous sound transfers at the same time with command over sound levels and the screen district being caught.
Filmora Screen Recorder and Editor
Record computer screen and webcam
Capture system and microphone audio
Customize target recording area
Edit videos with thousands of effects and tools
Final Words
Work area screen recording is required for various purposes. Some of them incorporate gaming meetings in real-time, video instructional exercises and so forth We’ve currently seen Kazam Free Screen-Recording App for Linux. You can utilize the Kazam hotkeys that help you in beginning, stopping, continuing, and completing the process of recording. With the most recent renditions of Kazam, you can even record your mouse snaps and console key presses. There is screen capture support too. These backings various video organizes and permits recording from mouthpiece or speaker.
2. Shortcuts for Kazam Ubuntu Screen Recording
Use console alternate ways. It’s the most effective way to appreciate Kazam. Utilizing console alternate ways is a lot simpler than you can suspect. Here is the rundown of hotkeys upheld by Kazam. You can do it with the menu choice too however that part gets recorded also. Enter console easy routes. Assuming that you are a capable screen caster you comprehend the significance of console alternate ways. There are countless occasions when we record our screen where we want to stop the screen for some time and resume once more.
- Start recording: WINDOWS KEY + CTRL + R
- Finish recording: WINDOWS KEY + CTRL + F
- Pause recording, press again to resume: WINDOWS KEY + CTRL + P
- For pausing and resuming the recording: WINDOWS + CTRL + P
- Quits recording: WINDOWS KEY + CTRL + Q
- Shows Kazam Ubuntu UI: WINDOWS + CONTROL + S
In addition to these, you can also use console alternative ways. It’s the most ideal way to kickstart Kazam screen recording. Utilizing console alternate routes is a lot simpler than you can suspect. Whatever you put forth a valiant effort, to take a look at the choices “Mouse cursor” and “Key presses and mouse clicks”. Along these lines, your mouse snaps, and key presses will be recorded/communicated. If not, your watchers will not have the option to see the cursor development.
 Project Manager - Asset Browser for 3Ds Max
3. How to Record Screen with Kazam
When utilizing Linux, Kazam is one of the most amazing screen recorders you can get. It’s a truly well-known device among the local area that accompanies strong capacities and hearty dependability. Assuming you’ve observed any Linux instructional exercise on YouTube or another stage, it’s exceptionally conceivable that the video was recorded with the assistance of Kazam. Kazam has procured colossal notoriety locally that the authority Ubuntu store has the current most recent stable adaptation (v1.4.5). Notwithstanding, for partaking in the most recent variant (v1.5.3), we need to utilize the Kazam PPA. V1.5.3 is close to as steady as the “steady” discharge.
Step 1: Introduce Kazam in Ubuntu
The most recent adaptation of Kazam is 1.5.3 and I prescribe you to utilize this, in any case, if you don’t need highlights, for example, Webcam recording, live stream and so forth you can utilize form 1.4.5.
To introduce Kazam 1.4.5, run this order in the Ubuntu terminal.
sudo apt-get install Kazam
If you want to install version 1.5.3, you can use this PPA.
sudo add-apt-repository ppa:sylvain-pineau/Kazam
sudo apt-get update
sudo apt install Kazam

Step 2: Launch Kazam
Whenever you have introduced Kazam, open it from the Application menu. You should see a screen like this one. Select the region which you need to record, you can utilize the full screen to record one screen and All screens to record every one of the screens. The Kazam utility permits you to make some customizations that you can make before recording your video.
The below window also allows you to make numerous settings that you can redo as per your screen catching requirements. This window likewise allows you to set a period, in a flash, that this utility will take before recording your screen. This allows you to change to the specific screen, window, or region that you need to record.
Step 3. Start the Recording
Click on catch once you are prepared and it will show you a commencement like this. Ensure that you generally “stand by” enough before the catching starts. The default timing is 5 seconds. This permits you to get ready for the recording. At the point when the catching starts, it’ll sprinkle the excess seconds on the screen. Kazam will begin recording when the counter arrives at 0. Do anything you desire for recording. You’ll see the Kazam button at the top strip.
Step 4. Save the Recording
After commencement moves past, your recording will start. You should see a red camera symbol flickering at the highest point of the menu bar. Assuming you decide to complete the recording, it will give you the choice to “Save for Later”. If you have a video supervisor introduced in Linux, you can likewise begin altering the recording starting here.
Whenever you are finished with the recording, press Windows key + CTRL + F to complete the process of recording or you can explore through the menu and Snap-On Finish recording.
4. Our Take on Kazam Ubuntu Recorder
Not at all like most screen recording programs for Linux, Kazam is amazing in its altering/trading choices (in a perfect, decent graphical UI), works with a norm, simple to-alter design, however, it isn’t without its disadvantages. Kazam allows you to record in different document designs (WEBM, AVI, MP4 and others). For staying away from the capacity issue while recording, the most ideal choice is the MP4. I additionally unequivocally suggest staying away from the RAW (AVI) design (except if you’re completely mindful of what you’re doing) as even the recording several minutes can create GBs of recorded information. There is additionally another choice present for taking screen captures in Kazam. At the point when you start screen recording,
The main serious issue with Kazam is the absence of help for recording through a webcam. Even though, in case you simply need to utilize Kazam for catching screens and taking screen captures, it is the best decision for fledglings. Kazam is an extraordinary screen recorder that is extremely simple to learn. Kazam is genuinely a monster as far as elements and effortlessness. It offers the most exquisite method of recording for any Linux distro. Notwithstanding not being refreshed for some time, Kazam manages the land. Kazam additionally upholds various video yield designs. Recording sound from a solid source is one more extraordinary fundamental extra in Kazam. It gives an all-around planned and simple to utilize interface for catching screen projects and screen captures. It can record work area video and numerous sound transfers at the same time with command over sound levels and the screen district being caught.
Filmora Screen Recorder and Editor
Record computer screen and webcam
Capture system and microphone audio
Customize target recording area
Edit videos with thousands of effects and tools
Final Words
Work area screen recording is required for various purposes. Some of them incorporate gaming meetings in real-time, video instructional exercises and so forth We’ve currently seen Kazam Free Screen-Recording App for Linux. You can utilize the Kazam hotkeys that help you in beginning, stopping, continuing, and completing the process of recording. With the most recent renditions of Kazam, you can even record your mouse snaps and console key presses. There is screen capture support too. These backings various video organizes and permits recording from mouthpiece or speaker.
- Title: Kazam Screen Recorder Features| Guide| Review for 2024
- Author: Vivienne Westwood
- Created at : 2024-07-20 03:04:52
- Updated at : 2024-07-21 03:04:52
- Link: https://video-capture.techidaily.com/kazam-screen-recorder-features-guide-review-for-2024/
- License: This work is licensed under CC BY-NC-SA 4.0.