
Elevating Gameplay with Optimized Ram Assignment for Minecraft for 2024
Elevating Gameplay with Optimized Ram Assignment for Minecraft
How to Allocate More Ram to Minecraft in 2024: 3 Methods

Ollie Mattison
Mar 27, 2024• Proven solutions
Minecraft is one of the best video games that allows its players to create their world, explore new places, build amazing things, and many more. Everyone loves to play Minecraft, especially after installing modes and textures into it. But adding such elements into Minecraft makes it heavy and it consumes a lot of memory of your PC. If your PC doesn’t have enough memory to be used by Minecraft, its frames may shutter, it may load slowly and sometimes it might even crash. But there is no need to worry about it. There are several ways available on the internet that show you how to allocate more ram to Minecraft. In this article, we are going to show the easiest way of how to allocate more ram to Minecraft with a step-by-step guide.
Before proceeding to the method of how to allocate more ram to Minecraft, keep in mind that this method will only work for “Minecraft: Java Edition”. It will not work on any other edition such as “Bedrock” which is also known as “Minecraft for Windows 10”. In Minecraft Bedrock Edition there is no built-in option to control how much ram to use.
To allocate more RAM to Minecraft, you have to change the setting of your Minecraft launcher app. It is the app that you use to launch and play Minecraft. There are several different launchers available on the internet that are used for Minecraft depending upon the mods you are using. In this article, we are going to cover three mostly used launcher
This article contains:
- 1. How to allocate more RAM to Minecraft using Default Launcher
- 2. How to allocate more RAM to Minecraft using CurseForge Launcher
- 3. How to allocate more RAM to Minecraft using ATLauncher


Filmora Game Recorder
Wondershare Filmora - Minecraft Game Recorder
• Record screen while game streaming without using spare RAM
• Personalize the crop the recording area to post the game record on any social media
• Cross-platform supported - (Windows, Mac, iOS, Android)
Start Game Recording Start Game Recording Start Game Recording Learn More >
How to allocate more RAM to Minecraft using Default Launcher
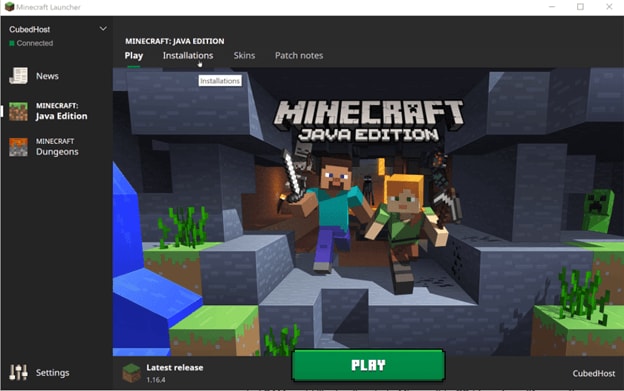
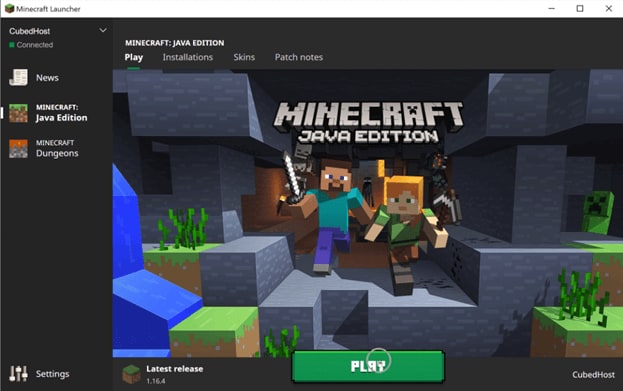
If you love to play Minecraft it is impossible that you would not have heard of Minecraft Launcher. It is the most common Minecraft Launcher that is used by so many players all around the world.
Step 01: Open Minecraft Launcher and navigate to the “Installation” Tab.
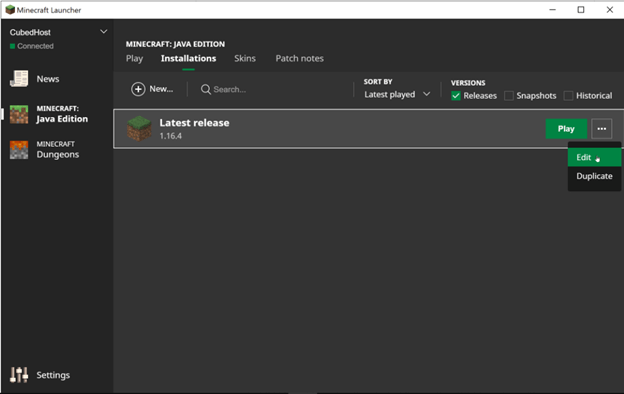
Step 02: Under the Installation, tab clicks on the three dots located on the right of the “Latest Release” and select “Edit”.
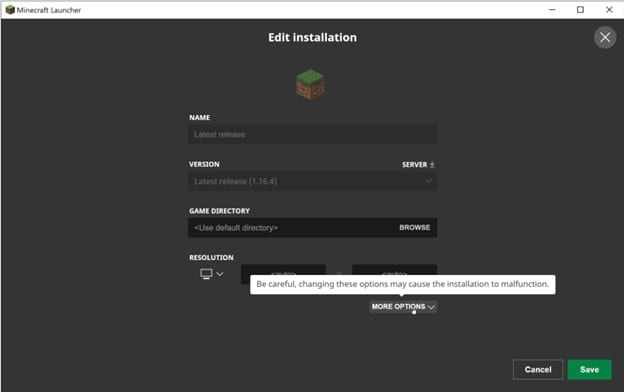
Step 03: It will open a new window that contains the settings of Minecraft. Now click on the “More Options”.
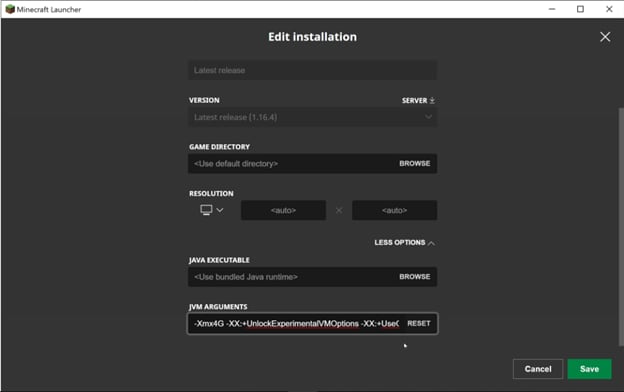
Step 04: Scroll down to “JVM Arguments”. Here you can see the text. The “2G” in this text represents the 2 Gigabytes of RAM. Change it to the number of Gigabytes that you want to allocate to Minecraft. In this case, we are changing it to “4G”, which means 4 Gigabytes. Leave the rest of the text as it is and hit “Save”.
Step 05: Now go to the “Play” tab, hit Play, and enjoy playing Minecraft with more RAM for a smooth and better experience.
Try Filmora to Make Game Recording Smoothly!
Filmora Game Recorder can capture any area of the PC screen and webcam. It’s perfect to capture and streaming the game process without using much RAM. Plus, you can edit the game recording video files in Filmora directly! Worth to have a try!
Start Game Recording Start Game Recording Start Game Recording Learn More >
How to allocate more RAM to Minecraft using CurseForge Launcher
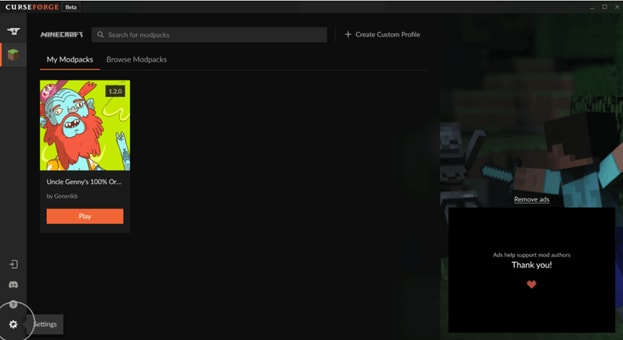
After Minecraft Launcher, CurseForge is the second-best launcher for Minecraft. It allows you to change the Memory you want to allocate to Minecraft according to your needs.
Step 01: Open CurseForge Launcher and click on the Settings icon located at the bottom left corner of the window.
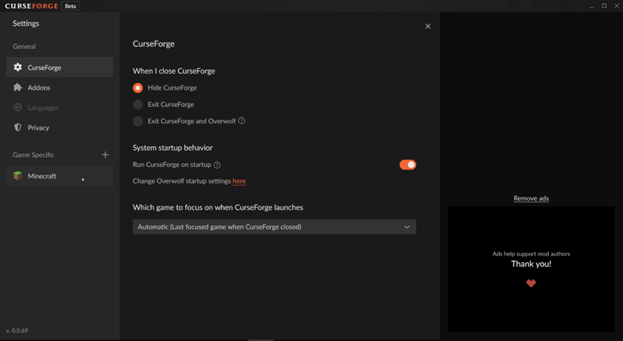
Step 02: Under Game Specifics, which is located on the left bar of the CurseForge, click on Minecraft. It will open the settings related to Minecraft.

Step 03: Scroll down to Java Settings. Under Java Settings, you will find a bar to control the Allocated Memory. Arrange it according to your need and requirement of the memory you want to allocate to Minecraft. Hit the Cross (X) on the top and enjoy playing your favorite game without any glitch or crash.
 The BootIt Collection covers multi-booting, partitioning, and disk imaging on traditional PC’s using the standard BIOS and newer PC’s using UEFI. The collection includes BootIt Bare Metal (BIBM) for standard BIOS systems and BootIt UEFI (BIU) for UEFI system.
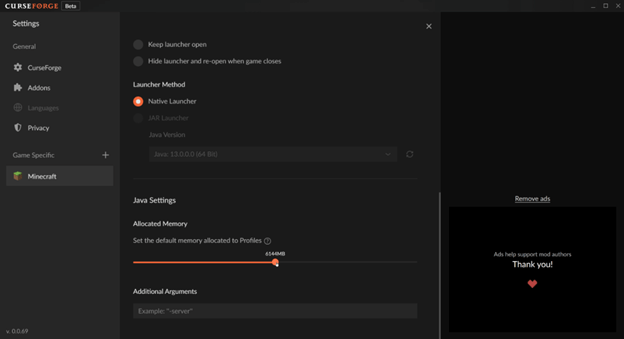
![]()
A cross-platform for making videos anywhere for all creators

Why your video editing isn’t good enough? How about some creative inspo?
- 100 Million+ Users
- 150+ Countries and Regions
- 4 Million+ Social Media Followers
- 5 Million+ Stock Media for Use
* Secure Download

 PCDJ Karaoki is the complete professional karaoke software designed for KJs and karaoke venues. Karaoki includes an advanced automatic singer rotation list with singer history, key control, news ticker, next singers screen, a song book exporter and printer, a jukebox background music player and many other features designed so you can host karaoke shows faster and easier!
How to allocate more RAM to Minecraft using ATLauncher
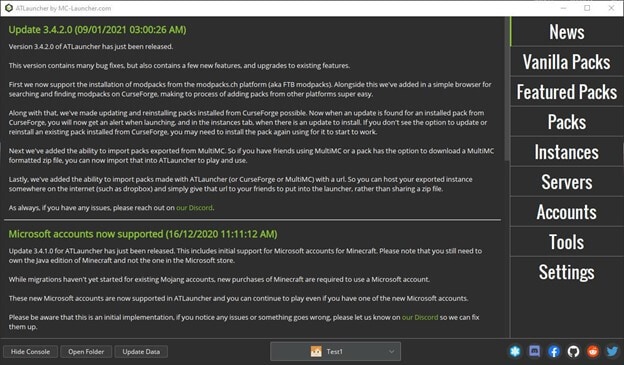
ATLauncher is another famous and widely used launcher for Minecraft. It also has a feature to control the memory you want to allocate to Minecraft. Let’s proceed to how to allocate more RAM to Minecraft.
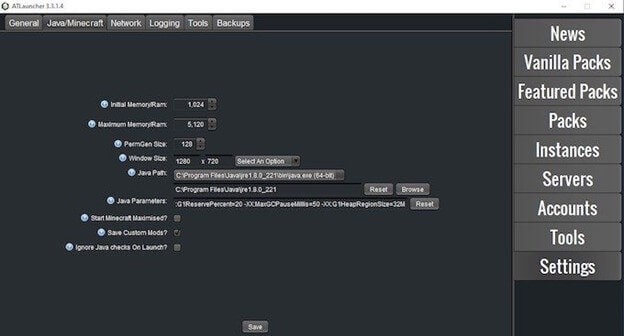
Step 01: Open ATLauncher and navigate to “Settings”.
Step 02: At the top of the settings page, you will some tabs. Click on the Java/Minecraft. It will open the settings related to Minecraft. Under these settings, change the “Maximum Memory/RAM” according to your needs and hit “Save”. It will allocate Minecraft with the memory of your choice to let you play Minecraft in the perfect way possible.
These are the most used Minecraft launchers that are used throughout the world. Choose any method depending upon the launcher you are using to play Minecraft. These methods of how to allocate more RAM to Minecraft can help you have the smoothest Minecraft experience and enjoy all kinds of mods and texture without any lag or crash. If you want to capture the Minecraft games, you can use a screen recorder for computer called Filmora. It is an all-in-one video recorder and editor, which helps to capture high quality videos and edit them with rich tools and effects. Take a look at the below video to know more details.


Ollie Mattison
Ollie Mattison is a writer and a lover of all things video.
Follow @Ollie Mattison
Ollie Mattison
Mar 27, 2024• Proven solutions
Minecraft is one of the best video games that allows its players to create their world, explore new places, build amazing things, and many more. Everyone loves to play Minecraft, especially after installing modes and textures into it. But adding such elements into Minecraft makes it heavy and it consumes a lot of memory of your PC. If your PC doesn’t have enough memory to be used by Minecraft, its frames may shutter, it may load slowly and sometimes it might even crash. But there is no need to worry about it. There are several ways available on the internet that show you how to allocate more ram to Minecraft. In this article, we are going to show the easiest way of how to allocate more ram to Minecraft with a step-by-step guide.
Before proceeding to the method of how to allocate more ram to Minecraft, keep in mind that this method will only work for “Minecraft: Java Edition”. It will not work on any other edition such as “Bedrock” which is also known as “Minecraft for Windows 10”. In Minecraft Bedrock Edition there is no built-in option to control how much ram to use.
To allocate more RAM to Minecraft, you have to change the setting of your Minecraft launcher app. It is the app that you use to launch and play Minecraft. There are several different launchers available on the internet that are used for Minecraft depending upon the mods you are using. In this article, we are going to cover three mostly used launcher
This article contains:
- 1. How to allocate more RAM to Minecraft using Default Launcher
- 2. How to allocate more RAM to Minecraft using CurseForge Launcher
- 3. How to allocate more RAM to Minecraft using ATLauncher
Filmora Game Recorder
Wondershare Filmora - Minecraft Game Recorder
• Record screen while game streaming without using spare RAM
• Personalize the crop the recording area to post the game record on any social media
• Cross-platform supported - (Windows, Mac, iOS, Android)
Start Game Recording Start Game Recording Start Game Recording Learn More >
How to allocate more RAM to Minecraft using Default Launcher
If you love to play Minecraft it is impossible that you would not have heard of Minecraft Launcher. It is the most common Minecraft Launcher that is used by so many players all around the world.
Step 01: Open Minecraft Launcher and navigate to the “Installation” Tab.
Step 02: Under the Installation, tab clicks on the three dots located on the right of the “Latest Release” and select “Edit”.
Step 03: It will open a new window that contains the settings of Minecraft. Now click on the “More Options”.
Step 04: Scroll down to “JVM Arguments”. Here you can see the text. The “2G” in this text represents the 2 Gigabytes of RAM. Change it to the number of Gigabytes that you want to allocate to Minecraft. In this case, we are changing it to “4G”, which means 4 Gigabytes. Leave the rest of the text as it is and hit “Save”.
Step 05: Now go to the “Play” tab, hit Play, and enjoy playing Minecraft with more RAM for a smooth and better experience.

Try Filmora to Make Game Recording Smoothly!
Filmora Game Recorder can capture any area of the PC screen and webcam. It’s perfect to capture and streaming the game process without using much RAM. Plus, you can edit the game recording video files in Filmora directly! Worth to have a try!
Start Game Recording Start Game Recording Start Game Recording Learn More >
How to allocate more RAM to Minecraft using CurseForge Launcher
After Minecraft Launcher, CurseForge is the second-best launcher for Minecraft. It allows you to change the Memory you want to allocate to Minecraft according to your needs.
Step 01: Open CurseForge Launcher and click on the Settings icon located at the bottom left corner of the window.
Step 02: Under Game Specifics, which is located on the left bar of the CurseForge, click on Minecraft. It will open the settings related to Minecraft.
 vMix Basic HD - Software based live production. vMix Basic HD includes 4 inputs, 3 cameras, streaming, recording, playlist.
Step 03: Scroll down to Java Settings. Under Java Settings, you will find a bar to control the Allocated Memory. Arrange it according to your need and requirement of the memory you want to allocate to Minecraft. Hit the Cross (X) on the top and enjoy playing your favorite game without any glitch or crash.
Parental Control Software
![]()

A cross-platform for making videos anywhere for all creators
Why your video editing isn’t good enough? How about some creative inspo?
- 100 Million+ Users
- 150+ Countries and Regions
- 4 Million+ Social Media Followers
- 5 Million+ Stock Media for Use
* Secure Download
How to allocate more RAM to Minecraft using ATLauncher
ATLauncher is another famous and widely used launcher for Minecraft. It also has a feature to control the memory you want to allocate to Minecraft. Let’s proceed to how to allocate more RAM to Minecraft.
Step 01: Open ATLauncher and navigate to “Settings”.
Step 02: At the top of the settings page, you will some tabs. Click on the Java/Minecraft. It will open the settings related to Minecraft. Under these settings, change the “Maximum Memory/RAM” according to your needs and hit “Save”. It will allocate Minecraft with the memory of your choice to let you play Minecraft in the perfect way possible.
These are the most used Minecraft launchers that are used throughout the world. Choose any method depending upon the launcher you are using to play Minecraft. These methods of how to allocate more RAM to Minecraft can help you have the smoothest Minecraft experience and enjoy all kinds of mods and texture without any lag or crash. If you want to capture the Minecraft games, you can use a screen recorder for computer called Filmora. It is an all-in-one video recorder and editor, which helps to capture high quality videos and edit them with rich tools and effects. Take a look at the below video to know more details.
Ollie Mattison
Ollie Mattison is a writer and a lover of all things video.
Follow @Ollie Mattison
Ollie Mattison
Mar 27, 2024• Proven solutions
Minecraft is one of the best video games that allows its players to create their world, explore new places, build amazing things, and many more. Everyone loves to play Minecraft, especially after installing modes and textures into it. But adding such elements into Minecraft makes it heavy and it consumes a lot of memory of your PC. If your PC doesn’t have enough memory to be used by Minecraft, its frames may shutter, it may load slowly and sometimes it might even crash. But there is no need to worry about it. There are several ways available on the internet that show you how to allocate more ram to Minecraft. In this article, we are going to show the easiest way of how to allocate more ram to Minecraft with a step-by-step guide.
Before proceeding to the method of how to allocate more ram to Minecraft, keep in mind that this method will only work for “Minecraft: Java Edition”. It will not work on any other edition such as “Bedrock” which is also known as “Minecraft for Windows 10”. In Minecraft Bedrock Edition there is no built-in option to control how much ram to use.
To allocate more RAM to Minecraft, you have to change the setting of your Minecraft launcher app. It is the app that you use to launch and play Minecraft. There are several different launchers available on the internet that are used for Minecraft depending upon the mods you are using. In this article, we are going to cover three mostly used launcher
This article contains:
- 1. How to allocate more RAM to Minecraft using Default Launcher
- 2. How to allocate more RAM to Minecraft using CurseForge Launcher
- 3. How to allocate more RAM to Minecraft using ATLauncher
Filmora Game Recorder
Wondershare Filmora - Minecraft Game Recorder
• Record screen while game streaming without using spare RAM
• Personalize the crop the recording area to post the game record on any social media
• Cross-platform supported - (Windows, Mac, iOS, Android)
Start Game Recording Start Game Recording Start Game Recording Learn More >
How to allocate more RAM to Minecraft using Default Launcher
If you love to play Minecraft it is impossible that you would not have heard of Minecraft Launcher. It is the most common Minecraft Launcher that is used by so many players all around the world.
Step 01: Open Minecraft Launcher and navigate to the “Installation” Tab.
Step 02: Under the Installation, tab clicks on the three dots located on the right of the “Latest Release” and select “Edit”.
Step 03: It will open a new window that contains the settings of Minecraft. Now click on the “More Options”.
Step 04: Scroll down to “JVM Arguments”. Here you can see the text. The “2G” in this text represents the 2 Gigabytes of RAM. Change it to the number of Gigabytes that you want to allocate to Minecraft. In this case, we are changing it to “4G”, which means 4 Gigabytes. Leave the rest of the text as it is and hit “Save”.
Step 05: Now go to the “Play” tab, hit Play, and enjoy playing Minecraft with more RAM for a smooth and better experience.
Try Filmora to Make Game Recording Smoothly!
Filmora Game Recorder can capture any area of the PC screen and webcam. It’s perfect to capture and streaming the game process without using much RAM. Plus, you can edit the game recording video files in Filmora directly! Worth to have a try!
Start Game Recording Start Game Recording Start Game Recording Learn More >
How to allocate more RAM to Minecraft using CurseForge Launcher
After Minecraft Launcher, CurseForge is the second-best launcher for Minecraft. It allows you to change the Memory you want to allocate to Minecraft according to your needs.
Step 01: Open CurseForge Launcher and click on the Settings icon located at the bottom left corner of the window.
Step 02: Under Game Specifics, which is located on the left bar of the CurseForge, click on Minecraft. It will open the settings related to Minecraft.
Step 03: Scroll down to Java Settings. Under Java Settings, you will find a bar to control the Allocated Memory. Arrange it according to your need and requirement of the memory you want to allocate to Minecraft. Hit the Cross (X) on the top and enjoy playing your favorite game without any glitch or crash.
.png) Kanto Player Professional
Kanto Player Professional
 Allavsoft Batch Download Online Videos, Music Offline to MP4, MP3, MOV, etc format
![]()
A cross-platform for making videos anywhere for all creators
Why your video editing isn’t good enough? How about some creative inspo?
- 100 Million+ Users
- 150+ Countries and Regions
- 4 Million+ Social Media Followers
- 5 Million+ Stock Media for Use
* Secure Download
How to allocate more RAM to Minecraft using ATLauncher
ATLauncher is another famous and widely used launcher for Minecraft. It also has a feature to control the memory you want to allocate to Minecraft. Let’s proceed to how to allocate more RAM to Minecraft.
Step 01: Open ATLauncher and navigate to “Settings”.
Step 02: At the top of the settings page, you will some tabs. Click on the Java/Minecraft. It will open the settings related to Minecraft. Under these settings, change the “Maximum Memory/RAM” according to your needs and hit “Save”. It will allocate Minecraft with the memory of your choice to let you play Minecraft in the perfect way possible.
These are the most used Minecraft launchers that are used throughout the world. Choose any method depending upon the launcher you are using to play Minecraft. These methods of how to allocate more RAM to Minecraft can help you have the smoothest Minecraft experience and enjoy all kinds of mods and texture without any lag or crash. If you want to capture the Minecraft games, you can use a screen recorder for computer called Filmora. It is an all-in-one video recorder and editor, which helps to capture high quality videos and edit them with rich tools and effects. Take a look at the below video to know more details.
Ollie Mattison
Ollie Mattison is a writer and a lover of all things video.
Follow @Ollie Mattison
Ollie Mattison
Mar 27, 2024• Proven solutions
Minecraft is one of the best video games that allows its players to create their world, explore new places, build amazing things, and many more. Everyone loves to play Minecraft, especially after installing modes and textures into it. But adding such elements into Minecraft makes it heavy and it consumes a lot of memory of your PC. If your PC doesn’t have enough memory to be used by Minecraft, its frames may shutter, it may load slowly and sometimes it might even crash. But there is no need to worry about it. There are several ways available on the internet that show you how to allocate more ram to Minecraft. In this article, we are going to show the easiest way of how to allocate more ram to Minecraft with a step-by-step guide.
Before proceeding to the method of how to allocate more ram to Minecraft, keep in mind that this method will only work for “Minecraft: Java Edition”. It will not work on any other edition such as “Bedrock” which is also known as “Minecraft for Windows 10”. In Minecraft Bedrock Edition there is no built-in option to control how much ram to use.
To allocate more RAM to Minecraft, you have to change the setting of your Minecraft launcher app. It is the app that you use to launch and play Minecraft. There are several different launchers available on the internet that are used for Minecraft depending upon the mods you are using. In this article, we are going to cover three mostly used launcher
This article contains:
- 1. How to allocate more RAM to Minecraft using Default Launcher
- 2. How to allocate more RAM to Minecraft using CurseForge Launcher
- 3. How to allocate more RAM to Minecraft using ATLauncher
Filmora Game Recorder
Wondershare Filmora - Minecraft Game Recorder
• Record screen while game streaming without using spare RAM
• Personalize the crop the recording area to post the game record on any social media
• Cross-platform supported - (Windows, Mac, iOS, Android)
Start Game Recording Start Game Recording Start Game Recording Learn More >
How to allocate more RAM to Minecraft using Default Launcher
If you love to play Minecraft it is impossible that you would not have heard of Minecraft Launcher. It is the most common Minecraft Launcher that is used by so many players all around the world.
Step 01: Open Minecraft Launcher and navigate to the “Installation” Tab.
Step 02: Under the Installation, tab clicks on the three dots located on the right of the “Latest Release” and select “Edit”.
Step 03: It will open a new window that contains the settings of Minecraft. Now click on the “More Options”.
Step 04: Scroll down to “JVM Arguments”. Here you can see the text. The “2G” in this text represents the 2 Gigabytes of RAM. Change it to the number of Gigabytes that you want to allocate to Minecraft. In this case, we are changing it to “4G”, which means 4 Gigabytes. Leave the rest of the text as it is and hit “Save”.
 WonderFox DVD Ripper Pro
Step 05: Now go to the “Play” tab, hit Play, and enjoy playing Minecraft with more RAM for a smooth and better experience.
Try Filmora to Make Game Recording Smoothly!
Filmora Game Recorder can capture any area of the PC screen and webcam. It’s perfect to capture and streaming the game process without using much RAM. Plus, you can edit the game recording video files in Filmora directly! Worth to have a try!
Start Game Recording Start Game Recording Start Game Recording Learn More >
How to allocate more RAM to Minecraft using CurseForge Launcher
After Minecraft Launcher, CurseForge is the second-best launcher for Minecraft. It allows you to change the Memory you want to allocate to Minecraft according to your needs.
Step 01: Open CurseForge Launcher and click on the Settings icon located at the bottom left corner of the window.
Step 02: Under Game Specifics, which is located on the left bar of the CurseForge, click on Minecraft. It will open the settings related to Minecraft.

Step 03: Scroll down to Java Settings. Under Java Settings, you will find a bar to control the Allocated Memory. Arrange it according to your need and requirement of the memory you want to allocate to Minecraft. Hit the Cross (X) on the top and enjoy playing your favorite game without any glitch or crash.
![]()
A cross-platform for making videos anywhere for all creators
Why your video editing isn’t good enough? How about some creative inspo?
- 100 Million+ Users
- 150+ Countries and Regions
- 4 Million+ Social Media Followers
- 5 Million+ Stock Media for Use
* Secure Download

How to allocate more RAM to Minecraft using ATLauncher
ATLauncher is another famous and widely used launcher for Minecraft. It also has a feature to control the memory you want to allocate to Minecraft. Let’s proceed to how to allocate more RAM to Minecraft.
Step 01: Open ATLauncher and navigate to “Settings”.
Step 02: At the top of the settings page, you will some tabs. Click on the Java/Minecraft. It will open the settings related to Minecraft. Under these settings, change the “Maximum Memory/RAM” according to your needs and hit “Save”. It will allocate Minecraft with the memory of your choice to let you play Minecraft in the perfect way possible.
These are the most used Minecraft launchers that are used throughout the world. Choose any method depending upon the launcher you are using to play Minecraft. These methods of how to allocate more RAM to Minecraft can help you have the smoothest Minecraft experience and enjoy all kinds of mods and texture without any lag or crash. If you want to capture the Minecraft games, you can use a screen recorder for computer called Filmora. It is an all-in-one video recorder and editor, which helps to capture high quality videos and edit them with rich tools and effects. Take a look at the below video to know more details.

Ollie Mattison
Ollie Mattison is a writer and a lover of all things video.
Follow @Ollie Mattison
- Title: Elevating Gameplay with Optimized Ram Assignment for Minecraft for 2024
- Author: Vivienne Westwood
- Created at : 2024-07-20 00:55:16
- Updated at : 2024-07-21 00:55:16
- Link: https://video-capture.techidaily.com/elevating-gameplay-with-optimized-ram-assignment-for-minecraft-for-2024/
- License: This work is licensed under CC BY-NC-SA 4.0.