
"2024 Approved Scripter's Toolbox"
Scripter’s Toolbox
Loom screen recorder is an expert usefulness and video informing application that permits anybody to rapidly record and offer recordings with enormous crowds. The application is centred not around giving its video creation, altering, and distributing apparatuses for clients who need to send their records to online media stages, yet for school, work, and association use situations where video messages can considerably more strongly serve the expected interest group. Loom recorder is entirely simple, to the point that you can do it at the snap of a button. Loom records your whole screen and furnishes you with an in a split-second shareable connection. Lastly, the Loom download video steps are also shared with you in this blog post. So, let’s dive in to find out.
Part 1. How to Record and Download Videos from Loom
Part 2. Can I Download and Install Loom on Computer
Part 3. Loom Desktop Alternative to Record Videos
Part 1. How to Record and Download Videos from Loom
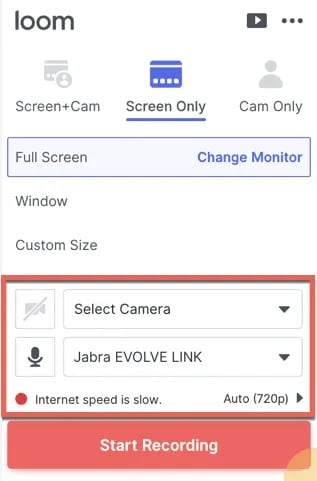
The Loom work area customer has three diverse recording modes: Camera Only, Screen Only, and Screen + Camera. You can rapidly get to the menu by tapping the ellipsis in the upper right corner of the program and choosing Preferences to change the default recording choices to best suit your necessities. For instance, clients can set the nature of their recording to consequently change as indicated by accessible transmission capacity or a number somewhere in the range of 360p and 1080p. You can likewise choose if the control menu is noticeable, have a commencement before your accounts start, and feature the snaps you make with the mouse while recording.
Step 1: Launch Loom Desktop
Click on the desktop application symbol to open the recorder. After you have downloaded the application to your PC, you should look for Loom in the Windows search bar and snap the red pinwheel Loom logo to open it. Sign in or make a Loom account. With Loom, you can likewise alter your recording experience, from changing your mouthpiece and camera inputs to goal, settings, and console alternate routes.

Step 2: Select the Capture Mode
Assuming you decide to record your camera and sound with your screen, you can choose any camera or mouthpiece associated with your PC (e.g., a webcam). Take a look at the sound pointer to let know if your mouthpiece is empowered and catching sound before you hit the record button. For the Screen + Cam and Screen Only choices, pick whether to record your full screen, a particular window, or a custom-size recording region. On the off chance that you have numerous screens, you can likewise pick which’s screen to record.
Step 3: Hit Start Recording
After you’re done with the customisations. Just press the Start Recording button. You will get a short commencement and afterwards your recording meeting will start. At the point when the recording starts, a red “recording” button will show up on the left-hand side of your screen.
Step 4: Stop/Save your Recording
Lastly, to quit your recording, utilize the stop button on the Control Menu or snap the Loom application on your work area. You can likewise rapidly restart, stop, or erase your recording from the Control Menu.
When you wrap up recording, your video is transferred to Loom and you can immediately watch and offer it with a connection, no compelling reason to download a huge video document as you would.
How to Download or Share Your Video
Assuming that you are pondering where to observe the video you recently recorded, you will explore your My Videos Library on Loom.com. Your My Videos library is the place where all your Loom recordings and envelopes live. When you wrap up recording, your video will consequently process and show up in your video library. When you are in the My Video library, click on the video you need to download or share. Whenever that is opened, you will see an offered video connect choice to one side of your video.
Part 2. Can I Download and Install Loom on Computer?
Loom for PC is completely viable with a wide cluster of famous cloud administrations like Gmail, Slack, Coda, Notion, Intercom, Jira, and Headway, empowering clients from one side of the planet to the other to see Loom recordings straightforwardly from their most loved application without expected to introduce and deal with their own Loom application and record. The application has implicit help for recording video and sound, recording work area or application surface, adding text and a lot more straightforward devices that all consider fast video creation quicker than is required for composing an email. To sweeten the deal, just sending the message with video and sound can receive your message quicker and all the more obviously, subsequently decreasing to and fro composing.
Loom’s screen recording software allows you to record your screen and immediately share your video with a connection without taking up any of your PC space. Loom is presented in four levels of access, each opening an ever-increasing number of instruments expected for use in huge cooperative conditions. The basic free level permits the production of up to 25 recordings and restricted watcher experiences. The top-notch levels are centred around more drew in people with the Pro level, and two Team-centered levels that open group video library, custom marking, and full examination and the board toolsets. Everything except the most noteworthy levels of Loom can be gotten to for FREE during a 14-day time for testing.
Part 3. Loom Desktop Alternative to Record Videos
Many screen recording instruments exist including ones that come pre-introduced on your Microsoft Windows PC. however, by far most of them are hard to explore and expect you to download and transfer huge documents just to share your video. Albeit extravagant recording software can address your issues, Loom offers a simple and free method for recording recordings and screen accounts with the snap of a button. However, as usual, its excessive cost can be an issue for some individuals, so it is imperative to review the best Loom elective, Filmora Screen Recorder assists you with introducing your thoughts through a blend of screen recording, inward and outer sound recording, and cam recording. This will guarantee that you are pretty much as clear as could be expected
For Win 7 or later (64-bit)
For macOS 10.12 or later
Filmora is one of the most amazing video-sharing devices that is accessible on Windows and Mac stages. With the assistance of Filmora, you can without much of a stretch record your screen, mouthpiece, sound, and work area all simultaneously. These recordings are saved money on your PC and are quickly shareable across any stage. You can utilize Filmora to record the substance on your PC screen alongside the film of yourself describing. Or then again decide to simply record yourself with the camera-just mode. In the bit-by-bit guide beneath, we will tell you the best way to use Filmora for your next business speaker video, college lecture, screen recording, or simply an online meetup. If you’re new to this software, then we’ve provided you with the links to download and install the software as it’s an easy and minutes task to perform before diving into the recordings of your desktop screen.
Steps to use Filmora as Loom Alternative
Filmora screen recording assists you with sharing the data you have on your screen with your companions, or all the more critically, your associates and colleagues. Let’s learn the steps you need to perform to utilize the Filmora screen recorder.
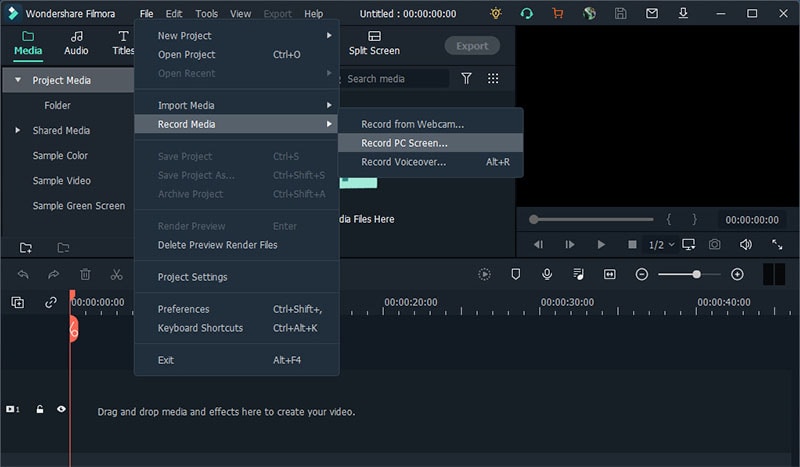
Step 1: Install and Open Filmora
if you want to download the installer you need to visit the official website and download the latest version of Wondershare Filmora. To initiate the installation, open the .exe file on your system and follow the default installation steps. Upon successful installation, open the Filmora from your desktop and you will be left out with the below interface from which, you need to opt for New Project so you can go for recording PC screen effectively.

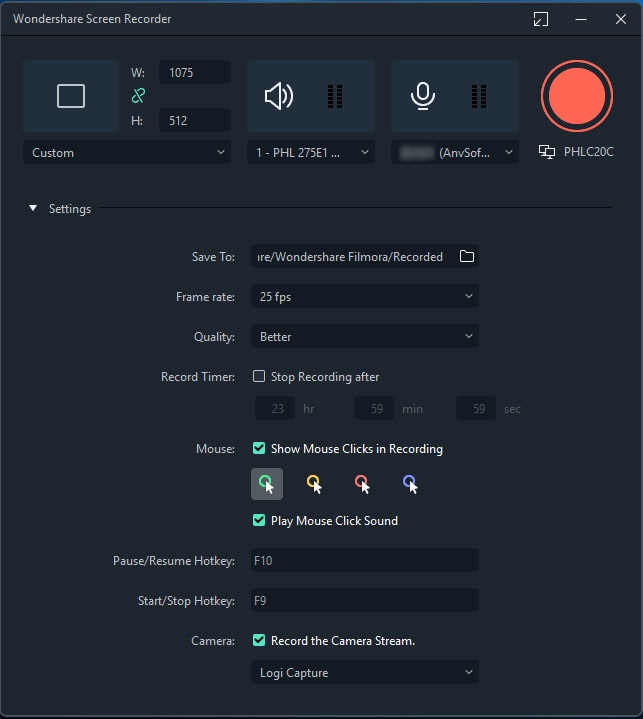
Step 2: Customize the Screen
Now, within the recording UI of Filmora, you can customize your screen to the fullest. From that interface, click on the record button and select the Record PC Screen alternative as follow. Here you can choose the best video capturing settings for your screen to be recorded. Filmora gives you the choice to enable the microphone, system sounds, webcam and another setting for your screen recording handily.
Step 3: Start Share your Recordings
Finally, when you’re ready, hit the Record button (a red circled button) and it shall start the recording after giving you a 3-second get-ready time. You can start recording your screen activity afterwards.
Whenever you’re done, simply hit the Stop button that’ll lead you to the Video Editor to utilize the top-notch features inside your recordings to the best extent. You can use Titles, Transitions, Cursor Settings, audio editing and much more with the Editor. Afterwards, to share your work of art straightforwardly to YouTube or some other renowned stage, go for the Export button and select the platform to share your video recording.
Conclusion
Loom Application is that it doesn’t appear as though the conventional software or instruments used the application runs on most stages like Windows or Mac or it has an augmentation for Google Chrome. But with several cons associated with the Loom recorder, we recommend going for the Filmora, which furnishes you with all the assistance you with expecting you to begin making your recordings. You will want to make instructional exercises, demos, preparing recordings, and considerably more. It is not difficult to figure out how to utilize it; there is no requirement for any high-level IT information.
Part 2. Can I Download and Install Loom on Computer
Part 3. Loom Desktop Alternative to Record Videos
Part 1. How to Record and Download Videos from Loom
The Loom work area customer has three diverse recording modes: Camera Only, Screen Only, and Screen + Camera. You can rapidly get to the menu by tapping the ellipsis in the upper right corner of the program and choosing Preferences to change the default recording choices to best suit your necessities. For instance, clients can set the nature of their recording to consequently change as indicated by accessible transmission capacity or a number somewhere in the range of 360p and 1080p. You can likewise choose if the control menu is noticeable, have a commencement before your accounts start, and feature the snaps you make with the mouse while recording.
Step 1: Launch Loom Desktop
Click on the desktop application symbol to open the recorder. After you have downloaded the application to your PC, you should look for Loom in the Windows search bar and snap the red pinwheel Loom logo to open it. Sign in or make a Loom account. With Loom, you can likewise alter your recording experience, from changing your mouthpiece and camera inputs to goal, settings, and console alternate routes.
Step 2: Select the Capture Mode
Assuming you decide to record your camera and sound with your screen, you can choose any camera or mouthpiece associated with your PC (e.g., a webcam). Take a look at the sound pointer to let know if your mouthpiece is empowered and catching sound before you hit the record button. For the Screen + Cam and Screen Only choices, pick whether to record your full screen, a particular window, or a custom-size recording region. On the off chance that you have numerous screens, you can likewise pick which’s screen to record.
Step 3: Hit Start Recording
After you’re done with the customisations. Just press the Start Recording button. You will get a short commencement and afterwards your recording meeting will start. At the point when the recording starts, a red “recording” button will show up on the left-hand side of your screen.
Step 4: Stop/Save your Recording
Lastly, to quit your recording, utilize the stop button on the Control Menu or snap the Loom application on your work area. You can likewise rapidly restart, stop, or erase your recording from the Control Menu.
When you wrap up recording, your video is transferred to Loom and you can immediately watch and offer it with a connection, no compelling reason to download a huge video document as you would.
How to Download or Share Your Video
Assuming that you are pondering where to observe the video you recently recorded, you will explore your My Videos Library on Loom.com. Your My Videos library is the place where all your Loom recordings and envelopes live. When you wrap up recording, your video will consequently process and show up in your video library. When you are in the My Video library, click on the video you need to download or share. Whenever that is opened, you will see an offered video connect choice to one side of your video.
Part 2. Can I Download and Install Loom on Computer?
Loom for PC is completely viable with a wide cluster of famous cloud administrations like Gmail, Slack, Coda, Notion, Intercom, Jira, and Headway, empowering clients from one side of the planet to the other to see Loom recordings straightforwardly from their most loved application without expected to introduce and deal with their own Loom application and record. The application has implicit help for recording video and sound, recording work area or application surface, adding text and a lot more straightforward devices that all consider fast video creation quicker than is required for composing an email. To sweeten the deal, just sending the message with video and sound can receive your message quicker and all the more obviously, subsequently decreasing to and fro composing.
Loom’s screen recording software allows you to record your screen and immediately share your video with a connection without taking up any of your PC space. Loom is presented in four levels of access, each opening an ever-increasing number of instruments expected for use in huge cooperative conditions. The basic free level permits the production of up to 25 recordings and restricted watcher experiences. The top-notch levels are centred around more drew in people with the Pro level, and two Team-centered levels that open group video library, custom marking, and full examination and the board toolsets. Everything except the most noteworthy levels of Loom can be gotten to for FREE during a 14-day time for testing.
Part 3. Loom Desktop Alternative to Record Videos
Many screen recording instruments exist including ones that come pre-introduced on your Microsoft Windows PC. however, by far most of them are hard to explore and expect you to download and transfer huge documents just to share your video. Albeit extravagant recording software can address your issues, Loom offers a simple and free method for recording recordings and screen accounts with the snap of a button. However, as usual, its excessive cost can be an issue for some individuals, so it is imperative to review the best Loom elective, Filmora Screen Recorder assists you with introducing your thoughts through a blend of screen recording, inward and outer sound recording, and cam recording. This will guarantee that you are pretty much as clear as could be expected
For Win 7 or later (64-bit)
For macOS 10.12 or later
Filmora is one of the most amazing video-sharing devices that is accessible on Windows and Mac stages. With the assistance of Filmora, you can without much of a stretch record your screen, mouthpiece, sound, and work area all simultaneously. These recordings are saved money on your PC and are quickly shareable across any stage. You can utilize Filmora to record the substance on your PC screen alongside the film of yourself describing. Or then again decide to simply record yourself with the camera-just mode. In the bit-by-bit guide beneath, we will tell you the best way to use Filmora for your next business speaker video, college lecture, screen recording, or simply an online meetup. If you’re new to this software, then we’ve provided you with the links to download and install the software as it’s an easy and minutes task to perform before diving into the recordings of your desktop screen.
Steps to use Filmora as Loom Alternative
Filmora screen recording assists you with sharing the data you have on your screen with your companions, or all the more critically, your associates and colleagues. Let’s learn the steps you need to perform to utilize the Filmora screen recorder.
Step 1: Install and Open Filmora
if you want to download the installer you need to visit the official website and download the latest version of Wondershare Filmora. To initiate the installation, open the .exe file on your system and follow the default installation steps. Upon successful installation, open the Filmora from your desktop and you will be left out with the below interface from which, you need to opt for New Project so you can go for recording PC screen effectively.
Step 2: Customize the Screen
Now, within the recording UI of Filmora, you can customize your screen to the fullest. From that interface, click on the record button and select the Record PC Screen alternative as follow. Here you can choose the best video capturing settings for your screen to be recorded. Filmora gives you the choice to enable the microphone, system sounds, webcam and another setting for your screen recording handily.
Step 3: Start Share your Recordings
Finally, when you’re ready, hit the Record button (a red circled button) and it shall start the recording after giving you a 3-second get-ready time. You can start recording your screen activity afterwards.
Whenever you’re done, simply hit the Stop button that’ll lead you to the Video Editor to utilize the top-notch features inside your recordings to the best extent. You can use Titles, Transitions, Cursor Settings, audio editing and much more with the Editor. Afterwards, to share your work of art straightforwardly to YouTube or some other renowned stage, go for the Export button and select the platform to share your video recording.
Conclusion
Loom Application is that it doesn’t appear as though the conventional software or instruments used the application runs on most stages like Windows or Mac or it has an augmentation for Google Chrome. But with several cons associated with the Loom recorder, we recommend going for the Filmora, which furnishes you with all the assistance you with expecting you to begin making your recordings. You will want to make instructional exercises, demos, preparing recordings, and considerably more. It is not difficult to figure out how to utilize it; there is no requirement for any high-level IT information.
Also read:
- [New] 2024 Approved Awesome IGTV Channels That Deliver Quality Content
- [Updated] Cutting Edge Complete Rotation Videography Equipment for 2024
- [Updated] Essential iPhone Recording Apps for 2024
- [Updated] Syncing Twitter & Snapchat for Sharing Videos
- 2024 Approved Streamlining the Process of IPTV Video Recordings
- Detailed Ice Cream Snapshot Analysis Report for 2024
- Efficient Screen-Capture Strategies for Effective FaceTime Recording
- Enhancing Your Recording Setup with RL Tech Insights
- How to Fix Life360 Shows Wrong Location On Poco M6 Pro 5G? | Dr.fone
- In 2024, Discovering Top Webinar Platforms
- In 2024, How Can You Transfer Files From OnePlus 11R To iPhone 15/14/13? | Dr.fone
- In 2024, How To Create an Apple Developer Account From Apple iPhone 14 Pro Max
- In 2024, Sim Unlock Realme C55 Phones without Code 2 Ways to Remove Android Sim Lock
- Title: 2024 Approved Scripter's Toolbox
- Author: Vivienne Westwood
- Created at : 2025-02-27 17:04:21
- Updated at : 2025-03-03 01:03:13
- Link: https://video-capture.techidaily.com/2024-approved-scripters-toolbox/
- License: This work is licensed under CC BY-NC-SA 4.0.