
"2024 Approved Best Practices in Digital Media Capturing"
Best Practices in Digital Media Capturing
How Do I Schedule A Screen Recording

Max Wales
Mar 27, 2024• Proven solutions
No matter whether you’re looking to capture a screen recording as part of a personal video for a loved one, as part of your latest vlog, or even as a part of a walk-through instructional guide, this article aims to help users assess which software offers the best features for their cause. Although there are many desirable and versatile screen recorders available on the current market, we’ve pieced together a handy guide that is designed to help walk users through our top 7 auto-scheduling screen recorders.
Best 7 Screen Recorders for Schedule Recording & How-To Implement Them
![]()

The All-in-One Screen Recorder & Video Editor
- Record desktop screen, voiceover, and webcam simultaneously
- Edit recorded clips quickly with a wide range of professional tools
- Built-in plentiful templates and effects
- Export to MP4, MOV, MKV, GIF and multiple formats
For Win 7 or later (64-bit)
For macOS 10.12 or later
 Secure Download
Below you will find an overview of our Top 7 Screen Recorders . Perfect for editors of all capabilities, our aim is to help inform users of the beneficial attributes and the step-by-step procedure that each software requires so that they can set up pre-scheduled recordings with ease.
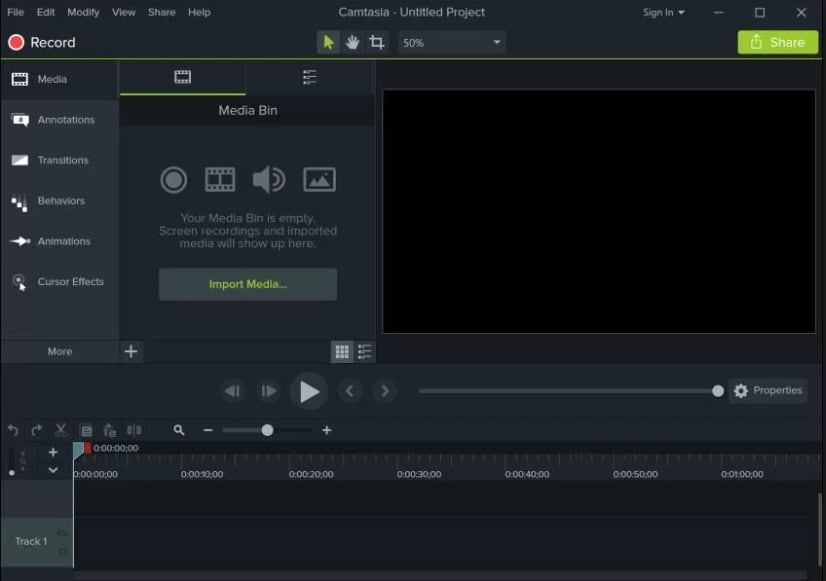
1. Schedule Screen Recording with Camtasia
Price: Free Trial, then $249 (Suitable for Windows and Mac)
Overview
Perfect for those looking to record important live-streamed events, webinars, and even online gaming sessions, Camtasia is a straight forward and easy-to-use screen recording software. Featuring the ability to add visual effects, voice narration, and even meaningful annotations, this popular platform is sure to help you record and edit with ease.
Please note: The process detailed below may vary when using either Windows 7, Windows 8, or Windows 10.
How to Schedule Screen Recording with Camtasia:
To schedule a screen recording with the Camtasia Screen Recorder, follow these simple steps-
- Download and install the Screen Recorder
- Create a new document within the pre-installed “Notepad” application
- Insert (via Copying and Pasting) the following line of text: “C:\Program Files\TechSmith\Camtasia 9\CamRecorder.exe”/record

- To initiate the recording, save the notepad document with the title “record.bat.”. Please note: Saving the document as a .txt file will not allow the user to implement a recording.
- To create a file that’s designed to stop the recording, simply create another Notepad document and input the following line of text: “C:\Program Files\TechSmith\Camtasia 9\CamRecorder.exe”/stop
Similarly, save this file using the title “stop.bat”.
2. Scheduling A Screen Recording with Icecream Screen Recorder

Price: Freemium (Suitable for Mac and Windows)
Overview: An intuitive and versatile software that’s designed to help users create a professional screen capture at the press of a button, the Icecream Screen Recorder is sure to stand out. Ideal for recording Skype sessions, webinars, and even handy step-by-step tutorial videos in High Definition, this hassle-free recorder is perfect for everyday use. With area selection, a drawing panel, and even zoom-in functionality, this in-depth tool is guaranteed to help produce top-quality videos.
How to schedule a screen recording with Icecream screen recorder?
To schedule a screen recording with the Icecream Screen Recorder, follow these simple steps -
- Download and install the Screen Recorder
- Open the Program and select, from the top menu, the “Tasks” panel
- When you are ready to record, having checked you have suitable free disk-space (approx. 1GB for 1 hours worth of recording), click the Orange “PLUS (+)” icon to commence a recording
- Select the area you wish to be captured in your screen recording
- Enter the “Start Date and Time” and the “Finish Date and Time” into the colored fields. Here you may also be allowed to Title the Task
- By choosing either the Pencil Icon or the Trash Can icon, users are able to edit or delete the Task before the scheduled recording begins
- Once completed, your newly captured video will be saved in the destination folder
3. Scheduling A Screen Recording with Deskshare My Screen Recorder Pro

Price: Free Trial, then $49.50 (Suitable for Windows Only)
Overview: Offering a wide selection of tools, including the ability for users to record both system speaker sound and noise generated from a microphone, the Deskshare My Screen Recorder Pro is perfect for users of all abilities. Capturing high-quality yet small-sized files, this efficient screen recording software is guaranteed to help capture all your important webinars, gaming sessions, and personalized memoirs with ease.
How to schedule a screen recording with Deskshare My Screen Recorder Pro?
To schedule a screen recording with the Deskshare My Screen Recorder Pro, follow these simple steps-
- Download and install the Screen Recorder
- Open the Program and select, from the top menu, the “Tools” panel. Select “Schedule Recording”
- By clicking “New” a “New Schedule” menu to open.
- From the “Recording Type” menu, you can select either the “PC Screen with Audio” or “Without Audio”
- Enter both the “Start” and “End” Date and Time, a Title, and the Output Folder. Click Next.
- Once completed, your newly captured video will be saved in the destination folder
4. Scheduling A Screen Recording with Debut Video Capture Software

Price: Free trial, $2.49/month (Suitable for Windows Only)
Overview: Allowing users to capture recordings from sources such as a webcam and even videotapes, this intuitive and versatile software is perfect for a wide range of projects. Designed to save files in avi, mp4, and even flv format, this feature-filled screen recording software is guaranteed to help your new recording project stand out.
How to schedule a screen recording with Debut Screen Recorder?
To schedule a screen recording with the Debut Screen Recorder, follow these simple steps-
- Download and install the Debut Screen Recorder
- Select the “Schedule” tab from the toolbar
- Click the “Add” option
- Enter a “Title” for your screen recording and ensure the “Active” checkbox is selected
- Enter the desired requirements for the “Recurrence”, “Source”, and “Audio” parameters. Click “OK” to save your schedule
- Once completed, your newly captured video will be saved in the destination folder
5. Scheduling A Screen Recording with Movavi Screen Capture

Price: From $79.61 (Suitable for Windows and Mac)
Overview: An all-in-one video editing software that’s designed to help users capture and edit their latest creations, Movavi Screen Capture is guaranteed to stand out. Perfect for recording webinars, Skype calls, and even live gaming sessions, this desirable and advanced software even boasts the ability to export into a wide range of popular file formats.
How to schedule a screen recording with Movavi Screen Capture?
To schedule a screen recording with the Movavi Screen Capture, follow these simple steps-
- Download and install the Screen Recorder
- Open the software. Select the “Clock” icon and then the “Schedule Recording” button
- Enter the desired “Start Time/Date” and the “End Time/Date” requirements
- Further to this, it is possible to edit the “Capture Area” and “Sound” settings
Once completed, your newly captured video will be saved in the destination folder
6. Scheduling A Screen Recording with Apowersoft Screen Recorder Pro

Price: Free trial, $39.95/year (Suitable for Windows and Mac)
Overview: A straight-forward and premium-quality software that’s perfect for a wide range of projects, Apowersoft Screen Recorder Pro is sure to help your video capture stand out. Offering the ability for files to be stored in not only MP4 format, but also WMV, SWF, and even AVI, this professional screen recorder even features a wide range of desirable editing features.
How to schedule a screen recording with Apowersoft Screen Recorder Pro?
To schedule a screen recording with the Apowersoft Screen Recorder Pro, follow these simple steps-
- Download and install the Screen Recorder
- Select the “Settings” option from the center of the Main Menu. Click the “Task Scheduler”
- Enter the desired Task Title, Start/Finish Duration, and the destination folder
- Once completed, your newly captured video will be saved in the destination folder
7. BB FlashBack Screen Recorder Scheduled Recording

Price: Free Trial, then from $49 (Suitable for Windows only)
Overview: Ideal for users looking to record not only their screen, but also both sound and webcam functionality, BB Flashback Screen Recorder is designed to help project creators generate premium-quality videos with ease. Boasting the ability to share online, as well as to export to a wide range of desirable formats, this inquisitive software is perfect for recording step-by-step guides, gaming sessions, and even webcam conversations.
How to schedule a screen recording with BB FlashBack Screen Recorder?
To schedule a screen recording with the BB FlashBack Screen Recorder, follow these simple steps:
- Download and install the Screen Recorder
- Open the software, open “Tools -> (Recording) Options” and then select “Scheduling” from the menu
- Select the “Use Scheduling for The Next Recording” option
- Input the desired scheduling requirements. This includes Start/Finish Time, Title, and destination folder. Select Ok
- Click the Red Circular Record Button. Click Ok
- Once completed, your newly captured video will be saved in the destination folder
Summary
Pre-scheduling a screen recording is a stress-free and intuitive way to capture all your personal Skype sessions, gaming data, and webinars with ease. Perfect for users with busy schedules as well as for those looking to stay organized when it comes to back-to-back scheduling, the ability to schedule your next screen recording ahead of time is guaranteed to help you capture all the essential information without you even needing to be present.
Max Wales
Max Wales is a writer and a lover of all things video.
Follow @Max Wales
Max Wales
Mar 27, 2024• Proven solutions
No matter whether you’re looking to capture a screen recording as part of a personal video for a loved one, as part of your latest vlog, or even as a part of a walk-through instructional guide, this article aims to help users assess which software offers the best features for their cause. Although there are many desirable and versatile screen recorders available on the current market, we’ve pieced together a handy guide that is designed to help walk users through our top 7 auto-scheduling screen recorders.
Best 7 Screen Recorders for Schedule Recording & How-To Implement Them
![]()
The All-in-One Screen Recorder & Video Editor
- Record desktop screen, voiceover, and webcam simultaneously
- Edit recorded clips quickly with a wide range of professional tools
- Built-in plentiful templates and effects
- Export to MP4, MOV, MKV, GIF and multiple formats
For Win 7 or later (64-bit)
For macOS 10.12 or later
Secure Download
Below you will find an overview of our Top 7 Screen Recorders . Perfect for editors of all capabilities, our aim is to help inform users of the beneficial attributes and the step-by-step procedure that each software requires so that they can set up pre-scheduled recordings with ease.
1. Schedule Screen Recording with Camtasia
Price: Free Trial, then $249 (Suitable for Windows and Mac)
Overview
Perfect for those looking to record important live-streamed events, webinars, and even online gaming sessions, Camtasia is a straight forward and easy-to-use screen recording software. Featuring the ability to add visual effects, voice narration, and even meaningful annotations, this popular platform is sure to help you record and edit with ease.
Please note: The process detailed below may vary when using either Windows 7, Windows 8, or Windows 10.
How to Schedule Screen Recording with Camtasia:
To schedule a screen recording with the Camtasia Screen Recorder, follow these simple steps-
- Download and install the Screen Recorder
- Create a new document within the pre-installed “Notepad” application
- Insert (via Copying and Pasting) the following line of text: “C:\Program Files\TechSmith\Camtasia 9\CamRecorder.exe”/record
- To initiate the recording, save the notepad document with the title “record.bat.”. Please note: Saving the document as a .txt file will not allow the user to implement a recording.
- To create a file that’s designed to stop the recording, simply create another Notepad document and input the following line of text: “C:\Program Files\TechSmith\Camtasia 9\CamRecorder.exe”/stop
Similarly, save this file using the title “stop.bat”.
2. Scheduling A Screen Recording with Icecream Screen Recorder
Price: Freemium (Suitable for Mac and Windows)
Overview: An intuitive and versatile software that’s designed to help users create a professional screen capture at the press of a button, the Icecream Screen Recorder is sure to stand out. Ideal for recording Skype sessions, webinars, and even handy step-by-step tutorial videos in High Definition, this hassle-free recorder is perfect for everyday use. With area selection, a drawing panel, and even zoom-in functionality, this in-depth tool is guaranteed to help produce top-quality videos.
How to schedule a screen recording with Icecream screen recorder?
To schedule a screen recording with the Icecream Screen Recorder, follow these simple steps -
- Download and install the Screen Recorder
- Open the Program and select, from the top menu, the “Tasks” panel
- When you are ready to record, having checked you have suitable free disk-space (approx. 1GB for 1 hours worth of recording), click the Orange “PLUS (+)” icon to commence a recording
- Select the area you wish to be captured in your screen recording
- Enter the “Start Date and Time” and the “Finish Date and Time” into the colored fields. Here you may also be allowed to Title the Task
- By choosing either the Pencil Icon or the Trash Can icon, users are able to edit or delete the Task before the scheduled recording begins
- Once completed, your newly captured video will be saved in the destination folder
3. Scheduling A Screen Recording with Deskshare My Screen Recorder Pro
Price: Free Trial, then $49.50 (Suitable for Windows Only)
Overview: Offering a wide selection of tools, including the ability for users to record both system speaker sound and noise generated from a microphone, the Deskshare My Screen Recorder Pro is perfect for users of all abilities. Capturing high-quality yet small-sized files, this efficient screen recording software is guaranteed to help capture all your important webinars, gaming sessions, and personalized memoirs with ease.
How to schedule a screen recording with Deskshare My Screen Recorder Pro?
To schedule a screen recording with the Deskshare My Screen Recorder Pro, follow these simple steps-
- Download and install the Screen Recorder
- Open the Program and select, from the top menu, the “Tools” panel. Select “Schedule Recording”
- By clicking “New” a “New Schedule” menu to open.
- From the “Recording Type” menu, you can select either the “PC Screen with Audio” or “Without Audio”
- Enter both the “Start” and “End” Date and Time, a Title, and the Output Folder. Click Next.
- Once completed, your newly captured video will be saved in the destination folder
4. Scheduling A Screen Recording with Debut Video Capture Software
Price: Free trial, $2.49/month (Suitable for Windows Only)
Overview: Allowing users to capture recordings from sources such as a webcam and even videotapes, this intuitive and versatile software is perfect for a wide range of projects. Designed to save files in avi, mp4, and even flv format, this feature-filled screen recording software is guaranteed to help your new recording project stand out.
How to schedule a screen recording with Debut Screen Recorder?
To schedule a screen recording with the Debut Screen Recorder, follow these simple steps-
- Download and install the Debut Screen Recorder
- Select the “Schedule” tab from the toolbar
- Click the “Add” option
- Enter a “Title” for your screen recording and ensure the “Active” checkbox is selected
- Enter the desired requirements for the “Recurrence”, “Source”, and “Audio” parameters. Click “OK” to save your schedule
- Once completed, your newly captured video will be saved in the destination folder
5. Scheduling A Screen Recording with Movavi Screen Capture
Price: From $79.61 (Suitable for Windows and Mac)
Overview: An all-in-one video editing software that’s designed to help users capture and edit their latest creations, Movavi Screen Capture is guaranteed to stand out. Perfect for recording webinars, Skype calls, and even live gaming sessions, this desirable and advanced software even boasts the ability to export into a wide range of popular file formats.
How to schedule a screen recording with Movavi Screen Capture?
To schedule a screen recording with the Movavi Screen Capture, follow these simple steps-
- Download and install the Screen Recorder
- Open the software. Select the “Clock” icon and then the “Schedule Recording” button
- Enter the desired “Start Time/Date” and the “End Time/Date” requirements
- Further to this, it is possible to edit the “Capture Area” and “Sound” settings
Once completed, your newly captured video will be saved in the destination folder
6. Scheduling A Screen Recording with Apowersoft Screen Recorder Pro
Price: Free trial, $39.95/year (Suitable for Windows and Mac)
Overview: A straight-forward and premium-quality software that’s perfect for a wide range of projects, Apowersoft Screen Recorder Pro is sure to help your video capture stand out. Offering the ability for files to be stored in not only MP4 format, but also WMV, SWF, and even AVI, this professional screen recorder even features a wide range of desirable editing features.
How to schedule a screen recording with Apowersoft Screen Recorder Pro?
To schedule a screen recording with the Apowersoft Screen Recorder Pro, follow these simple steps-
- Download and install the Screen Recorder
- Select the “Settings” option from the center of the Main Menu. Click the “Task Scheduler”
- Enter the desired Task Title, Start/Finish Duration, and the destination folder
- Once completed, your newly captured video will be saved in the destination folder
7. BB FlashBack Screen Recorder Scheduled Recording
Price: Free Trial, then from $49 (Suitable for Windows only)
Overview: Ideal for users looking to record not only their screen, but also both sound and webcam functionality, BB Flashback Screen Recorder is designed to help project creators generate premium-quality videos with ease. Boasting the ability to share online, as well as to export to a wide range of desirable formats, this inquisitive software is perfect for recording step-by-step guides, gaming sessions, and even webcam conversations.
How to schedule a screen recording with BB FlashBack Screen Recorder?
To schedule a screen recording with the BB FlashBack Screen Recorder, follow these simple steps:
- Download and install the Screen Recorder
- Open the software, open “Tools -> (Recording) Options” and then select “Scheduling” from the menu
- Select the “Use Scheduling for The Next Recording” option
- Input the desired scheduling requirements. This includes Start/Finish Time, Title, and destination folder. Select Ok
- Click the Red Circular Record Button. Click Ok
- Once completed, your newly captured video will be saved in the destination folder
Summary
Pre-scheduling a screen recording is a stress-free and intuitive way to capture all your personal Skype sessions, gaming data, and webinars with ease. Perfect for users with busy schedules as well as for those looking to stay organized when it comes to back-to-back scheduling, the ability to schedule your next screen recording ahead of time is guaranteed to help you capture all the essential information without you even needing to be present.
Max Wales
Max Wales is a writer and a lover of all things video.
Follow @Max Wales
Also read:
- [New] In 2024, Audio-Visual Elites Selecting 5 Exceptional Creators Who Mix Sounds
- [New] In 2024, Premium Top 11 List - Audio Recording Essentials
- [Updated] 15 Inspiring YouTube Guides for Aspiring Singers and Instrumentalists
- [Updated] 2024 Approved Essential Techniques for Perfecting Your Green-Screen Shots
- [Updated] 2024 Approved Internal Screen Recording Huawei Mate 10/20 & P Series Devices (P20, P10).
- [Updated] 2024 Approved Navigating the World of Video Screen Capture
- [Updated] 2024 Approved The Complete Guide to High-Quality Sims Video Sessions
- [Updated] In 2024, Facebook Evolution What You Need to Know
- [Updated] In 2024, Initial Visual Journey Review with Additional Paths
- [Updated] Live Caption Coder
- [Updated] Precision Play Mastering Steam's Switch Controllers for 2024
- Ahead of the Curve Best Hydro Games Compiled for 2024
- Can Life360 Track Or See Text Messages? What Can You Do with Life360 On Honor Play 40C? | Dr.fone
- Complete guide for recovering video files on Samsung Galaxy F14 5G
- Fixing Logitech G633 Microphone Issues: Solutions & Tips
- Focus on the Frame Master Logitech Cam Edits
- Mouse Gesture Power-Ups for XP/Win 7
- Title: 2024 Approved Best Practices in Digital Media Capturing
- Author: Vivienne Westwood
- Created at : 2025-02-07 19:55:10
- Updated at : 2025-02-12 03:12:12
- Link: https://video-capture.techidaily.com/2024-approved-best-practices-in-digital-media-capturing/
- License: This work is licensed under CC BY-NC-SA 4.0.