
"2024 Approved Advanced Strategies for Recording and Saving Gameplay on PS4"
Advanced Strategies for Recording and Saving Gameplay on PS4
Playing video games on a gaming console is not just a regular thing for kids and teenagers but also young adults. Every gamer wants to record their gameplay and upload them on social media platforms and video streaming sites. If you are playing video games on PlayStation 4, you can record PS4 gameplay with the built-in recording tool. In fact, you can also take upload the recorded video on YouTube and Facebook.
However, when you record on PS4, you can record your gameplay up to 60 minutes only. To record more than an hour’s gameplay, you have to opt for PS4 screen recorder on your computer. If you want to ensure superior video quality, and you want to stream your gameplay on Twitch, you will need a Capture Card. In this article, we will illustrate how to record PS4 gameplay with all the available methods.
Way 1. How to Record on PS4 with Built-in Tool
Way 2. How to Screen Record on PS4 via PC
Way 3. Record Video on PS4 with Capture Card

Way 1. How to Record on PS4 with Built-in Tool
The easiest way on how to record gameplay on PS4 is by using its default recording tool. However, there are certain limitations that you should be aware of. The default PS4 recording time is 15 minutes, and you can adjust the duration up to 60 minutes only. This means you cannot record a gameplay beyond 60 minutes. If you are good with the limitations, you can follow the simple steps on how to record PS4 gameplay for YouTube and Twitch below.
Step 1: Turn on your PS4 and press Share button. Go to Sharing and Broadcasts option.
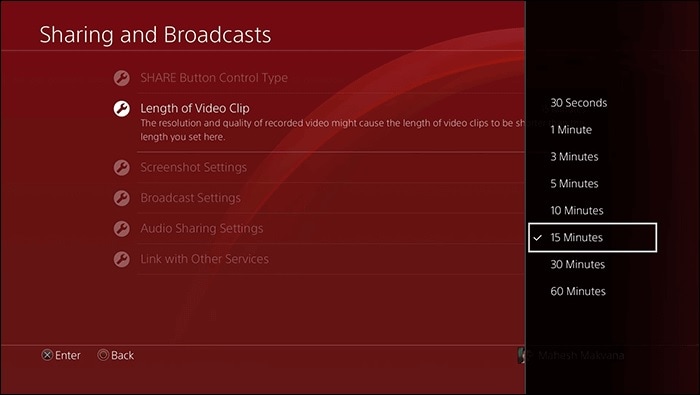
Step 2: Under Sharing and Broadcasts, go to Length of Video Clip option. Here you are set the recording duration up to 60 minutes.
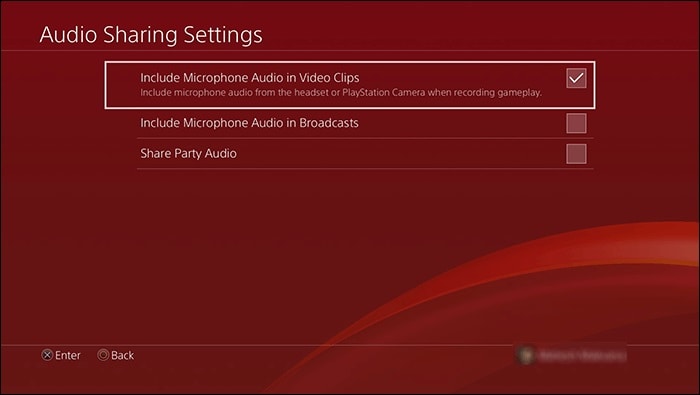
Step 3: If you want to record your gameplay with your voice, go to Audio Sharing Settings option. Turn on “Include Mic in Video Clip” option.
Parental Control Software
Step 4: Start your game and whenever you feel like you need to start recording, press the Share button two times on PS4. The recording will start automatically in the background and as soon as the set duration limit is reached, the recording will stop. However, you can also stop the recording by pressing on Share button twice again.
Step 5: You can go to the main menu and under Capture Gallery, you will find the recorded video.
 Jet Profiler for MySQL, Enterprise Version: Jet Profiler for MySQL is real-time query performance and diagnostics tool for the MySQL database server. Its detailed query information, graphical interface and ease of use makes this a great tool for finding performance bottlenecks in your MySQL databases.
 Way 2. How to Screen Record on PS4 via PC
In most cases, your gameplay is likely to go beyond an hour, and hence, PS4 inbuilt screen recorder may not be useful for you. If you want to record your gameplay for more than an hour, you have to use screen recorder software on your computer. We recommend Wondershare Filmora to record your gameplay with your audio. There is not going to be any recording time limit, and the video quality is likely to be better than by default screen recorder.
In fact, you can record at 4K resolution, and you can record with audio as well as webcam. You can edit the video like a pro before publishing the video on various online platforms. However, you have to install a PS4 emulator on your computer to stream your PS4 gameplay. Once you have done that successfully, here are the steps you have to follow.
Step 1: Download and install Wondershare Filmora.
For Win 7 or later (64-bit)
For macOS 10.12 or later
Step 2: Open Wondershare Filmora and click on New Project option.
 PCDJ DEX 3 for Windows & MAC is the total entertainment DJ software solution, offering audio, video, and karaoke mixing ability. Automatic beat-sync, smart looping, 4 decks, DJ MIDI controller support, Karaoke Streaming and much more.
Step 3: Go to Record and click on Record PC Screen option.
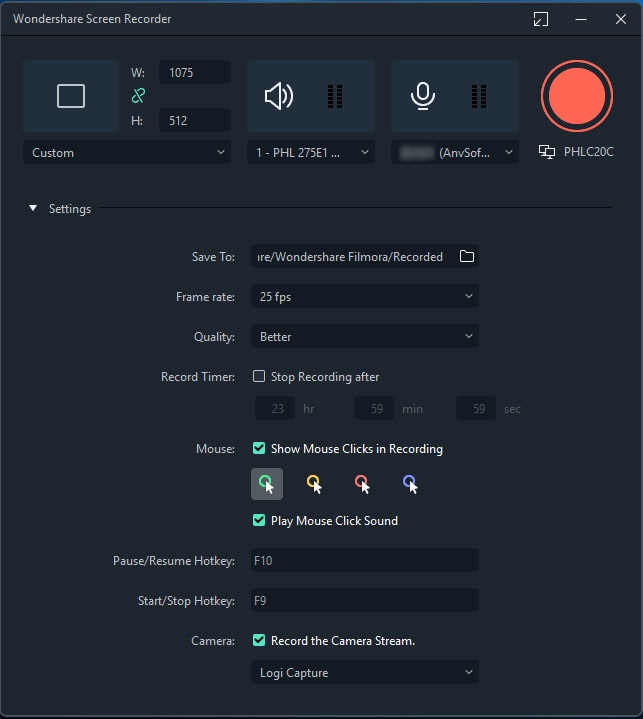
Step 4: Set the screen size as per the screen size of your PS4 emulator. Similarly, select the audio sources appropriately. For more configurations and parameters, click on Gear icon in the bottom-right corner. You should make the frame rate as high and quality as best. Note the hotkeys as they will come handy.
Step 5: Click on the Record button to start recording the screen.
You will get a few seconds to go to PS4 emulator and start playing your game. Press F9 to stop recording when your gameplay is over.
Way 3. How to Record Video on PS4 with Capture Card
If you do not want to install a PS4 emulator on your computer, you can purchase a capture card to connect your PS4 to your computer. Your computer screen will literally turn into a TV screen which you use to play on PS4. This does not make the gameplay lag, which is a common case when you use PS4 emulator to stream gameplay on PS4. In order to record your gameplay with Capture Card, you can use any screen recorder. In fact, there are some capture cards that have inbuilt screen recorder. Here are the steps to follow for gameplay recording PS4 using Capture card.
Step 1: Connect PS4, capture card and your computer through HDMI cable.
Step 2: The USB or data cable should go from Capture card to your computer. The PS4 should be connected to your TV.
Step 3: Turn on PS4 and go to Settings on your TV screen. From Settings, go to System> System Information to check if PS4 software is updated. This is to ensure that what you see on your TV screen should also be on your laptop.
Step 4: On your computer, you can use any online screen recorder. If you have any inbuilt screen recorder that comes with your capture card, you can use the same. Start your gameplay and start recording on your computer.
The Bottom Line
Hopefully, you have understood how to record videos on PS4. If your gameplay is less than 60 minutes most of the time, you can do the recording with PS4 default screen recorder. However, for professional recording of your gameplay, we recommend you use Filmora to record gameplay on PSA via your computer. You can edit any part of the video and add transitions and video efforts to make it more eye-catching.
Way 2. How to Screen Record on PS4 via PC
Way 3. Record Video on PS4 with Capture Card
Way 1. How to Record on PS4 with Built-in Tool
The easiest way on how to record gameplay on PS4 is by using its default recording tool. However, there are certain limitations that you should be aware of. The default PS4 recording time is 15 minutes, and you can adjust the duration up to 60 minutes only. This means you cannot record a gameplay beyond 60 minutes. If you are good with the limitations, you can follow the simple steps on how to record PS4 gameplay for YouTube and Twitch below.
Step 1: Turn on your PS4 and press Share button. Go to Sharing and Broadcasts option.
Step 2: Under Sharing and Broadcasts, go to Length of Video Clip option. Here you are set the recording duration up to 60 minutes.
Step 3: If you want to record your gameplay with your voice, go to Audio Sharing Settings option. Turn on “Include Mic in Video Clip” option.

Step 4: Start your game and whenever you feel like you need to start recording, press the Share button two times on PS4. The recording will start automatically in the background and as soon as the set duration limit is reached, the recording will stop. However, you can also stop the recording by pressing on Share button twice again.
Step 5: You can go to the main menu and under Capture Gallery, you will find the recorded video.
Way 2. How to Screen Record on PS4 via PC
In most cases, your gameplay is likely to go beyond an hour, and hence, PS4 inbuilt screen recorder may not be useful for you. If you want to record your gameplay for more than an hour, you have to use screen recorder software on your computer. We recommend Wondershare Filmora to record your gameplay with your audio. There is not going to be any recording time limit, and the video quality is likely to be better than by default screen recorder.
In fact, you can record at 4K resolution, and you can record with audio as well as webcam. You can edit the video like a pro before publishing the video on various online platforms. However, you have to install a PS4 emulator on your computer to stream your PS4 gameplay. Once you have done that successfully, here are the steps you have to follow.
Step 1: Download and install Wondershare Filmora.
For Win 7 or later (64-bit)
For macOS 10.12 or later
Step 2: Open Wondershare Filmora and click on New Project option.
Step 3: Go to Record and click on Record PC Screen option.
Step 4: Set the screen size as per the screen size of your PS4 emulator. Similarly, select the audio sources appropriately. For more configurations and parameters, click on Gear icon in the bottom-right corner. You should make the frame rate as high and quality as best. Note the hotkeys as they will come handy.
Step 5: Click on the Record button to start recording the screen.

You will get a few seconds to go to PS4 emulator and start playing your game. Press F9 to stop recording when your gameplay is over.
Way 3. How to Record Video on PS4 with Capture Card
If you do not want to install a PS4 emulator on your computer, you can purchase a capture card to connect your PS4 to your computer. Your computer screen will literally turn into a TV screen which you use to play on PS4. This does not make the gameplay lag, which is a common case when you use PS4 emulator to stream gameplay on PS4. In order to record your gameplay with Capture Card, you can use any screen recorder. In fact, there are some capture cards that have inbuilt screen recorder. Here are the steps to follow for gameplay recording PS4 using Capture card.
Step 1: Connect PS4, capture card and your computer through HDMI cable.
Step 2: The USB or data cable should go from Capture card to your computer. The PS4 should be connected to your TV.
Step 3: Turn on PS4 and go to Settings on your TV screen. From Settings, go to System> System Information to check if PS4 software is updated. This is to ensure that what you see on your TV screen should also be on your laptop.
Step 4: On your computer, you can use any online screen recorder. If you have any inbuilt screen recorder that comes with your capture card, you can use the same. Start your gameplay and start recording on your computer.
The Bottom Line
Hopefully, you have understood how to record videos on PS4. If your gameplay is less than 60 minutes most of the time, you can do the recording with PS4 default screen recorder. However, for professional recording of your gameplay, we recommend you use Filmora to record gameplay on PSA via your computer. You can edit any part of the video and add transitions and video efforts to make it more eye-catching.
Way 2. How to Screen Record on PS4 via PC
Way 3. Record Video on PS4 with Capture Card
Way 1. How to Record on PS4 with Built-in Tool
The easiest way on how to record gameplay on PS4 is by using its default recording tool. However, there are certain limitations that you should be aware of. The default PS4 recording time is 15 minutes, and you can adjust the duration up to 60 minutes only. This means you cannot record a gameplay beyond 60 minutes. If you are good with the limitations, you can follow the simple steps on how to record PS4 gameplay for YouTube and Twitch below.
Step 1: Turn on your PS4 and press Share button. Go to Sharing and Broadcasts option.
Step 2: Under Sharing and Broadcasts, go to Length of Video Clip option. Here you are set the recording duration up to 60 minutes.
Step 3: If you want to record your gameplay with your voice, go to Audio Sharing Settings option. Turn on “Include Mic in Video Clip” option.
Step 4: Start your game and whenever you feel like you need to start recording, press the Share button two times on PS4. The recording will start automatically in the background and as soon as the set duration limit is reached, the recording will stop. However, you can also stop the recording by pressing on Share button twice again.
Step 5: You can go to the main menu and under Capture Gallery, you will find the recorded video.
Way 2. How to Screen Record on PS4 via PC
In most cases, your gameplay is likely to go beyond an hour, and hence, PS4 inbuilt screen recorder may not be useful for you. If you want to record your gameplay for more than an hour, you have to use screen recorder software on your computer. We recommend Wondershare Filmora to record your gameplay with your audio. There is not going to be any recording time limit, and the video quality is likely to be better than by default screen recorder.
In fact, you can record at 4K resolution, and you can record with audio as well as webcam. You can edit the video like a pro before publishing the video on various online platforms. However, you have to install a PS4 emulator on your computer to stream your PS4 gameplay. Once you have done that successfully, here are the steps you have to follow.
Step 1: Download and install Wondershare Filmora.
For Win 7 or later (64-bit)
For macOS 10.12 or later
Step 2: Open Wondershare Filmora and click on New Project option.
Step 3: Go to Record and click on Record PC Screen option.
Step 4: Set the screen size as per the screen size of your PS4 emulator. Similarly, select the audio sources appropriately. For more configurations and parameters, click on Gear icon in the bottom-right corner. You should make the frame rate as high and quality as best. Note the hotkeys as they will come handy.
Step 5: Click on the Record button to start recording the screen.
You will get a few seconds to go to PS4 emulator and start playing your game. Press F9 to stop recording when your gameplay is over.
 LYRX is an easy-to-use karaoke software with the professional features karaoke hosts need to perform with precision. LYRX is karaoke show hosting software that supports all standard karaoke file types as well as HD video formats, and it’s truly fun to use.
Way 3. How to Record Video on PS4 with Capture Card
If you do not want to install a PS4 emulator on your computer, you can purchase a capture card to connect your PS4 to your computer. Your computer screen will literally turn into a TV screen which you use to play on PS4. This does not make the gameplay lag, which is a common case when you use PS4 emulator to stream gameplay on PS4. In order to record your gameplay with Capture Card, you can use any screen recorder. In fact, there are some capture cards that have inbuilt screen recorder. Here are the steps to follow for gameplay recording PS4 using Capture card.
Step 1: Connect PS4, capture card and your computer through HDMI cable.
Step 2: The USB or data cable should go from Capture card to your computer. The PS4 should be connected to your TV.
Step 3: Turn on PS4 and go to Settings on your TV screen. From Settings, go to System> System Information to check if PS4 software is updated. This is to ensure that what you see on your TV screen should also be on your laptop.
Step 4: On your computer, you can use any online screen recorder. If you have any inbuilt screen recorder that comes with your capture card, you can use the same. Start your gameplay and start recording on your computer.
 Allavsoft Batch Download Online Videos, Music Offline to MP4, MP3, MOV, etc format
The Bottom Line
Hopefully, you have understood how to record videos on PS4. If your gameplay is less than 60 minutes most of the time, you can do the recording with PS4 default screen recorder. However, for professional recording of your gameplay, we recommend you use Filmora to record gameplay on PSA via your computer. You can edit any part of the video and add transitions and video efforts to make it more eye-catching.
Way 2. How to Screen Record on PS4 via PC
Way 3. Record Video on PS4 with Capture Card
Way 1. How to Record on PS4 with Built-in Tool
The easiest way on how to record gameplay on PS4 is by using its default recording tool. However, there are certain limitations that you should be aware of. The default PS4 recording time is 15 minutes, and you can adjust the duration up to 60 minutes only. This means you cannot record a gameplay beyond 60 minutes. If you are good with the limitations, you can follow the simple steps on how to record PS4 gameplay for YouTube and Twitch below.
Step 1: Turn on your PS4 and press Share button. Go to Sharing and Broadcasts option.
Step 2: Under Sharing and Broadcasts, go to Length of Video Clip option. Here you are set the recording duration up to 60 minutes.
Step 3: If you want to record your gameplay with your voice, go to Audio Sharing Settings option. Turn on “Include Mic in Video Clip” option.
Step 4: Start your game and whenever you feel like you need to start recording, press the Share button two times on PS4. The recording will start automatically in the background and as soon as the set duration limit is reached, the recording will stop. However, you can also stop the recording by pressing on Share button twice again.
Step 5: You can go to the main menu and under Capture Gallery, you will find the recorded video.
 Forex Robotron Basic Package
Way 2. How to Screen Record on PS4 via PC
In most cases, your gameplay is likely to go beyond an hour, and hence, PS4 inbuilt screen recorder may not be useful for you. If you want to record your gameplay for more than an hour, you have to use screen recorder software on your computer. We recommend Wondershare Filmora to record your gameplay with your audio. There is not going to be any recording time limit, and the video quality is likely to be better than by default screen recorder.
In fact, you can record at 4K resolution, and you can record with audio as well as webcam. You can edit the video like a pro before publishing the video on various online platforms. However, you have to install a PS4 emulator on your computer to stream your PS4 gameplay. Once you have done that successfully, here are the steps you have to follow.
Step 1: Download and install Wondershare Filmora.
For Win 7 or later (64-bit)
For macOS 10.12 or later
Step 2: Open Wondershare Filmora and click on New Project option.
Step 3: Go to Record and click on Record PC Screen option.
Step 4: Set the screen size as per the screen size of your PS4 emulator. Similarly, select the audio sources appropriately. For more configurations and parameters, click on Gear icon in the bottom-right corner. You should make the frame rate as high and quality as best. Note the hotkeys as they will come handy.
Step 5: Click on the Record button to start recording the screen.
You will get a few seconds to go to PS4 emulator and start playing your game. Press F9 to stop recording when your gameplay is over.
Way 3. How to Record Video on PS4 with Capture Card
If you do not want to install a PS4 emulator on your computer, you can purchase a capture card to connect your PS4 to your computer. Your computer screen will literally turn into a TV screen which you use to play on PS4. This does not make the gameplay lag, which is a common case when you use PS4 emulator to stream gameplay on PS4. In order to record your gameplay with Capture Card, you can use any screen recorder. In fact, there are some capture cards that have inbuilt screen recorder. Here are the steps to follow for gameplay recording PS4 using Capture card.
Step 1: Connect PS4, capture card and your computer through HDMI cable.
Step 2: The USB or data cable should go from Capture card to your computer. The PS4 should be connected to your TV.
Step 3: Turn on PS4 and go to Settings on your TV screen. From Settings, go to System> System Information to check if PS4 software is updated. This is to ensure that what you see on your TV screen should also be on your laptop.
Step 4: On your computer, you can use any online screen recorder. If you have any inbuilt screen recorder that comes with your capture card, you can use the same. Start your gameplay and start recording on your computer.
The Bottom Line
Hopefully, you have understood how to record videos on PS4. If your gameplay is less than 60 minutes most of the time, you can do the recording with PS4 default screen recorder. However, for professional recording of your gameplay, we recommend you use Filmora to record gameplay on PSA via your computer. You can edit any part of the video and add transitions and video efforts to make it more eye-catching.
- Title: 2024 Approved Advanced Strategies for Recording and Saving Gameplay on PS4
- Author: Vivienne Westwood
- Created at : 2024-07-20 03:26:10
- Updated at : 2024-07-21 03:26:10
- Link: https://video-capture.techidaily.com/2024-approved-advanced-strategies-for-recording-and-saving-gameplay-on-ps4/
- License: This work is licensed under CC BY-NC-SA 4.0.